
Users Guide


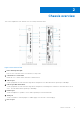
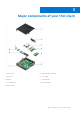
Table Of Contents
- Dell Wyse 5070 Thin Client User Guide
- Contents
- Welcome to Dell Wyse 5070 thin client
- Chassis overview
- Major components of your thin client
- Supported system peripherals for Wyse 5070 thin client
- Setting up the thin client
- Before working on your thin client
- After working on your thin client
- Removing and installing components
- Technical specifications
- Wyse 5070 thin client configuration on ThinOS
- Wyse 5070 thin client on ThinLinux
- Wyse 5070 thin client on Windows 10 IoT Enterprise
- BIOS overview
- Accessing thin client BIOS settings
- System Setup overview
- Boot Sequence
- Navigation keys
- General screen options
- System Configuration screen options
- Video screen option
- Security screen options
- Secure Boot screen options
- Performance screen options
- Power management screen options
- POST behavior screen options
- Wireless screen option
- Virtualization support screen options
- Maintenance screen options
- System Logs screen option
- Troubleshooting your system

Chassis overview
This section explains the front and rear views of Dell Wyse 5070 thin client.
Figure 1. Front and rear view
1. Power button/power light
Press to turn on the thin client if it is turned off, in sleep state.
2. Common Access Card reader
Reads the CAC or smart card for multi factor authentication.
3. USB 2.0 port
Connect peripherals such as external storage devices and printers. Provides data transfer speeds up to 480 Mbps.
4. USB 2.0 port with PowerShare
Connect peripherals such as external storage devices and printers, and charges the USB devices when thin client is in off
state. . Provides data transfer speeds up to 480 Mbps.
5. Headset port
Connect headphones or speakers. This is valid for pentium processor based model.
6. Serial port
Connect serial device. Internal jumpers to enable supply of 5V/1A total to selected pin(s).
7. Line out port
2
Chassis overview 7