
Users Guide
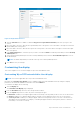
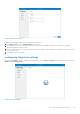
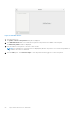


Table Of Contents
- Dell Wyse 5070 Extended Thin Client User Guide
- Contents
- Welcome to Dell Wyse 5070 extended thin client
- Chassis overview
- Major components of your thin client
- Supported system peripherals for Wyse 5070 thin client
- Setting up the thin client
- Before working on your thin client
- After working on your thin client
- Removing and installing components
- Technical specifications
- Wyse 5070 thin client configuration on ThinOS
- Wyse 5070 thin client on ThinLinux
- Wyse 5070 thin client on Windows 10 IoT Enterprise
- BIOS overview
- Accessing thin client BIOS settings
- System Setup overview
- Boot Sequence
- Navigation keys
- General screen options
- System Configuration screen options
- Video screen option
- Security screen options
- Secure Boot screen options
- Performance screen options
- Power management screen options
- POST behavior screen options
- Wireless screen option
- Virtualization support screen options
- Maintenance screen options
- System Logs screen option
- Troubleshooting your system

a. Click Additional Settings.
The Customize Format window is displayed.
b. Customize the settings, and click OK.
4. Click Apply, and then click OK.
5. In the Location tab, select a particular location to display additional information such as news and weather.
6. In the Administrative tab, change the language to be displayed in programs that do not support Unicode, and copy the
settings.
Devices and printers
To add devices and printers, use the Devices and Printers window.
CAUTION: To refrain from cleaning up your settings, disable/enable the Unified Write Filter (UWF) and
configure Application Launch Manager and xData Cleanup Manager. For more information, see Before
Configuring your thin clients.
To add a device or a printer to the thin client, do the following:
1. Log in as an administrator.
2. Go to Start > Control Panel > Devices and Printers.
The Devices and Printers window is displayed.
Adding printers
To add a printer to the thin client:
1. Click the Devices and Printers icon in Control Panel.
The Devices and Printers window is displayed.
2. To open and use the Add a Printer wizard, click Add a Printer.
The Add a Printer wizard session starts.
A Dell Open Print Driver is installed on the thin client along with other built-in print drivers. To print full text and graphics to a
local printer, install the driver provided by the manufacturer according to the instructions.
Printing to network printers from Citrix Receiver, Remote Desktop Connection or VMware Horizon Client applications
can be achieved through printer drivers on the servers.
Printing to a local printer from Citrix Receiver, Remote Desktop Connection or VMware Horizon Client application
using the printer drivers of the server produces full text and graphics functionality from the printer. Install the printer driver
on the server, and the text only driver on the thin client using the following procedure:
a. Click Add a local printer, and click Next.
b. Click Use an existing port, select the port from the list, and then click Next.
c. Select the manufacturer and model of the printer, and click Next.
d. Enter a name for the printer and click Next.
e. Select Do not share this printer and click Next.
f. Select whether to print a test page and click Next.
g. Click Finish to complete the installation.
A test page will print after installation if this option was selected.
Configuring multi-monitor display
You can use the Screen Resolution window to configure dual monitor settings on your dual-monitor capable thin client device.
To open the Screen Resolution window, do the following:
1. Log in as an administrator.
2. Go to Start > Control Panel > Display > Change Display Settings.
The Screen Resolution window is displayed. For detailed instructions on how to configure the screen resolution, go to
www.microsoft.com.
Wyse 5070 thin client on Windows 10 IoT Enterprise
57