
Administrator Guide


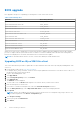
Table Of Contents
- Dell Wyse ThinOS Version 8.6 Administrator’s Guide
- Introduction
- Before working on ThinOS
- Getting started
- End User License Agreement
- Configuring ThinOS using the First Boot Wizard
- Connecting to a remote server
- Using your desktop
- Configuring thin client settings and connection settings
- Connecting to a printer
- Connecting to a monitor
- Locking the thin client
- Signing off and shutting down
- Battery information
- Sleep mode
- Additional getting started details
- Classic desktop features
- Login dialog box features
- Word wrap feature
- Accessing system information
- ENERGY STAR compliance
- IPv6 certification
- Global Connection settings
- Configuring connectivity
- Configuring the network settings
- Configuring the remote connections
- Configuring the central configurations
- Configuring the VPN Manager
- Configuring the connection brokers
- Configuring Citrix
- Configuring the Citrix broker connection
- Citrix Receiver feature matrix
- Citrix HDX RealTime Multimedia Engine or RealTime Optimization Pack
- Cisco Jabber Softphone for VDI
- Using Citrix ADC
- Citrix Cloud services
- Citrix icon refresh
- Using multiple audio in Citrix session
- Configuring ICA connections
- Support for multi-monitors in Citrix session
- ICA Self Service Password Reset
- QUMU or ICA Multimedia URL Redirection
- HTML5 Video Redirection
- ICA SuperCodec
- Anonymous logon
- Configuring the Citrix UPD printer
- Configuring VMware
- Configuring the VMware broker connection
- VMware Horizon Client feature matrix
- Using VMware Horizon View broker and desktop
- Enable username hint for smart card login
- Supporting VMware Real Time Audio-Video
- VMware Blast
- VMware Horizon Virtualization Pack for Skype for Business
- Using multi-monitors in PCoIP session
- Using Multi-monitors in VMware Blast session
- Blast Virtual Printing
- Enable hardware cursor in Blast session
- Enable relative mouse feature
- USB device splitting in Blast session
- Supporting Teradici SDK
- Configuring PCoIP connections using Teradici Remote Workstation card
- Customize PCoIP login window and icons
- Configuring Microsoft Remote Desktop
- Configuring Dell vWorkspace
- Configuring Amazon Web Services or WorkSpaces
- Configuring Teradici Cloud Access
- Configuring Citrix
- Configuring local settings
- Local Settings Menu
- Configuring the system preferences
- Configuring the display settings
- Configuring the peripherals settings
- Configuring the keyboard settings
- Configuring the mouse settings
- Configuring the audio settings
- Configuring the serial settings
- Configuring the camera settings
- Configuring the touch screen settings
- Configure the touch screen settings for VDI sessions
- Configuring the Bluetooth settings
- USB support
- Support for USB Type-C
- Configuring the printer settings
- Reset features
- Local Settings Menu
- TCX Suite
- Trusted Platform Module version 2.0
- Performing diagnostics
- BIOS management on ThinOS
- Security
- Troubleshooting
- Examples of common printing configurations
- Important notes
- Frequently asked questions

Table 2. Package information
Package name Details
Pcoip.i386.pkg Automatically updated upon firmware upgrade of a PCoIP client.
RTME.i386.pkg Upload the new package to central configuration, and system can update without INI
configuration.
Horizon.i386.pkg Upload the new package to central configuration, and configure the INI parameter to
update this package.
JVDI.i386.pkg Upload the new package to central configuration, and configure the INI parameter to
update this package.
NOTE:
● When the packages fail to update, or cannot function after update with new version firmware, or if there is further
failure, the workaround is to remove all packages and reinstall the packages upon reboot.
● For information about the ThinOS build number, and package versions, see the latest Dell Wyse ThinOS Release Notes.
Firmware upgrade using HTTPS
Ensure that you have set up a Windows PC or Server with Microsoft Internet Information Services (IIS) and HTTPS services
installed. If you do not have the HTTPS server installed, then refer to the article about how to setup an HTTPS server at
support.microsoft.com.
Ensure that the web server can identify the file types used by ThinOS. Create two MIME types under IIS. The MIME's option
needs to be configured on a per site basis. On a default IIS, install:
1. Launch the IIS admin console.
2. Browse to the default website, right-click and select Properties.
3. Click the HTTP Headers tab, and in the MIME Map section, select File types > New Type.
4. Add the two MIME types. Use .INI and . for the associated extension fields.
5. Apply the settings and close the IIS admin console.
Installing IIS creates the default directory C:\inetpub\WWWroot, which is known as the WWW root. In the
WWWroot directory, create a folder WYSE and a sub folder wnos. The directory structure must read as C:
\inetpub\wwwroot\WYSE\wnos.
To upgrade the ThinOS firmware using HTTPS server:
1. Go to www.dell.com/support.
2. Download the latest ThinOS firmware and latest ThinOS packages that corresponds to your thin client model. If the firmware
and packages are in the form of a compressed self-extracting (.EXE) or zipped file (.ZIP), then extract the files. When you
download the JVDI.zip package, the README WITH EULA.txt and JVDI.i386.pkg files are unzipped. Ensure that you
open the readme file and read the EULA agreement.
3. Place the extracted firmware files in the C:\inetpub\wwwroot\WYSE\wnos folder, and the packages to C:
\inetpub\wwwroot\WYSE\wnos\pkg on your HTTPS server.
4. Create a wnos.ini text file (using a text editor) in the C:\inetpub\wwwroot\WYSE\wnos folder with the following INI
parameters:
Autoload=2 loadpkg=1 Addpkg=horizon,JVDI
NOTE:
JVDI package is introduced from ThinOS version 8.6 to support Cisco Jabber. However, if you intend to use only
horizon package, then do not load the JVDI package to avoid unknown user trap issue.
The option Autoload=2, ensures that the thin client uses the firmware installed on the server to upgrade, only if the
firmware on the thin client is older than the version on the server. The option LoadPkg specifies how to update the external
packages. If LoadPkg is not in the statement, it will inherit the value of AutoLoad.
Base package and the PCoIP package are integrated into the ThinOS firmware image. Installing the latest ThinOS firmware
image automatically installs the latest version of these packages on the ThinOS client. If you set AutoLoad=1 LoadPkg=0,
the firmware is checked, but the packages are not checked. The packages check is performed after firmware check. From
ThinOS 8.3, the external packages update mechanism is changed. Some packages are default, and loaded according to value
of LoadPkg. For example RTME. Some packages need additional parameter AddPkg to add. For example, Horizon and
14
Before working on ThinOS