
Administrator Guide
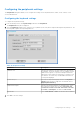
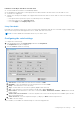
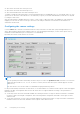

Table Of Contents
- Dell Wyse ThinOS Version 8.6 Administrator’s Guide
- Introduction
- Before working on ThinOS
- Getting started
- End User License Agreement
- Configuring ThinOS using the First Boot Wizard
- Connecting to a remote server
- Using your desktop
- Configuring thin client settings and connection settings
- Connecting to a printer
- Connecting to a monitor
- Locking the thin client
- Signing off and shutting down
- Battery information
- Sleep mode
- Additional getting started details
- Classic desktop features
- Login dialog box features
- Word wrap feature
- Accessing system information
- ENERGY STAR compliance
- IPv6 certification
- Global Connection settings
- Configuring connectivity
- Configuring the network settings
- Configuring the remote connections
- Configuring the central configurations
- Configuring the VPN Manager
- Configuring the connection brokers
- Configuring Citrix
- Configuring the Citrix broker connection
- Citrix Receiver feature matrix
- Citrix HDX RealTime Multimedia Engine or RealTime Optimization Pack
- Cisco Jabber Softphone for VDI
- Using Citrix ADC
- Citrix Cloud services
- Citrix icon refresh
- Using multiple audio in Citrix session
- Configuring ICA connections
- Support for multi-monitors in Citrix session
- ICA Self Service Password Reset
- QUMU or ICA Multimedia URL Redirection
- HTML5 Video Redirection
- ICA SuperCodec
- Anonymous logon
- Configuring the Citrix UPD printer
- Configuring VMware
- Configuring the VMware broker connection
- VMware Horizon Client feature matrix
- Using VMware Horizon View broker and desktop
- Enable username hint for smart card login
- Supporting VMware Real Time Audio-Video
- VMware Blast
- VMware Horizon Virtualization Pack for Skype for Business
- Using multi-monitors in PCoIP session
- Using Multi-monitors in VMware Blast session
- Blast Virtual Printing
- Enable hardware cursor in Blast session
- Enable relative mouse feature
- USB device splitting in Blast session
- Supporting Teradici SDK
- Configuring PCoIP connections using Teradici Remote Workstation card
- Customize PCoIP login window and icons
- Configuring Microsoft Remote Desktop
- Configuring Dell vWorkspace
- Configuring Amazon Web Services or WorkSpaces
- Configuring Teradici Cloud Access
- Configuring Citrix
- Configuring local settings
- Local Settings Menu
- Configuring the system preferences
- Configuring the display settings
- Configuring the peripherals settings
- Configuring the keyboard settings
- Configuring the mouse settings
- Configuring the audio settings
- Configuring the serial settings
- Configuring the camera settings
- Configuring the touch screen settings
- Configure the touch screen settings for VDI sessions
- Configuring the Bluetooth settings
- USB support
- Support for USB Type-C
- Configuring the printer settings
- Reset features
- Local Settings Menu
- TCX Suite
- Trusted Platform Module version 2.0
- Performing diagnostics
- BIOS management on ThinOS
- Security
- Troubleshooting
- Examples of common printing configurations
- Important notes
- Frequently asked questions

● Wyse 5070 Thin Client with Celeron processor
● Wyse 5070 Thin Client with Pentium processor
● Wyse 5070 Extended Thin Client with Pentium processor
To disable or enable the onboard serial port, use the INI parameter Device=SerialDisable={yes, no}. The default value is no. This
option does not affect the USB serial devices. The value that you specify is saved into NVRAM and a system reboot is required
for changes to take effect.
After the onboard port is disabled, all the port values—COM1, COM2, COM3, and COM4—are available for USB serial device
mapping. You can view the ThinOS event log to know the local serial port name that is used when a USB serial device is
attached to the thin client.
Configuring the camera settings
Use the Camera tab to interface with cameras that are locally connected to the thin client (USB) and supported by a UVC
driver. When using the HDX RealTime webcam feature of Citrix Virtual Apps and Desktops, you can control options such as
maximum resolution and frames per second (10 FPS is recommended).
By default, the format of USB camera is set to RAW.
NOTE:
You can optimize performance and modify the frame rate per second, if the Optimize for CPU check box is not selected—
supported values include 1/1, 1/2, 1/3, 1/4, 1/5, and 1/6– directly from the thin client (if the webcam supports Universal
Video Driver).
Also, this feature is CPU intensive and is recommended for high performance products.
For Wyse 5470 and Wyse 5470 All-in-One thin clients, it is recommended to use a camera such as Logitech C930e that supports
hardware encoding. The integrated camera on the thin clients does not support hardware encoding, so the performance is
limited as follows:
● On the Wyse 5470 Thin Client with RTME-enabled, the camera performance on Skype for Business is limited to a maximum
resolution of 640 x 360 using HD configuration, 960 x 540 using Full HD configuration, and 1280 x 720 if Logitech C930e
camera is used.
● On the Wyse 5470 All-in-One Thin Client with RTME-enabled, the camera performance on Skype for Business is limited to a
maximum resolution of 960 x 540, and 1280 x 720 if Logitech C930e camera is used.
176
Configuring local settings