Dell Wyse Management Suite Version 1.
Notes, cautions, and warnings NOTE: A NOTE indicates important information that helps you make better use of your product. CAUTION: A CAUTION indicates either potential damage to hardware or loss of data and tells you how to avoid the problem. WARNING: A WARNING indicates a potential for property damage, personal injury, or death. © 2018 Dell Inc. or its subsidiaries. All rights reserved. Dell, EMC, and other trademarks are trademarks of Dell Inc. or its subsidiaries.
Contents 1 Introduction....................................................................................................................................................5 Migration overview............................................................................................................................................................ 5 2 Prerequisites for migration.............................................................................................................................
Import process stops when importing view and profiles............................................................................................ 25 Switching SUSE Linux device from WDM to Wyse Management Suite is unsuccessful.......................................
1 Introduction This guide contains instructions to migrate from Wyse Device Manager (WDM) to the Wyse Management Suite environment. The target audience for this guide is enterprise customers with administrator privileges. You must have knowledge about various thin client operating systems, Wyse Device Manager, cloud infrastructure, network technologies, file system permissions, and user authentication technologies. Dell recommends that you migrate from WDM version 5.7.2 to Wyse Management Suite version 1.2.
9 Validate data imported from Wyse Device Manager to Wyse Management Suite—see Post-migration. 10 (Optional) Uninstall the Wyse Management Suite Import Tool—see Uninstalling Wyse Management Suite Import Tool.
2 Prerequisites for migration Ensure that you meet the following migration requirements from Wyse Device Manager (WDM) and Wyse Management Suite: • Wyse Device Manager – Migration to Wyse Management Suite is supported from WDM version 5.7.2. If you are using an earlier version of WDM, then upgrade WDM to version 5.7.2. – WDM enterprise edition must be installed on your network. – Scheduled jobs or tasks in WDM must not be in progress state. • Wyse Management Suite – Wyse Management Suite version 1.
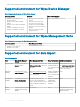
• Private cloud installed with a Pro trial license, and the thin client trial license has expired. Supported environment for Wyse Device Manager Table 1. Supported environment for Wyse Device Manager Operating system Database • • • • • • Windows Server 2008 R2 SP1 Enterprise Edition. Windows Server 2012 Standard Edition. Windows Server 2012 R2 Standard Edition. Windows 7 Enterprise SP1 32–bit. Windows 7 Enterprise SP1 64–bit. • • • • Wyse Device Manager Wyse Device Manager version 5.7.2.
Data Wyse Device Manager (WDM) Profile Resources associated with profiles Wyse Management Suite Supported platform Additional information Device configuration profile Profiles are moved in the pushed through Profile configuration policy. Manager. Windows Embedded Standard and Windows 10 IoT Enterprise. Remote connections for vWorkspace cannot be migrated. Wallpaper and Windows wireless profile. Windows Embedded Standard and Windows 10 IoT Enterprise.
3 Using Wyse Management Suite Import Tool Wyse Management Suite Import Tool provides a solution to help administrators import the data from Wyse Device Manager (WDM) to Wyse Management Suite. This tool enables you to import RSP packages, Windows-based WCM resources, groups and device information in WDM views, and Windows-based profiles.
• Only Windows-based profiles in JSON format from Wyse Configuration Manager (WCM) can be imported. You cannot import ThinOS and ThinLinux WCM profiles. • Only Windows-based wireless profiles in XML format from WCM can be imported. • Scheduled jobs from Wyse Device Manager (WDM) cannot be imported. • When verifying the licenses, the import tool does not filter the unsupported devices in the Wyse Management Suite.
NOTE: If you are using the import tool for the first time on the server where WDM is installed, the server URL is populated automatically. This WDM server URL is displayed in the Wyse Device Manager Server URL field. If you modify the WDM server information on the login screen, the WDM server URL is not populated on the login screen. 3 In the Username field, enter the username to log in to the WDM database. 4 In the Password field, enter the password to access the WDM database.
4 Importing data inventory Data import is the process of importing data inventories from Wyse Device Manager (WDM) to Wyse Management Suite. In the WDM Import Task screen, you can perform each task independently. However, you must import the Windows-based WCM resources from WDM before importing the view and Windows profiles. For each group and its subgroup: • Wyse Management Suite creates a group with a group token enabled. The group token and group description are generated automatically.
NOTE: • Packages are imported even if they are part of pending updates or if they are assigned to Default Device Configuration (DDC). • Raw images are transferred to valid RSP packages. • If the disk size on the network drive is less than the size of selected packages, then the import tool displays an error message. • Configuration Packages cannot be imported using the RSP Packages import screen.
NOTE: • You can use the Search box to search for a resource in the list. Type the name of the resource in the Search box, and press Enter. • In the Wyse Management Suite Import Tool, the package name is prefixed with an underscore followed by the resource name. When you import the corresponding configurations, the tool updates the name in same manner. However, the WDM data remains unaltered, and the changes are made internally by the import tool.
Using existing WDM views To create groups and devices using one of the existing Wyse Device Manager (WDM) views: 1 On the View and WES Profiles screen, click the Create radio button. A drop-down list with the groups assigned to the selected view (except All Devices) is displayed. By default, all the groups under the view are selected for migration. 2 From the drop-down list, select a view and click Next. NOTE: • You can only select a view with nine or less levels of the group hierarchy.
NOTE: • If there are group levels with empty values, then the group levels are renamed to NotSet. However, if the group levels are missing in WDM, then they are assigned to the available parent. • 3 If there are resources for wallpaper and wireless in profile/configuration, the resource filenames are prefixed with the configuration package name in WDM. For example, packagename_resourcename.
To perform a rollback: 1 Go to the WDM Import Task screen. 2 In the View and WES Profiles area, click Rollback. If you have any device registered to Wyse Management Suite, then you are prompted to reconfirm whether you want to continue the rollback process. 3 Click Rollback. The time taken to complete the rollback process depends on the size of the data inventory that is imported to the Wyse Management Suite. NOTE: Rollback feature is supported only for view and Windows-based profiles.
5 Switching devices from Wyse Device Manager to Wyse Management Suite After you import all the devices from Wyse Device Manager (WDM) to Wyse Management Suite, the device registration status in the Wyse Management Suite console is displayed as Pre-registered. Deploy an RSP package to switch the Windows Embedded Standard, Windows 10 IoT Enterprise, ThinLinux, and SUSE Linux devices from WDM to Wyse Management Suite.
Deploying RSP package to ThinLinux devices To deploy an RSP package to the ThinLinux-based devices: 1 Download the RSP package from Dell Digital Locker. 2 Register the downloaded RSP package to Wyse Device Manager (WDM) v5.7.2. 3 In the Other Packages section, select the registered RSP package, and click Package Script. The Package Script screen is displayed. 4 Click Edit, and replace the server URL with the Wyse Management Suite server URL in the RSP package script.
Deploying INI parameter to ThinOS devices Ensure that your devices run on ThinOS version 8.4 or later. To deploy an INI parameter to the ThinOS-based devices: 1 Create a wnos.ini file with the following INI parameters: Table 5. INI parameters ThinOS v8.5-based devices ThinOS v8.4-based devices AutoLoad=1 AutoLoad=1 SignOn=1 SignOn=1 WDAService=yes\ WDAService=yes\ Priority=WMS Priority=CCM WMSEnable=yes\ CCMEnable=yes\ Server=\ CCMServer=\ CAValidation=no\ GroupPrefix
6 Post-migration Verify the data imported from Wyse Device Manager (WDM) to Wyse Management Suite. You can use the event logs to compare the total file count and capacity. To verify that the data is successfully migrated: 1 Log in to the Wyse Management Suite. 2 On the Dashboard page, verify the device count for total devices imported from WDM. 3 On the Dashboard page, verify the summary of events for WDM import activity.
7 Uninstalling Wyse Management Suite Import Tool To uninstall Wyse Management Suite Import Tool: 1 Go to Control Panel, and click Programs > Programs and Features. 2 From the programs list, select Wyse Management Suite Import Tool. 3 Click Uninstall. The Wyse Management Suite Import Tool Uninstaller screen is displayed. By default, the Remove radio button is selected. 4 Click Next. After the uninstallation is complete, the uninstallation complete message is displayed. 5 Click Finish.
8 Troubleshooting This section describes some basic troubleshooting that you can implement when you experience any problem. NOTE: If the details of the previous import session are not required, delete the %programdata%WMS-Import \WMSMigrationInfo.json file.
Import process stops when importing view and profiles Problem—While importing view and Windows-based profiles, if you close and reopen the import tool, then the import process stops. The import status screen displays a zero value. Solution—Perform the Rollback operation on the View and WES Profiles task screen, and start the import activity again—see Importing view and Windows-based profiles.