
Administrator Guide
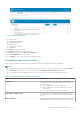


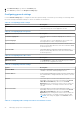


Table Of Contents
- Dell Wyse Management Suite Version 1.3.1 Administrator’s Guide
- Introduction to Wyse Management Suite
- Getting started with Wyse Management Suite
- Wyse Management Suite dashboard
- Managing groups and configurations
- Add a group
- Edit a group
- Remove a group
- Edit an unmanaged group
- Configure a global level policy
- Configure a group level policy
- Configure a device level policy
- Edit the ThinOS policy settings
- ThinOS—Wizard mode
- ThinOS—Advanced mode
- Configuring general settings
- Configuring general settings
- Configuring security settings
- Configuring keyboard settings
- Configuring display settings
- Configuring visual experience settings
- Schedule shutdown or reboot settings
- Configuring device information
- Configuring BIOS settings
- Configuring firmware upgrade
- Configuring device settings
- Configuring global INI settings
- Configuring central configuration settings
- Configuring advanced settings
- Configuring remote connections
- Configuring global session settings—ThinOS 8.5 and later versions
- Configuring USB redirection settings
- Configuring third party authentication settings
- Configuring citrix broker connection settings
- Configuring citrix HDX connection settings
- Configuring VMware broker connection settings
- Configuring VMware settings
- Configuring Microsoft broker connection settings
- Configuring Microsoft RDP connection settings
- Configuring vWorksapce broker connection settings
- Configuring AWS broker connection settings
- Configuring direct RDP connection settings
- Configuring direct ICA connection settings
- Configuring global printer settings
- Configuring printer settings
- Configuring WLAN global settings
- Configuring WLAN connections
- Configuring LAN connections
- Configure SCEP Settings
- Configure proxy Settings
- Edit the Windows Embedded Standard policy settings
- Configuring system personalization
- Configuring desktop experience
- Configuring network settings
- Configuring security and lockdown settings
- Configuring other settings
- Configuring remote connection settings—Citrix
- Configuring remote connection settings—VMware
- Configuring remote connection settings—RDP
- Configuring remote connection settings—Browser
- Configuring Latitude mobile thin client BIOS settings
- Configuring Wyse 7040 thin client BIOS settings
- Configuring device information
- Configuring Wyse Easy Setup settings
- Configuring VNC settings
- Configuring domain settings
- Configuring BIOS settings for Wyse 5070 thin client with Windows 10 IoT Enterprise
- Edit the Linux policy settings
- Configuring system personalization
- Configuring desktop experience
- Configuring login experience settings
- Configuring network settings
- Configuring security settings
- Configuring central configuration settings
- Configuring other settings
- Configuring VDI global settings
- Configuring remote connection settings—Citrix
- Configuring remote connection settings—VMware
- Configuring remote connection settings—RDP
- Configuring remote connection settings—Browser
- Configuring advanced settings
- Edit the ThinLinux policy settings
- Configuring system personalization
- Configuring desktop experience
- Configuring login experience
- Configuring network settings
- Configuring security settings
- Configuring central configuration settings
- Configuring other settings
- Configuring VDI global settings
- Configuring remote connection settings—Citrix
- Configuring remote connection settings—VMware
- Configuring remote connection settings—RDP
- Configuring remote connection settings—Browser
- Configuring advanced settings
- Configuring device information
- Configuring Wyse 3040 thin client BIOS settings
- Configuring BIOS settings for Wyse 5070 thin client with ThinLinux
- Editing Teradici policy settings
- Edit the Wyse Software Thin Client policy settings
- Configuring system personalization
- Configuring desktop experience
- Configuring network settings
- Configuring security and lockdown settings
- Configuring other settings
- Configuring remote connection settings—Citrix
- Configuring remote connection settings—VMware
- Configuring remote connection settings—RDP
- Configuring remote connection settings—Browser
- Configuring device information
- Configuring Wyse Easy Setup version settings
- Configuring VNC settings
- Configuring domain settings
- Managing devices
- Methods to register devices to Wyse Management Suite
- Registering ThinOS devices by using Wyse Device Agent
- Registering Wyse Software Thin Client to Wyse Management Suite by using Wyse Device Agent
- Registering Linux thin clients using Wyse Device Agent
- Registering Wyse Embedded Standard Thin Clients to Wyse Management Suite by using Wyse Device Agent
- Registering ThinLinux version 2.0 devices by using FTP INI method
- Registering ThinLinux version 1.0 devices by using FTP INI method
- Registering ThinOS devices by using the FTP INI method
- Registering ThinLinux thin clients by using Wyse Device Agent
- Registering devices by using DHCP option tags
- Registering devices by using DNS SRV record
- Searching a device using filters
- Saving the current filter
- Querying the device status
- Locking the devices
- Restarting the devices
- Unregistering the devices
- Resetting to factory default settings
- Changing a group assignment
- Sending messages to devices
- Activating the devices
- Viewing device details
- Managing device summary
- Viewing system information
- Viewing device events
- Viewing installed applications
- Rename the thin client
- Configuring remote shadow connection
- Tagging devices
- Device compliance status
- Pulling Windows Embedded Standard or ThinLinux image
- Requesting a log file
- Troubleshooting your device
- Methods to register devices to Wyse Management Suite
- Apps and data
- Application policy
- Configuring thin client application inventory
- Configuring Wyse Software thin client application inventory
- Creating and deploying standard application policy to thin clients
- Creating and deploying advanced application policy to thin clients
- Creating and deploying standard application policy to Wyse Software Thin Clients
- Creating and deploying advanced application policy to Wyse Software Thin Clients
- Image policy
- Managing file repository
- Application policy
- Managing rules
- Managing Jobs
- Managing Events
- Managing users
- Portal administration
- Adding the Active Directory server information
- Importing users to public cloud through active directory
- Alert classifications
- Creating an Application Programming Interface-API accounts
- Accessing file repository
- Configuring other settings
- Thin clients
- Managing Teradici configurations
- Enabling Two-Factor authentication
- Generating reports
- Enabling multi-tenant accounts
- Enabling custom branding
- Managing license subscription
- Managing system setup
- Configuring Wyse Easy Setup by using Wyse Management Suite
- Configuring Wyse Converter for PCs by using Wyse Management Suite
- Registering Wyse Software thin client to Wyse Management Suite
- Registering Wyse Software Thin Client to Wyse Management Suite by using Wyse Device Agent
- Registering devices by using DHCP option tags to Wyse Management Suite
- Registering Wyse Software thin clients by using DNS SRV record to Wyse Management Suite
- Configuring the Wyse Software thin client by using Wyse Management Suite
- Teradici device management
- Troubleshooting Wyse Management Suite
- Installing or upgrading Wyse Device Agent
- Wyse Management Suite feature matrix
- Wireless profiles password editor
- Create and configure DHCP option tags
- Create and configure DNS SRV records
- Steps to change the host name to IP address

Table 20. Configuring sign on settings
Option Description
Require domain login From the Require domain login drop-down menu, select the
preferred option.
Disable guest user Select the check box to disable the local guest user account.
Require reentering password Select the check box to enter the password again while
signing in.
Require smartcard From the Require smartcard drop-down menu, select the
preferred option.
Table 21. Configuring privilege settings
Option Description
Privilege level Select this option to define the default privilege level during
system boot. From the drop-down menu, select any one of
the following levels:
● None—Disables all the system setting menus.
● High—Disables the connectivity settings, but the local
customization is enabled.
● Low—All settings are enabled on the local client.
Show Display Settings (8.5+) Select this option to configure the display settings. From
the drop-down menu, select a group to set the configuration
access.
Enable Keyboard and Mouse Settings (8.5+) Select this option to configure the keyboard and mouse
settings.
Disable Date and Time Settings (8.5+) Select this option to configure the date and time settings.
Network location to upload (8.5+) Enter the location to upload the network trace, network
capture, and log files.
Table 22. Configuring administrator mode
Option Description
Enable Admin mode Select the check box to enable the admin mode. When
privilege level is low or none, you can access the admin mode
by entering the user name and password.
Encrypted Credentials (8.5+) Select the check box to encrypt the credentials.
Show Admin Mode button (8.5+) Select the check box to display the admin mode option on the
sign on window.
Table 23. Configuring general settings
Option Description
Enable the Gkey reset Select this option to reset the factory settings of the device.
While restarting the system, press the G key to reset the
factory settings.
Enable Trace Select this option to trace the files. This parameter enables
the ICA or RDP trace mode and the trace file is created in the
directory.
Remove Certificate (8.5+) Select this option to remove the certificate.
Delete Certificate (8.5+) Select this option to delete the certificate. Enter the
certificate name which you want to delete.
Auto-install Certificates Select this option to install the certificate automatically.
Managing groups and configurations 29