March 2021 Hardening Document for Server Security Configuration Introduction This guide contains security hardening rules to secure your community servers that are deployed with Wyse Management Suite. In database management, server hardening is the process of maximizing the security of database servers and eliminating database vulnerabilities. This document provides guidelines to restrict nonadministrators from accessing the database resources.
Figure 1. Wyse Management Suite installation directory 3. Right-click MongoDB and click Properties. MongoDB Properties window is displayed.
Figure 2. MongoDB properties 4. Go to the Security tab and click Advanced.
Figure 3. Security tab Advanced Security Settings for MongoDB window is displayed. 5. Click Disable inheritance. The Block Inheritance window is displayed.
Figure 4. Block inheritance NOTE: By default, inheritance is enabled which restricts the altering of permissions to the folder. 6. Click the Convert inherited permissions into explicit permissions on this object option. 7. Select the users that you want to remove access to the MongoDB service and click Remove. Figure 5. Remove user 8.
Figure 6. Verify the user deletion Restrict access to MongoDB data directory You must access the MongoDB data directory using an administrator account. If all users have access to the MongoDB data directory, they can access the configuration files and the data directories. Read and write permission must be set to only an administrator group, as these files are critical for the system to operate. The following steps ensure that the MongoDB resources are not accessible to other users. Steps 1.
Figure 7. Wyse Management Suite installation directory 3. Right-click Mongo and click Properties. MongoDB Properties window is displayed. 4. Go to the Security tab and click Advanced.
Figure 8. Security tab Advanced Security Settings for MongoDB window is displayed. 5. Click Disable inheritance. The Block Inheritance window is displayed.
Figure 9. Disable Inheritance NOTE: By default, inheritance is enabled which restricts the altering of permissions to the folder. 6. Click the Convert inherited permissions into explicit permissions on this object option. 7. Select the users that you want to remove access to MongoDB service and click Remove.
Figure 10. Remove users 8. Verify the changes by logging out from the server and logging in again using the removed user credentials You must be denied access to the MongoDB folder—This step is optional. Change the port number used by MongoDB You can change the port number that is used by MongoDB and protect the database from an unauthorized access. Steps 1. Log in to the server where Wyse Management Suite is installed. 2. Go to the MongoDB folder in the Wyse Management Suite installation directory.
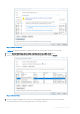
Figure 11. Wyse Management Suite installation directory 3. Open the mongod.cfg file and add the following command at the end of the configuration: port= Figure 12. Change port number The following are the default port numbers in MongoDB: ● 27017—The default port for Mongod and Mongos instances. ● 27018—The default port when you run with --shardsvr runtime operation. ● 27019—The default port when you run with --configsvr runtime operation. ● 28017—The default port for the web status page.
5. Right-click Dell WMS: MongoDB and click Restart. Figure 13. Restart MongoDB services Change the new MongoDB port in the configuration file Steps 1. Log in to the server where Wyse Management Suite is installed. 2. Go to C:\Program Files\DELL\WMS\Tomcat-9\webapps\ccm-web\WEB-INF\classes. Figure 14.
3. Open the bootstrap.properties file. 4. Update the following value with the new port number that is assigned to MongoDB in the file: mongodb.seedList=localhost\: Figure 15. Updated port number 5. Save the file. 6. Go to Start > Services. 7. Right-click Dell WMS: Tomcat Service and click Restart. Figure 16. Restart Tomcat service 8. Log in to the Wyse Management Suite application. The port number is changed, and the application is loaded.
Configure MongoDB resources to capture system logs If the MongoDB log configuration is set to silent or quiet, the logging of information does not work. You must configure the SystemLog.quiet option to log information such as connection events, authentication events, replication sync activities, and capture evidence if some harmful commands are run such as drop, dropIndexes, and so on. Steps 1. Log in to the server where Wyse Management Suite is installed. 2.
Figure 18. Configuration file 4. Go to Start > Services. 5. Right-click Dell WMS: MongoDB and click Restart. Figure 19.
Server hardening for MariaDB/MySQL This chapter contains security hardening rules to secure your MariaDB and MySQL Community servers 5.x that are deployed with Wyse Management Suite. Restrict access to MariaDB or MySQL resources You must access the MariaDB or MySQL service using an administrator account. If all users have access to the MariaDB or MySQL service, they can access the configuration files and the data directories.
Figure 21. Security tab 4. Go to the Security tab and click Advanced. Advanced Security Settings for MariaDB window is displayed. 5. Click Disable inheritance. The Block Inheritance window is displayed.
Figure 22. Block inheritance NOTE: By default, inheritance is enabled which restricts the altering of permissions to the folder. 6. Click the Convert inherited permissions into explicit permissions on this object option. 7. Select the users that you want to remove access to the MariaDB service and click Remove. Figure 23.
Figure 24. Removed user 8. Verify the changes by logging out from the server and logging in again using the removed user credentials. You must be denied access to the MariaDB folder—This step is optional. 9. Click Enable inheritance. Restrict access to MariaDB or MySQL data directory The data directory (datadir) contains the MySQL databases. If the access is restricted, other users cannot read data from the mysql.user table that contains passwords.
Figure 25. MySQL shell 2. Switch to stratus schema using the following command: --use stratus; Figure 26. Switch schema 3. Run the following command to identify the data directory path: --show variables where variable_name = 'datadir'; Figure 27. MySQL data directory 4. Go to the data directory.
5. Right-click SQL and click Properties. Figure 28. SQL data directory MariaDB Properties window is displayed. 6. Go to the Security tab and click Advanced.
Figure 29. Security tab Advanced Security Settings for MariaDB window is displayed. 7. Click Disable inheritance. The Block Inheritance window is displayed.
Figure 30. Block inheritance NOTE: By default, inheritance is enabled which restricts altering permissions to the folder. 8. Click the Convert inherited permissions into explicit permissions on this object option. 9. Select the users that you want to remove access to the MariaDB service and click Remove. Disable local_infile parameter The local_infile parameter defines whether the files that are located in the MySQL client system can be loaded or selected using the LOAD DATA INFILE or SELECT local_file.
2. Switch to stratus schema using the following command: --use stratus; Figure 32. Stratus schema 3. Run the following command to identify the loca_infile value from Wyse Management Suite schema: SHOW VARIABLES WHERE Variable_name = 'local_infile'; Figure 33. Local infile value 4. Verify the local_infile value. If the value is ON, go to step 5. 5. Go to Start > Services and right-click Dell WMS: MariaDB. 6. Go to the path mentioned in the Path to executable field. 7. Open the my.
Figure 34. My.ini file 8. Go to Start > Services and right-click Dell WMS: MariaDB. Figure 35. Restart MariaDB 9. Click Restart. When you restart the MariaDB services, you are prompted to restart Tomcat services.
Figure 36. Restart Tomcat services 10. Click Yes in the Restart Other Services window. Next steps 1. Log in to the MySQL shell. 2. Switch to stratus schema using the following command: --use stratus; 3. Run the following command to identify the loca_infile value from Wyse Management Suite schema: SHOW VARIABLES WHERE Variable_name = 'local_infile'; The local_infile value must be 0. Server hardening for JDK This chapter contains security hardening rules to secure your JDK Community servers 11.
Figure 37. conf 2. Right-click the catalina.policy file and open it in any editor. Figure 38. Right-click options The default permissions are provided in the catalina.policy file.
Figure 39. Default permissions 3. Update the permissions with the following lines: grant { permission java.io.FilePermission "${java.home}${file.separator}conf$ {file.separator}security${file.separator}java.security", "read"; }; grant { permission java.io.FilePermission "C:\\Program Files\\DELL\\WMS\\jdk-11.0.7\ \conf\\security\\java.policy","read,write,delete,execute" }; Figure 40.
NOTE: Retain only the permissions that are required. Remove all other permissions to avoid system failure. 4. Save and close the editor. Restart Tomcat in secure mode to enable the configurations. NOTE: See Start Tomcat Service in secure mode if your tomcat server is not running in secure mode. If Tomcat is already running in secure configuration mode, you can ignore the steps. Start Tomcat Service in secure mode Steps 1. Open the Run box, type services.msc and click OK. Figure 41.
Figure 42. Services 3. Go to the Tomcat directory and open the bin folder. The default Tomcat directory location is C:\Program Files\DELL\WMS\Tomcat-9. Figure 43. Tomcat directory 4. Double-click Tomcat9w.exe. The Dell WMS: Tomcat Service Properties window is displayed. 5. Go to the Java tab. 6. Add the following lines in the Java Options section: Djava.security.manager Djava.security.policy= C:\Program Files\DELL\WMS\Tomcat-9\conf\catalina.policy NOTE: The path for catalina.
Figure 44. Java options 7. Click Apply and click OK. 8. Open the Run box, type services.msc and click OK. 9. Right-click Dell WMS: Tomcat Service and click Start. Restrict access to JDK resources You must access the JDK service using an administrator account. If all users have access to the JDK service, they can access the configuration files and the data directories. Dell Technologies recommends restricting access to a user account that is used for Wyse Management Suite installation and configuration.
Figure 45. Wyse Management Suite installation directory 2. Go to the Wyse Management Suite installation directory. 3. Right-click jdk-11.x.x and click Properties. jdk-11.x.x Properties window is displayed. 4. Go to the Security tab and click Advanced.
Figure 46. jdk-11.x.x Properties Advanced Security Settings for jdk-11.x.x window is displayed.
Figure 47. Advanced Security Settings for jdk-11.x.x 5. Click Disable inheritance. The Block Inheritance window is displayed.
Figure 48. Block inheritance NOTE: By default, inheritance is enabled which restricts the altering of permissions to the folder. 6. Click the Convert inherited permissions into explicit permissions on this object option. 7. Select the users that you want to remove access to the jdk-11.x.x service and click Remove.
Figure 49. Remove user 8. Verify the changes by logging out from the server and logging in again using the removed user credentials. You must be denied access to the jdk-11.x.x folder—This step is optional.
Figure 50.
Notes, cautions, and warnings NOTE: A NOTE indicates important information that helps you make better use of your product. CAUTION: A CAUTION indicates either potential damage to hardware or loss of data and tells you how to avoid the problem. WARNING: A WARNING indicates a potential for property damage, personal injury, or death. © 2021 Dell Inc. or its subsidiaries. All rights reserved. Dell, EMC, and other trademarks are trademarks of Dell Inc. or its subsidiaries.