
Administrator Guide


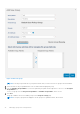


Table Of Contents
- Dell Wyse Management Suite Version 3.3 Administrator's Guide
- Contents
- Introduction to Wyse Management Suite
- Getting started with Wyse Management Suite
- Installing or upgrading Wyse Device Agent
- Installing or upgrading DCA-Enabler on Ubuntu devices
- Registering and configuring a new device using Wyse Management Suite
- Register and configure a new Windows Embedded Standard device using Wyse Management Suite
- Register and configure a new ThinOS 8.x device using Wyse Management Suite
- Register and configure a new ThinOS 9.x device using Wyse Management Suite
- Register and configure a new Linux or ThinLinux device using Wyse Management Suite
- Register and configure a new Wyse Software Thin Client using Wyse Management Suite
- Register and configure Dell Hybrid Client using Wyse Management Suite
- Register and configure Dell Generic Client using Wyse Management Suite
- Wyse Management Suite dashboard
- Managing groups and configurations
- Edit an unmanaged group
- Create a default device policy group
- Create a user policy group
- Configure a global level policy
- Import a user policy group
- Remove a group
- Configure a device level policy
- Export group policies
- Importing group policies
- Edit the ThinOS policy settings
- Edit the ThinOS 9.x policy settings
- Edit the Windows Embedded Standard policy settings
- Edit the Linux policy settings
- Edit the ThinLinux policy settings
- Edit the Wyse Software Thin Client policy settings
- Edit the Cloud Connect policy settings
- Edit the Dell Hybrid Client policy settings
- Edit the Dell Generic Client policy settings
- Create and import bulk device exception file
- Managing devices
- Methods to register devices to Wyse Management Suite
- Register Dell Hybrid Client manually
- Register Dell Generic Client by using manual discovery method
- Register Dell Hybrid Client by using manual discovery method
- Register ThinOS devices by using Wyse Device Agent
- Registering Windows Embedded Standard Thin Clients to Wyse Management Suite by using Wyse Device Agent
- Register Wyse Software Thin Client to Wyse Management Suite by using Wyse Device Agent
- Register ThinLinux thin clients by using Wyse Device Agent
- Register ThinOS devices by using the FTP INI method
- Register ThinLinux version 2.0 devices by using FTP INI method
- Register ThinLinux version 1.0 devices by using FTP INI method
- Registering devices by using DHCP option tags
- Registering devices by using DNS SRV record
- Search a device by using filters
- Save the filter in Devices page
- Query the device status
- Lock the devices
- Restart the devices
- Unregister the device
- Enrollment Validation
- Reset the device to factory default settings
- Change a group assignment on the Devices page
- Send messages to a device
- Wake On LAN command
- View the device details
- View the display parameters
- View the virtual NIC details
- View the BIOS details
- Manage the device summary
- View the system information
- View device events
- View the installed applications
- Rename the thin client
- Enable remote shadow connection
- Configure remote shadow connection for Dell Hybrid Client devices
- Shutting down devices
- Tag a device
- Device compliance status
- Pulling Windows Embedded Standard or ThinLinux image
- Request a log file
- Troubleshooting your device
- Reimage your Dell Hybrid Client
- Convert your Dell Generic Client to Hybrid Client
- Pull configuration user interface package for Dell Hybrid Client
- Reset your Dell Hybrid Client to factory settings
- Bulk group change of devices
- Methods to register devices to Wyse Management Suite
- Apps and data
- Application policy
- Configure thin client application inventory
- Configure Wyse Software thin client application inventory
- Create and deploy standard application policy to thin clients
- Create and deploy standard application policy to Wyse Software thin clients
- Enable single sign-on for Citrix StoreFront using standard application policy
- Create and deploy advanced application policy to thin clients
- Create and deploy advanced application policy to Wyse Software Thin Clients
- Create and deploy standard application policy to Dell Hybrid Clients
- Create and deploy advanced application policy to Dell Hybrid Clients
- Create and deploy standard application policy to Dell Generic Clients
- Create and deploy advanced application policy to Dell Generic Clients
- Image policy
- Add Windows Embedded Standard operating system and ThinLinux images to repository
- Add ThinOS firmware to repository
- Add ThinOS BIOS file to repository
- Add ThinOS package file to repository
- Create Windows Embedded Standard and ThinLinux image policies
- Add ThinOS 9.x firmware to the repository
- Add ThinOS 9.x BIOS file to repository
- Add ThinOS application packages to the repository
- Create Dell Hybrid Client image policies
- Manage file repository
- Application policy
- Managing rules
- Edit a registration rule
- Create auto assignment rules for unmanaged devices
- Edit an unmanaged device auto assignment rule
- Disable and delete rule for the unmanaged device auto assignment
- Save the rule order
- Add a rule for alert notification
- Edit an alert notification rule
- Create rule to auto-unregister a device
- Managing Jobs
- Managing Events
- Managing users
- Add a new admin profile
- Create a WMS custom role in Wyse Management Suite
- Assign WMS custom roles to imported AD groups
- Bulk import unassigned administrators or cloud connect users
- Edit an administrator profile
- Activate an administrator profile
- Deactivate an administrator profile
- Delete an administrator profile
- Unlock an administrator profile
- Deactivate an administrator profile
- Create auto assignment rules for unmanaged devices
- Add end user
- Edit an end user
- Configure end user policy
- Bulk import end users
- Deleting end user
- Edit a user profile
- Portal administration
- Import unassigned users or user groups to public cloud through active directory
- Adding the Active Directory server information
- Alert classifications
- Create an Application Programming Interface-API accounts
- Access Wyse Management Suite file repository
- Configuring other settings
- Managing Teradici configurations
- Enable Two-Factor authentication
- Enabling multi-tenant accounts
- Generate reports
- Enabling custom branding
- Manage system setup
- Configure secure MQTT
- Enable secure LDAP over SSL
- Convert Dell Wyse 5070 devices and Dell Ubuntu Generic Clients to Dell Hybrid Client
- Security configurations
- Teradici device management
- Managing license subscription
- Firmware upgrade
- Remote repository
- Proxy support for Windows Embedded Standard WDA and Dell Hybrid Client DCA
- Troubleshooting your device
- Request a log file using Wyse Management Suite
- View audit logs using Wyse Management Suite
- Device fails to register to Wyse Management Suite when WinHTTP proxy is configured
- RemoteFX USB redirection Policy does not get applied for USB mass storage devices
- WiFi settings configured from Wyse Management Suite are not persistent across multiple Wyse 5070 thin clients
- Frequently asked questions
- What takes precedence between Wyse Management Suite and ThinOS UI when conflicting settings are enforced?
- How do I use Wyse Management Suite file repository?
- How do I import users from a .csv file?
- How do I check the version of Wyse Management Suite
- How to create and configure DHCP option tags
- How to create and configure DNS SRV records
- How to change the hostname to IP address
- How do I image the device using self-signed remote repository

Importing group policies
The Import Policies option enables you to import the policies. This option is available for Wyse Management Suite PRO license
users. You can import the group policies from the Groups & Configs page or from the Edit Policies page.
Import group policies from Groups and Configs page
Steps
1. On the Groups & Configs page, select your preferred group.
If the destination group contains policies of the same device type as the imported ones, they are removed and new ones are
added.
2. Click Import Policies.
The Import Policies Wizard screen is displayed.
3. Select the mode of importing the group policies from the selected group.
The following options are available:
● From an existing group—Select a group from the drop-down list. Policies from that group are copied to the current
group.
● From an exported file—Browse the .json file. Policies from that file are copied to the current group.
4. Click Next.
5. Select the device type configurations to import.
The following options are available:
● All device type policies—All configured device type policies are imported to the current group.
● Specific device type policies—Select one or more device types from the dropdown list. Only the selected device type
policies are imported to the current group.
6. Click Next.
A preview of the policies in the selected group is displayed.
7. Click Next.
The summary of the import process is displayed. The following types of warnings can be displayed:
● Imported <operating system type> policies are applied to group <group name>—This warning is displayed when
you import the operating system configurations to a group that does not contain any of the configurations.
● <Operating system type> policies already exists for the <group name> group. Existing <operating system
type> policies are removed policies are applied—This warning is displayed when you import new operating system
type configurations to a group that contains the operating system type configurations.
● Importing policies from a file that contains dependencies to inventory files will fail. To allow this import, use
the import option from the "Edit Policies" window—This warning is displayed when you import the device type
configurations from a file that contains references to inventory files.
8. Click Import.
NOTE:
Only the device type configurations that are selected can be imported. The policies that are defined in the target
group for the selected device type are removed before applying the new policies of the same device type.
NOTE: While importing the group policies, the passwords and reference files are not imported. The administrator must
select them before publishing the policy.
Import group policies from Edit Policies page
Steps
1. On the Groups & Configs page, select your preferred group.
2. Click Edit Policies and select your preferred option.
3. Click Import.
The Import Policies Wizard screen is displayed.
4. Select the mode of importing the group policies from the selected group. The following options are available:
Managing groups and configurations
39