Dell OptiPlex 3060 Micro Setup and specifications guide Regulatory Model: D10U Regulatory Type: D10U003
Notes, cautions, and warnings NOTE: A NOTE indicates important information that helps you make better use of your product. CAUTION: A CAUTION indicates either potential damage to hardware or loss of data and tells you how to avoid the problem. WARNING: A WARNING indicates a potential for property damage, personal injury, or death. © 2019 Dell Inc. or its subsidiaries. All rights reserved. Dell, EMC, and other trademarks are trademarks of Dell Inc. or its subsidiaries.
Contents 1 Set up your computer.....................................................................................................................................5 2 Chassis.......................................................................................................................................................... 9 Front view..........................................................................................................................................................................
Network adapter drivers................................................................................................................................................. 29 Audio drivers.....................................................................................................................................................................29 Display adapter................................................................................................................................................
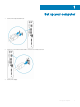
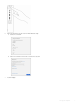
1 Set up your computer 1 Connect the keyboard and mouse. 2 Connect to your network using a cable, or connect to a wireless network. 3 Connect the display.
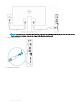
NOTE: If you ordered your computer with a discrete graphics card, the HDMI and the display ports on the back panel of your computer are covered. Connect the display to the discrete graphics card. 4 Connect the power cable. 5 Press the power button.
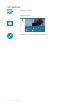
6 7 Follow the instructions on the screen to finish Windows setup: a Connect to a network. b Sign-in to your Microsoft account or create a new account. Locate Dell apps.
Table 1.
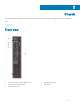
2 Chassis This chapter illustrates the multiple chassis views along with the ports and connectors and also explains the FN hot key combinations. Topics: • Front view • Back view Front view 1 Power button and power light/diagnostic LED 2 Hard drive activity light 3 Headset/Universal audio jack port 4 Line-out port 5 USB 3.
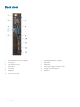
Back view 1 External antenna connectors (optional) 2 DP/HDMI2.0b/VGA port (optional) 3 USB 2.0 port 4 Cable holder 5 USB 3.1 Gen 1 ports (2) 6 Padlock ring 7 Network port 8 USB 2.
3 System specifications NOTE: Offerings may vary by region. The following specifications are only those required by law to ship with your computer. For more information about the configuration of your computer, go to Help and Support in your Windows operating system and select the option to view information about your computer.
Type UMA Graphics Intel Core i3-8300T (4 Cores/8 MB cache/4 Threads/3.2 GHz/35 W); supports Windows 10/Linux Intel HD Graphics 630 Intel Core i5-8400T (6 Cores/9 MB cache/6 Threads/up to 3.3 GHz/35 W); supports Windows 10/Linux Intel HD Graphics 630 Intel Core i5-8500T (6 Cores/9 MB cache/6 Threads/up to 3.5 GHz/35 W); supports Windows 10/Linux Intel HD Graphics 630 Intel Core i7-8700T (6 Cores/12 MB cache/12 Threads/up to 4.
Type Form factor One 2.5 inch Self-encrypting drive Hard-Disk Drive (SED HDD) Interface Capacity SATA AHCI, Up to 6 Gbps Up to 512 GB, upto 7200 RPM Chipset Table 5. Chipset specifications Type Intel H370 Non-volatile memory on chipset Yes BIOS configuration SPI (Serial Peripheral Interface) 256 Mbit (32 MB) located at SPI_FLASH on chipset Trusted Platform Module (TPM) 2.0 Security Device (Discrete TPM 24 KB located at TPM 2.
• • Internal speaker amplifier Dell Performance USB Headset - AE2 (optional) Dell Pro Stereo Headsets - UC150/UC350 (optional) 2 W (RMS) per channel Video Table 8. Video Controller Type CPU Dependency Graphics memory type Capacity External display support Maximum resolution Intel UHD Graphics 630 UMA Intel Pentium Gold G5500T Integrated Shared system memory DisplayPort 1.2 VGA: 2048x1536@60 Hz HDMI 1.4 HDMI : DP/HDMI 2.
Ports and connectors Table 10. Ports and connectors USB Security Audio Video • • Two USB 2.0 port (One supports SmartPower On) Four USB 3.1 Gen 1 ports Kensington lock slot • • Headset port/Universal audio jack port One line-out port • • • DisplayPort 1.2 HDMI 1.4 (UMA) DP/HDMI2.0b/VGA port (optional) Network adapter One RJ-45 connector Serial port One serial port (optional) Parallel port One parallel port (optional) System board connectors Table 11. System board connectors M.
Physical system dimensions Table 13. Physical system dimensions Chassis volume (liters) 1.16 Chassis weight (pounds / kilograms) 2.60/1.18 Table 14. Chassis dimensions Height (inches / centimeters) 7.2/18.2 Width (inches / centimeters) 1.4/3.6 Depth (inches / centimeters) 7/17.8 Shipping weight (pounds / kilograms – includes packaging materials) 5.91/2.68 Table 15. Packaging parameters Height (inches / centimeters) 5.2/13.3 Width (inches / centimeters) 9.4/23.
Table 17.
4 System setup System setup enables you to manage your desktop hardware and specify BIOS level options.
General options Table 18. General Option Description System Information Displays the following information: • • • • • System Information: Displays BIOS Version, Service Tag, Asset Tag, Ownership Tag, Ownership Date, Manufacture Date, and the Express Service Code. Memory Information: Displays Memory Installed, Memory Available, Memory Speed, Memory Channel Mode, Memory Technology, DIMM 1 Size,, and DIMM 2 Size. PCI Information: Displays Slot1_M.2, Slot2_M.
Option Description • • Drives AHCI = SATA is configured for AHCI mode RAID ON = SATA is configured to support RAID mode (selected by default) Allows you to enable or disable the various drives on-board: • • • SATA-0 (enabled by default) SATA-1 (enabled by default) M.2 PCIe SSD-0 (enabled by default) Smart Reporting This field controls whether hard drive errors for integrated drives are reported during system startup. The Enable Smart Reporting option is disabled by default.
Option Description • Intel HD Graphics NOTE: If you do not select Auto, the on-board graphics device will be present and enabled. Security Table 21. Security Option Description Admin Password Allows you to set, change, and delete the admin password. System Password Allows you to set, change, and delete the system password. Internal HDD-0 Password Allows you to set, change, and delete the computer’s internal HDD.
Option Description • • Chassis Intrusion Disable Activate - This option is selected by default. This field controls the chassis intrusion feature. Choose any one of the option: • • • Disabled (default) Enabled On-Silent Admin Setup Lockout Allows you to prevent users from entering Setup when Admin password is set. This option is not set by default. Master Password Lockout Allows you to disable master password support Hard Disk passwords need to be cleared before the settings can be changed.
Intel Software Guard Extensions options Table 23. Intel Software Guard Extensions Option Description Intel SGX Enable This field specifies you to provide a secured environment for running code/storing sensitive information in the context of the main OS. Click one of the following options: • • • Enclave Memory Size Disabled Enabled Software controlled—Default This option sets SGX Enclave Reserve Memory Size Click one of the following options: • • • 32 MB 64 MB 128 MB—Default Performance Table 24.
Option Description Hyper-Thread Control Allows you to enable or disable the HyperThreading in the processor. • • Disabled Enabled—Default Power management Table 25. Power Management Option Description AC Recovery Determines how the system responds when AC power is re-applied after a power loss. You can set the AC Recovery to: • • • Power Off Power On Last Power State This option is Power Off by default.
Post behavior Table 26. POST Behavior Option Description Numlock LED Allows you to enable or disable the Numlock feature when your computer starts. This option is enabled by default. Keyboard Errors Allows you to enable or disable the keyboard error reporting when the computer starts. The option Enable Keyboard Error Detection is enabled by default.
Wireless options Table 28. Wireless Option Description Wireless Device Enable Allows you to enable or disable the internal wireless devices. The options are: • • WLAN/WiGig Bluetooth All the options are enabled by default. Maintenance Table 29. Maintenance Option Description Service Tag Displays the service tag of your computer. Asset Tag Allows you to create a system asset tag if an asset tag is not already set. This option is not set by default.
Advanced configuration Table 31. Advanced configuration Option Description ASPM Allows you to set the ASPM level.
5 Software This chapter details the supported operating systems along with instructions on how to install the drivers. Topics: • Supported operating systems • Downloading drivers • Network adapter drivers • Audio drivers • Display adapter • Security drivers • Storage controller • System device drivers • Other device drivers Supported operating systems Table 32.
Network adapter drivers Verify if the Network adapter drivers are already installed in the system. Audio drivers Verify if the audio drivers are already installed in the computer. Display adapter Verify if the display adapter drivers are already installed in the system. Security drivers Verify if the security drivers are already installed in the system. Storage controller Verify if the storage control drivers are already installed in the system.
System device drivers Verify if the system device drivers are already installed in the system.
Software 31
Other device drivers Verify if the following drivers are already installed in the system.
6 Getting help Contacting Dell NOTE: If you do not have an active Internet connection, you can find contact information on your purchase invoice, packing slip, bill, or Dell product catalog. Dell provides several online and telephone-based support and service options. Availability varies by country and product, and some services may not be available in your area. To contact Dell for sales, technical support, or customer service issues: 1 Go to Dell.com/support. 2 Select your support category.