
Service Manual

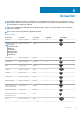

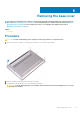
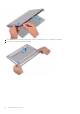
Table Of Contents
- XPS 13 7390 Service Manual
- Before working inside your computer
- After working inside your computer
- Safety instructions
- Recommended tools
- Screw list
- Removing the base cover
- Replacing the base cover
- Removing the battery
- Replacing the battery
- Removing the solid-state drive
- Replacing the solid-state drive
- Removing the speakers
- Replacing the speakers
- Removing the coin-cell battery
- Replacing the coin-cell battery
- Removing the heat sink
- Replacing the heat sink
- Removing the heat-sink assembly
- Replacing the heat-sink assembly
- Removing the display assembly
- Replacing the display assembly
- Removing the headset port
- Replacing the headset port
- Removing the fans
- Replacing the fans
- Removing the system board
- Replacing the system board
- Removing the power button with optional fingerprint reader
- Replacing the power button with optional fingerprint reader
- Removing the keyboard
- Replacing the keyboard
- Removing the palm-rest assembly
- Replacing the palm-rest assembly
- Device drivers
- System setup
- Troubleshooting
- Getting help and contacting Dell

Transporting sensitive components
When transporting ESD sensitive components such as replacement parts or parts to be returned to Dell, it is critical to place these parts in
anti-static bags for safe transport.
Lifting equipment
Adhere to the following guidelines when lifting heavy weight equipment:
CAUTION: Do not lift greater than 50 pounds. Always obtain additional resources or use a mechanical lifting device.
1. Get a firm balanced footing. Keep your feet apart for a stable base, and point your toes out.
2. Tighten stomach muscles. Abdominal muscles support your spine when you lift, offsetting the force of the load.
3. Lift with your legs, not your back.
4. Keep the load close. The closer it is to your spine, the less force it exerts on your back.
5. Keep your back upright, whether lifting or setting down the load. Do not add the weight of your body to the load. Avoid twisting your
body and back.
6. Follow the same techniques in reverse to set the load down.
Safety instructions 11