
Service Manual


Steps
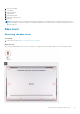
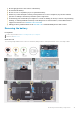
1. Remove the Torx 5 screw (M1.6x3.4) that secures the battery cable to the system board.
2. Disconnect the battery cable from the interposer board.
NOTE: Remove the interposer board immediately after disconnecting the battery cable to avoid misplacing it. Hold the
edges of the interposer board to avoid damaging the pins on it.
NOTE: The interposer board is not polarity sensitive and both sides are compatible.
3. Remove the interposer board from the system board.
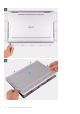
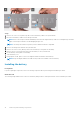
4. Remove the seven screws (M1.6x3) that secure the battery to the palm-rest assembly.
5. Remove the two screws (M1.2x4) that secure the battery to the system board.
6. Lift the battery off the palm-rest assembly.
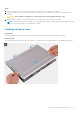
7. Turn the battery over.
8. Using a plastic scribe, push to remove the magnet and the metal bar from the battery.
NOTE: Keep the magnet and the metal bar as they need to be installed on the new battery.
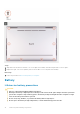
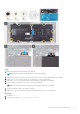
Installing the battery
Prerequisites
If you are replacing a component, remove the existing component before performing the installation procedure.
About this task
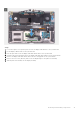
The following image indicates the location of the battery and provides a visual representation of the installation procedure.
16
Removing and installing components