XPS 15 維修手冊 管制型號: P56F 管制類型: P56F001 November 2020 修正版 A03
Identifier Version Status GUID-5B8DE7B7-879F-45A4-88E0-732155904029 15 Translation Validated 註、警示與警告 註: 「註」表示可以幫助您更有效地使用產品的重要資訊。 警示: 「警示」表示有可能會損壞硬體或導致資料遺失,並告訴您如何避免發生此類問題。 警告: 「警告」表示可能的財產損失、人身傷害或死亡。 © 2016-2020 Dell Inc. 或其子公司。版權所有,翻印必究。Dell、EMC 與其他商標均為 Dell Inc.
目錄 章 1: 拆裝電腦內部元件之前............................................................................................................... 7 開始操作之前 ........................................................................................................................................................................7 安全說明................................................................................................................................................................................. 7 建議的工具..............
後續必要作業...................................................................................................................................................................... 25 章 13: 卸下喇叭.............................................................................................................................. 26 事前準備作業...................................................................................................................................................................... 26 程序..................
後續必要作業...................................................................................................................................................................... 47 章 25: 卸下音效子板....................................................................................................................... 48 事前準備作業...................................................................................................................................................................... 48 程序.......................
後續必要作業...................................................................................................................................................................... 65 章 37: 卸下顯示器鉸接.................................................................................................................... 66 事前準備作業...................................................................................................................................................................... 66 程序.........................
1 Identifier Version Status GUID-5D3B1051-9384-409A-8D5B-9B53BD496DE8 6 Translation Validated 拆裝電腦內部元件之前 註: 根據您所訂購的組態而定,本文件中的圖片可能和您的電腦不同。 主題: • • • 開始操作之前 安全說明 建議的工具 Identifier Version Status GUID-F23987E4-5E0B-4DFD-9FC4-6B0036E6352B 10 Translation approved 開始操作之前 1. 儲存並關閉所有開啟的檔案,結束所有開啟的應用程式。 2. 關閉電腦。 關機指令根據電腦所安裝的作業系統而有所差異。 ● Windows 10:按一下開始 > 電源 > 關閉。 ● Windows 8.1:在開始畫面中,按一下電源圖示 ● Windows 7:按一下開始 > 關機。 > 關機。 註: 如果您使用了其他作業系統,請參閱您作業系統的說明文件,以獲得關機說明。 3. 從電源插座上拔下電腦和所有連接裝置的電源線。 4.
警示: 您只能在 Dell 技術援助團隊的授權或指導之下執行故障排除和維修。由未經 Dell 授權的維修造成的損壞不在保固範圍之 內。請參閱產品隨附或在 www.dell.
2 Identifier Version Status GUID-06588814-2678-4667-9FF9-C009F4BCE185 8 Translation Validated 拆裝電腦內部元件之後 警示: 電腦內部如有遺留任何螺絲可能會造成嚴重電腦受損。 1. 裝回所有螺絲,確定沒有任何遺漏的螺絲留在電腦內。 2. 先連接您卸下的所有外接式裝置、週邊設備或纜線,然後再使用電腦。 3. 先裝回您卸下的所有媒體卡、光碟或任何其他零件,然後再使用電腦。 4. 將電腦和所有連接裝置連接至電源插座。 5.
3 Identifier Version Status GUID-98068FC2-1C1C-46DE-B3FA-DF9D488E9BA1 2 Translation Validated 卸下基座護蓋 註: 拆裝電腦內部元件之前,請先閱讀電腦隨附的安全資訊,並按照拆裝電腦內部元件之前中的步驟進行操作。拆裝電腦內部元 件之後,請按照拆裝電腦內部元件之後中的指示進行操作。如需更多有關安全性的資訊最佳實務,請參閱 Regulatory Compliance (法規遵循) 首頁 www.dell.com/regulatory_compliance。 主題: • 程序 Identifier Version Status GUID-2EBA98C6-6807-4AA7-93CE-B94CB70E37F5 1 Translation approved 程序 1. 闔上顯示器並將電腦翻轉。 2. 將系統徽章翻面,放在基座護蓋上。 3. 卸下將基座護蓋固定至手掌墊組件的螺絲。 a. 基座護蓋 b. 系統徽章 c. 螺絲 (12) 4.
a.
4 Identifier Version Status GUID-27446428-82D7-4881-9220-9EB090B046EA 2 Translation Validated 裝回基座護蓋 註: 拆裝電腦內部元件之前,請先閱讀電腦隨附的安全資訊,並按照拆裝電腦內部元件之前中的步驟進行操作。拆裝電腦內部元 件之後,請按照拆裝電腦內部元件之後中的指示進行操作。如需更多有關安全性的資訊最佳實務,請參閱 Regulatory Compliance (法規遵循) 首頁 www.dell.com/regulatory_compliance。 主題: • 程序 Identifier Version Status GUID-CC5B4A17-DCA2-488E-A84F-D853FAA5C79E 1 Translation approved 程序 1. 將基座護蓋置於手掌墊組件,然後將它按壓到定位。 2. 裝回將基座護蓋固定至手掌墊組件的螺絲。 3. 將系統徽章翻面,將它卡至定位。 4.
5 Identifier Version Status GUID-D9015C06-6CEE-42EA-9215-9D0FD7B827D5 2 Translation Validated 卸下電池 註: 拆裝電腦內部元件之前,請先閱讀電腦隨附的安全資訊,並按照拆裝電腦內部元件之前中的步驟進行操作。拆裝電腦內部元 件之後,請按照拆裝電腦內部元件之後中的指示進行操作。如需更多有關安全性的資訊最佳實務,請參閱 Regulatory Compliance (法規遵循) 首頁 www.dell.
1. 電池纜線 3. 電池 2. 螺絲 (4) 4. 手掌墊組件 4.
6 Identifier Version Status GUID-E15EE482-44FD-4E71-91FC-899D4B61532E 2 Translation Validated 裝回電池 註: 拆裝電腦內部元件之前,請先閱讀電腦隨附的安全資訊,並按照拆裝電腦內部元件之前中的步驟進行操作。拆裝電腦內部元 件之後,請按照拆裝電腦內部元件之後中的指示進行操作。如需更多有關安全性的資訊最佳實務,請參閱 Regulatory Compliance (法規遵循) 首頁 www.dell.com/regulatory_compliance。 主題: • • 程序 後續必要作業 Identifier Version Status GUID-BB62A4A2-BF81-4898-BD26-C505542BCBB2 1 Translation approved 程序 1. 將電池上的螺絲孔與手掌墊組件上的螺絲孔對齊。 2. 裝回將電池固定在手掌墊組件上的螺絲。 3.
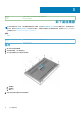
7 Identifier Version Status GUID-5DE1E07B-4633-4536-ACBF-4A3067007FE0 2 Translation Validated 卸下硬碟機 註: 拆裝電腦內部元件之前,請先閱讀電腦隨附的安全資訊,並按照拆裝電腦內部元件之前中的步驟進行操作。拆裝電腦內部元 件之後,請按照拆裝電腦內部元件之後中的指示進行操作。如需更多有關安全性的資訊最佳實務,請參閱 Regulatory Compliance (法規遵循) 首頁 www.dell.com/regulatory_compliance。 警示: 硬碟極易損壞。在處理硬碟機時請務必小心。 警示: 為避免遺失資料,請勿在電腦處於睡眠狀態或開機時卸下硬碟。 主題: • • 事前準備作業 程序 Identifier Version Status GUID-D6855CF8-188C-46F9-8023-39E45D90EBB0 1 Translation approved 事前準備作業 1. 卸下基座護蓋。 2.
a. 螺絲 (4) b. 硬碟機固定框架 c. 硬碟機組件 3. 使用拉式彈片,從主機板拔下硬碟機纜線。 4. 將硬碟組件從手掌墊組件抬起取下。 a. 拉式彈片 b. 硬碟機組件 5.
a. 硬碟機組件 b. 硬碟機內插板 6. 從硬碟卸下硬碟護蓋。 a. 硬碟護蓋 (2) b.
8 Identifier Version Status GUID-8D72BB77-0F8B-428E-A98E-FF7DA2CDA899 2 Translation Validated 裝回硬碟機 註: 拆裝電腦內部元件之前,請先閱讀電腦隨附的安全資訊,並按照拆裝電腦內部元件之前中的步驟進行操作。拆裝電腦內部元 件之後,請按照拆裝電腦內部元件之後中的指示進行操作。如需更多有關安全性的資訊最佳實務,請參閱 Regulatory Compliance (法規遵循) 首頁 www.dell.com/regulatory_compliance。 警示: 硬碟極易損壞。在處理硬碟機時請務必小心。 主題: • • 程序 後續必要作業 Identifier Version Status GUID-126CCE4A-6604-465A-9807-AE9B01219C4D 1 Translation approved 程序 1. 將硬碟護蓋裝回硬碟。 2. 將硬碟機內插板連接至硬碟機組件。 3. 將硬碟組件置於手掌墊組件。 4. 將硬碟機纜線連接至主機板。 5.
9 Identifier Version Status GUID-EBBE5C53-31DB-4774-87D0-E636597A97D1 1 Translation approved 卸下固態硬碟(半長) 註: 拆裝電腦內部元件之前,請先閱讀電腦隨附的安全資訊,並按照拆裝電腦內部元件之前中的步驟進行操作。拆裝電腦內部元 件之後,請按照拆裝電腦內部元件之後中的指示進行操作。如需更多有關安全性的資訊最佳實務,請參閱 Regulatory Compliance (法規遵循) 首頁 www.dell.com/regulatory_compliance。 警示: 固態硬碟極易損壞。持拿固態硬碟時,請務必小心。 警示: 為避免遺失資料,請勿在電腦處於睡眠狀態或開機時卸下固態硬碟。 主題: • • 事前準備作業 程序 Identifier Version Status GUID-ABD50AF6-189E-4C78-9449-F96A3980FFA5 1 Translation approved 事前準備作業 1. 卸下基座護蓋。 2.
1. 螺絲 3. 固態硬碟插槽 2. 固態硬碟組件 4. 主機板 3. 卸下將固態硬碟固定至固態硬碟托架的螺絲。 a. 固態硬碟托架 b. 螺絲 c. 固態硬碟 4.
10 Identifier Version Status GUID-7A5474EE-D081-483E-8B28-D357AC6F1B70 1 Translation approved 裝回固態硬碟(半長) 註: 拆裝電腦內部元件之前,請先閱讀電腦隨附的安全資訊,並按照拆裝電腦內部元件之前中的步驟進行操作。拆裝電腦內部元 件之後,請按照拆裝電腦內部元件之後中的指示進行操作。如需更多有關安全性的資訊最佳實務,請參閱 Regulatory Compliance (法規遵循) 首頁 www.dell.com/regulatory_compliance。 警示: 固態硬碟極易損壞。持拿固態硬碟時,請務必小心。 主題: • • 程序 後續必要作業 Identifier Version Status GUID-8A3DDFF8-4E95-444F-9914-57CA9C3FEBB4 1 Translation approved 程序 1. 將固態硬碟托架上的螺絲孔與固態硬碟上的螺絲孔對齊。 2. 裝回將固態硬碟固定在固態硬碟托架上的螺絲 3. 將固態硬碟組件上的槽口與固態硬碟插槽上的彈片對齊。 4.
11 Identifier Version Status GUID-8FCF9CF5-19F1-405F-B776-0D5518F058CA 1 Translation approved 卸下固態硬碟(全長度) 註: 拆裝電腦內部元件之前,請先閱讀電腦隨附的安全資訊,並按照拆裝電腦內部元件之前中的步驟進行操作。拆裝電腦內部元 件之後,請按照拆裝電腦內部元件之後中的指示進行操作。如需更多有關安全性的資訊最佳實務,請參閱 Regulatory Compliance (法規遵循) 首頁 www.dell.com/regulatory_compliance。 警示: 固態硬碟極易損壞。持拿固態硬碟時,請務必小心。 警示: 為避免遺失資料,請勿在電腦處於睡眠狀態或開機時卸下固態硬碟。 主題: • • 事前準備作業 程序 Identifier Version Status GUID-ABD50AF6-189E-4C78-9449-F96A3980FFA5 1 Translation approved 事前準備作業 1. 卸下基座護蓋。 2.
1. 螺絲 3. 固態硬碟插槽 3. 從固態硬碟上撕下散熱片。 a. 散熱片 b. 固態硬碟 24 卸下固態硬碟(全長度) 2. 散熱片 4.
12 Identifier Version Status GUID-FB9D849C-C6D8-4D49-8DE4-FE895CD9CCA5 1 Translation approved 裝回固態硬碟(全長) 註: 拆裝電腦內部元件之前,請先閱讀電腦隨附的安全資訊,並按照拆裝電腦內部元件之前中的步驟進行操作。拆裝電腦內部元 件之後,請按照拆裝電腦內部元件之後中的指示進行操作。如需更多有關安全性的資訊最佳實務,請參閱 Regulatory Compliance (法規遵循) 首頁 www.dell.com/regulatory_compliance。 警示: 固態硬碟極易損壞。持拿固態硬碟時,請務必小心。 主題: • • 程序 後續必要作業 Identifier Version Status GUID-9DAA0C26-ED8E-45FD-ADDD-E3B41F8AB8A0 1 Translation approved 程序 1. 將散熱片貼到固態硬碟上。 2. 將固態硬碟依照角度將其推入固態硬碟插槽中。 3.
13 Identifier Version Status GUID-BF7F1ECA-BC62-4949-B1BE-EC64E351719E 2 Translation Validated 卸下喇叭 註: 拆裝電腦內部元件之前,請先閱讀電腦隨附的安全資訊,並按照拆裝電腦內部元件之前中的步驟進行操作。拆裝電腦內部元 件之後,請按照拆裝電腦內部元件之後中的指示進行操作。如需更多有關安全性的資訊最佳實務,請參閱 Regulatory Compliance (法規遵循) 首頁 www.dell.com/regulatory_compliance。 主題: • • 事前準備作業 程序 Identifier Version Status GUID-73200129-C0AE-4659-9587-B21D939FC506 1 Translation approved 事前準備作業 1. 卸下基座護蓋。 2.
1. 喇叭纜線 3. 喇叭 (2) 2. 螺絲 (4) 4.
14 Identifier Version Status GUID-40DC76F7-B3EC-450A-848E-632D68C352E2 2 Translation Validated 裝回喇叭 註: 拆裝電腦內部元件之前,請先閱讀電腦隨附的安全資訊,並按照拆裝電腦內部元件之前中的步驟進行操作。拆裝電腦內部元 件之後,請按照拆裝電腦內部元件之後中的指示進行操作。如需更多有關安全性的資訊最佳實務,請參閱 Regulatory Compliance (法規遵循) 首頁 www.dell.com/regulatory_compliance。 主題: • • 程序 後續必要作業 Identifier Version Status GUID-C8EF587C-6487-4315-9392-1C1F3BEBEF43 1 Translation approved 程序 1. 使用對齊導柱,將喇叭置於手掌墊組件上。 2. 裝回用來將喇叭固定至手掌墊組件的螺絲。 3. 將喇叭纜線穿過手掌墊組件上的固定導軌。 4.
15 Identifier Version Status GUID-4AF7A7F4-79DC-43F4-A4DF-63362F890FB6 2 Translation Validated 卸下無線網卡 註: 拆裝電腦內部元件之前,請先閱讀電腦隨附的安全資訊,並按照拆裝電腦內部元件之前中的步驟進行操作。拆裝電腦內部元 件之後,請按照拆裝電腦內部元件之後中的指示進行操作。如需更多有關安全性的資訊最佳實務,請參閱 Regulatory Compliance (法規遵循) 首頁 www.dell.com/regulatory_compliance。 主題: • • 事前準備作業 程序 Identifier Version Status GUID-D4EA333B-9B68-43C5-885F-F51A977DF7FA 1 Translation approved 事前準備作業 1. 卸下基座護蓋。 2.
1. 螺絲 3. 無線網卡 30 卸下無線網卡 2. 無線網卡托架 4.
16 Identifier Version Status GUID-94E88AEC-6F12-4B0E-AA6A-B28D8E200225 3 Translation Validated 裝回無線網卡 註: 拆裝電腦內部元件之前,請先閱讀電腦隨附的安全資訊,並按照拆裝電腦內部元件之前中的步驟進行操作。拆裝電腦內部元 件之後,請按照拆裝電腦內部元件之後中的指示進行操作。如需更多有關安全性的資訊最佳實務,請參閱 Regulatory Compliance (法規遵循) 首頁 www.dell.com/regulatory_compliance。 主題: • • 程序 後續必要作業 Identifier Version Status GUID-615EDC0E-31FA-481B-A7CE-B737F89CFFAD 1 Translation approved 程序 警示: 為避免無線網卡受損,請勿在其下方放置纜線。 1. 將無線網卡上的槽口對準無線網卡插槽上的彈片,然後將網卡推入插槽中。 2.
17 Identifier Version Status GUID-F98150E9-52A3-4FCD-8420-54A9A2A6DA46 1 Translation Validated 卸下風扇 註: 拆裝電腦內部元件之前,請先閱讀電腦隨附的安全資訊,並按照拆裝電腦內部元件之前中的步驟進行操作。拆裝電腦內部元 件之後,請按照拆裝電腦內部元件之後中的指示進行操作。如需更多有關安全性的資訊最佳實務,請參閱 Regulatory Compliance (法規遵循) 首頁 www.dell.com/regulatory_compliance。 主題: • • 事前準備作業 程序 Identifier Version Status GUID-04B4CED7-4216-4A1A-BE6D-E95645623BFB 1 Translation approved 事前準備作業 1. 卸下基座護蓋。 2.
1. 固定導軌 3. 膠帶 5. 顯卡風扇 (JFAN_2) 2. 觸控螢幕纜線(選用) 4. 風扇纜線 6. 螺絲 (2) 7. 卸下將處理器風扇 (JFAN_1) 固定至主機板的螺絲。 8. 請記下顯示器纜線的佈線方式,然後將纜線從處理器風扇 (JFAN_1) 卸下。 9. 從主機板上拔下處理器風扇 (JFAN_1) 纜線。 10. 將風扇 (JFAN_1) 抬離手掌墊組件。 1. 固定導軌 2.
3. 風扇纜線 5. 螺絲 (2) 34 卸下風扇 4.
18 Identifier Version Status GUID-C3E89978-1994-4C7D-98C9-E51C8651B0A6 1 Translation Validated 裝回風扇 註: 拆裝電腦內部元件之前,請先閱讀電腦隨附的安全資訊,並按照拆裝電腦內部元件之前中的步驟進行操作。拆裝電腦內部元 件之後,請按照拆裝電腦內部元件之後中的指示進行操作。如需更多有關安全性的資訊最佳實務,請參閱 Regulatory Compliance (法規遵循) 首頁 www.dell.com/regulatory_compliance。 主題: • • 程序 後續必要作業 Identifier Version Status GUID-3EEF18DC-5BDA-403B-AB8B-CC2744244898 1 Translation approved 程序 1. 將處理器風扇 (JFAN_1) 上的螺絲孔與手掌墊組件上的螺絲孔對齊。 2. 將處理器風扇 (JFAN_1) 纜線連接至主機板。 3. 將顯示器纜線依照路徑穿越處理器風扇 (JFAN_1) 上的固定導軌。 4.
19 Identifier Version Status GUID-A4C65F77-E1D1-4595-B52B-D281E90F786D 2 Translation Validated 卸下散熱器組件 註: 拆裝電腦內部元件之前,請先閱讀電腦隨附的安全資訊,並按照拆裝電腦內部元件之前中的步驟進行操作。拆裝電腦內部元 件之後,請按照拆裝電腦內部元件之後中的指示進行操作。如需更多有關安全性的資訊最佳實務,請參閱 Regulatory Compliance (法規遵循) 首頁 www.dell.com/regulatory_compliance。 註: 散熱器在正常作業時可能會很熱。讓散熱器有足夠的時間冷卻再觸碰它。 警示: 為確保處理器獲得最佳冷卻效果,請勿碰觸散熱器上的導熱區域。皮膚上的油脂會降低熱脂的導熱能力。 主題: • • 事前準備作業 程序 Identifier Version Status GUID-A5515837-169C-4B52-90CF-AD7FF42B523E 1 Translation approved 事前準備作業 1. 卸下基座護蓋。 2.
a. 散熱器組件 b.
20 Identifier Version Status GUID-9847FD24-88EC-4F5A-BCCF-D9D9830B777A 3 Translation Validated 裝回散熱器組件 註: 拆裝電腦內部元件之前,請先閱讀電腦隨附的安全資訊,並按照拆裝電腦內部元件之前中的步驟進行操作。拆裝電腦內部元 件之後,請按照拆裝電腦內部元件之後中的指示進行操作。如需更多有關安全性的資訊最佳實務,請參閱 Regulatory Compliance (法規遵循) 首頁 www.dell.com/regulatory_compliance。 警示: 散熱器未正確對齊可能會損壞主機板和處理器。 註: 如果要更換主機板或風扇和散熱器組件,請使用套件中隨附的散熱片/散熱膏以確保導熱性。 主題: • • 程序 後續必要作業 Identifier Version Status GUID-E42D8964-1220-43EC-8C1C-5D964FC85D07 1 Translation approved 程序 1. 將散熱器組件上的螺絲孔與主機板上的螺絲孔對齊。 2.
21 Identifier Version Status GUID-AAC0DC5A-1680-492D-804F-52F812D409C2 3 Translation Validated 卸下記憶體模組 註: 拆裝電腦內部元件之前,請先閱讀電腦隨附的安全資訊,並按照拆裝電腦內部元件之前中的步驟進行操作。拆裝電腦內部元 件之後,請按照拆裝電腦內部元件之後中的指示進行操作。如需更多有關安全性的資訊最佳實務,請參閱 Regulatory Compliance (法規遵循) 首頁 www.dell.com/regulatory_compliance。 主題: • • 事前準備作業 程序 Identifier Version Status GUID-61705D5C-707B-4C40-BB62-12D50941FEB7 1 Translation approved 事前準備作業 1. 卸下基座護蓋。 2.
圖 1. 卸下記憶體模組 a. 記憶體模組 b. 固定夾 (2 個) c.
22 Identifier Version Status GUID-1F5023F5-9868-4AAF-A9F5-BFB400CD890A 3 Translation Validated 裝回記憶體模組 註: 拆裝電腦內部元件之前,請先閱讀電腦隨附的安全資訊,並按照拆裝電腦內部元件之前中的步驟進行操作。拆裝電腦內部元 件之後,請按照拆裝電腦內部元件之後中的指示進行操作。如需更多有關安全性的資訊最佳實務,請參閱 Regulatory Compliance (法規遵循) 首頁 www.dell.com/regulatory_compliance。 主題: • • 程序 後續必要作業 Identifier Version Status GUID-01D31343-9248-4391-A6FC-1C2FE832C508 2 Translation Validated 程序 1. 將記憶體模組上的槽口對準記憶體模組插槽上的彈片。 2. 將記憶體模組傾斜推入插槽,並向下按壓記憶體模組,直至其卡入到位。 註: 如果未聽到卡嗒聲,請卸下記憶體模組並重新安裝它。 圖 2. 裝回記憶體模組 1.
3. 彈片 5. 固定夾 Identifier Version Status GUID-32EE4E74-2BBE-4F44-B2EF-263A66006085 1 Translation approved 後續必要作業 1. 裝回電池。 2. 裝回基座護蓋。 42 4.
23 Identifier Version Status GUID-B54497E8-5AD5-4FF9-AD4A-F32FDBEDE1E8 6 Translation Validated 卸下主機板 註: 拆裝電腦內部元件之前,請先閱讀電腦隨附的安全資訊,並按照拆裝電腦內部元件之前中的步驟進行操作。拆裝電腦內部元 件之後,請按照拆裝電腦內部元件之後中的指示進行操作。如需更多有關安全性的資訊最佳實務,請參閱 Regulatory Compliance (法規遵循) 首頁 www.dell.
a. 顯示器纜線托架 b. 螺絲 c. 顯示器纜線 4. 從主機板拔下電源變壓器連接埠纜線、喇叭纜線、鍵盤控制板纜線、觸控墊纜線和觸控螢幕纜線。 1. 電源變壓器連接埠纜線 3. 鍵盤控制板纜線 5. 觸控螢幕纜線(選用) 5. 卸下將主機板固定在手掌墊組件上的螺絲。 6. 將主機板從手掌墊組件抬起取出。 44 卸下主機板 2. 喇叭纜線 4.
a. 主機板 b. 螺絲 (5) c.
24 Identifier Version Status GUID-67274E98-E2F1-4B7B-A903-F38BA6B62028 6 Translation Validated 裝回主機板 註: 拆裝電腦內部元件之前,請先閱讀電腦隨附的安全資訊,並按照拆裝電腦內部元件之前中的步驟進行操作。拆裝電腦內部元 件之後,請按照拆裝電腦內部元件之後中的指示進行操作。如需更多有關安全性的資訊最佳實務,請參閱 Regulatory Compliance (法規遵循) 首頁 www.dell.
1. 將主機板上的螺絲孔與手掌墊組件上的螺絲孔對齊。 2. 裝回將主機板固定至手掌墊組件的螺絲。 3. 將電源變壓器連接埠纜線、喇叭纜線、鍵盤控制板纜線、觸控墊纜線和觸控螢幕纜線連接至主機板。 4. 將顯示器纜線連接至主機板。 5. 將顯示器纜線托架的螺絲孔和主機板上的螺絲孔對齊。 6. 裝回將顯示器纜線固定於主機板的螺絲。 Identifier Version Status GUID-58CC9F44-4CA4-4144-B660-81201CB4C3EF 3 Translation approved 後續必要作業 1. 裝回記憶體模組。 2. 裝回散熱器組件。 3. 裝回風扇。 4. 裝回固態硬碟(半長)。 5. 裝回固態硬碟機(全長)。 6. 裝回硬碟。 7. 裝回無線網卡。 8. 裝回電池。 9.
25 Identifier Version Status GUID-A6840280-9874-4A46-8FC1-B5C2E5EC44B7 1 Translation approved 卸下音效子板 註: 拆裝電腦內部元件之前,請先閱讀電腦隨附的安全資訊,並按照拆裝電腦內部元件之前中的步驟進行操作。拆裝電腦內部元 件之後,請按照拆裝電腦內部元件之後中的指示進行操作。如需更多有關安全性的資訊最佳實務,請參閱 Regulatory Compliance (法規遵循) 首頁 www.dell.com/regulatory_compliance。 主題: • • 事前準備作業 程序 Identifier Version Status GUID-1A94F4CB-9698-41D1-A402-0E69C4373794 1 Translation approved 事前準備作業 1. 卸下基座護蓋。 2. 卸下電池。 3. 卸下無線網卡。 4. 卸下硬碟。 5. 卸下固態硬碟(半長)。 6. 卸下固態硬碟(全長)。 7. 卸下風扇。 8. 卸下散熱器組件。 9. 卸下記憶體模組。 10.
a. 主機板 b. 螺絲 2. 將主機板翻轉過來,然後將音效子板從主機板抬起。 a.
26 Identifier Version Status GUID-43C933EC-ED7A-475D-B51C-78D2EFE6E537 1 Translation approved 裝回音效子板 註: 拆裝電腦內部元件之前,請先閱讀電腦隨附的安全資訊,並按照拆裝電腦內部元件之前中的步驟進行操作。拆裝電腦內部元 件之後,請按照拆裝電腦內部元件之後中的指示進行操作。如需更多有關安全性的資訊最佳實務,請參閱 Regulatory Compliance (法規遵循) 首頁 www.dell.com/regulatory_compliance。 主題: • • 程序 後續必要作業 Identifier Version Status GUID-BEB95E8F-BF55-4C16-A25C-C297305287E1 1 Translation approved 程序 1. 將音效子板上的螺絲孔與主機板上的螺絲孔對齊。 2.
27 Identifier Version Status GUID-30EEBC49-DE3E-4C3F-8226-86CE5F32F388 3 Translation Validated 卸下幣式電池 註: 拆裝電腦內部元件之前,請先閱讀電腦隨附的安全資訊,並按照拆裝電腦內部元件之前中的步驟進行操作。拆裝電腦內部元 件之後,請按照拆裝電腦內部元件之後中的指示進行操作。如需更多有關安全性的資訊最佳實務,請參閱 Regulatory Compliance (法規遵循) 首頁 www.dell.com/regulatory_compliance。 警示: 取出幣式電池會將 BIOS 設定程式重設為預設設定。建議您在取出幣式電池之前先記下 BIOS 設定程式的設定。 主題: • • 事前準備作業 程序 Identifier Version Status GUID-5F1CD825-1F55-440C-9B43-4608E00003F1 1 Translation approved 事前準備作業 1. 卸下基座護蓋。 2. 卸下電池。 3. 卸下無線網卡。 4. 卸下硬碟機。 5.
圖 3. 卸下幣式電池 a. 幣式電池 b. 幣式電池纜線 c.
28 Identifier Version Status GUID-5E22F4A0-F01F-4522-8155-BE22A8CA6E5F 2 Translation Validated 裝回幣式電池 註: 拆裝電腦內部元件之前,請先閱讀電腦隨附的安全資訊,並按照拆裝電腦內部元件之前中的步驟進行操作。拆裝電腦內部元 件之後,請按照拆裝電腦內部元件之後中的指示進行操作。如需更多有關安全性的資訊最佳實務,請參閱 Regulatory Compliance (法規遵循) 首頁 www.dell.com/regulatory_compliance。 主題: • • 程序 後續必要作業 Identifier Version Status GUID-A26355E1-1177-48A1-86DE-85C0637849C0 1 Translation Validated 程序 1. 將幣式電池黏回主機板。 2. 將幣式電池纜線連接至主機板。 3.
29 Identifier Version Status GUID-5AE964CF-7958-4D31-BBA8-155C933167E8 2 Translation Validated 卸下鍵盤 註: 拆裝電腦內部元件之前,請先閱讀電腦隨附的安全資訊,並按照拆裝電腦內部元件之前中的步驟進行操作。拆裝電腦內部元 件之後,請按照拆裝電腦內部元件之後中的指示進行操作。如需更多有關安全性的資訊最佳實務,請參閱 Regulatory Compliance (法規遵循) 首頁 www.dell.com/regulatory_compliance。 主題: • • 事前準備作業 Object Missing Identifier Version Status GUID-40B31D0C-E7CA-4A97-A794-F849A522603A 1 Translation approved 事前準備作業 1. 卸下基座護蓋。 2. 卸下電池。 3. 卸下硬碟。 4.
30 Identifier Version Status GUID-18204C76-DF75-4DB8-BD6F-EFA74576AAD7 2 Translation Validated 裝回鍵盤 註: 拆裝電腦內部元件之前,請先閱讀電腦隨附的安全資訊,並按照拆裝電腦內部元件之前中的步驟進行操作。拆裝電腦內部元 件之後,請按照拆裝電腦內部元件之後中的指示進行操作。如需更多有關安全性的資訊最佳實務,請參閱 Regulatory Compliance (法規遵循) 首頁 www.dell.com/regulatory_compliance。 主題: • • 程序 後續必要作業 Identifier Version Status GUID-86C98AC3-454C-4994-A4B9-54BDDA2343B6 1 Translation approved 程序 1. 將麥拉帶貼到鍵盤上。 2. 將鍵盤上的螺絲孔與手掌墊組件上的螺絲孔對齊。 3. 裝回將鍵盤固定在手掌墊組件上的螺絲。 4. 將麥拉帶黏貼至用來將鍵盤固定至手掌墊組件的螺絲。 5.
31 Identifier Version Status GUID-AB1F153B-621B-42FC-89BE-0E1105FF1786 2 Translation Validated 卸下顯示器組件 註: 拆裝電腦內部元件之前,請先閱讀電腦隨附的安全資訊,並按照拆裝電腦內部元件之前中的步驟進行操作。拆裝電腦內部元 件之後,請按照拆裝電腦內部元件之後中的指示進行操作。如需更多有關安全性的資訊最佳實務,請參閱 Regulatory Compliance (法規遵循) 首頁 www.dell.com/regulatory_compliance。 主題: • • 事前準備作業 程序 Identifier Version Status GUID-20AC9528-8FB8-4DED-BA02-7E26A83E1E41 1 Translation approved 事前準備作業 1. 卸下基座護蓋。 2. 卸下電池。 3.
1. 觸控螢幕纜線(選用) 3. 顯示器纜線托架 5. 顯示器纜線 2. 膠帶 4. 螺絲 4. 翻轉電腦,然後打開顯示器傾斜 90 度。 5. 翻轉電腦,然後將它置於桌面邊緣,以方便觸及顯示器鉸接上的螺絲。 6. 卸下將顯示器鉸接固定在手掌墊組件上的螺絲。 7. 小心地將顯示器組件從手掌墊組件抬起取出 1. 手掌墊組件 3. 顯示器鉸接 (2) 2. 螺絲 (6) 4. 顯示器組件 8.
a.
32 Identifier Version Status GUID-2DF70EB1-9D26-4051-8B7C-FB14A89925D8 2 Translation Validated 裝回顯示器組件 註: 拆裝電腦內部元件之前,請先閱讀電腦隨附的安全資訊,並按照拆裝電腦內部元件之前中的步驟進行操作。拆裝電腦內部元 件之後,請按照拆裝電腦內部元件之後中的指示進行操作。如需更多有關安全性的資訊最佳實務,請參閱 Regulatory Compliance (法規遵循) 首頁 www.dell.com/regulatory_compliance。 主題: • • 程序 後續必要作業 Identifier Version Status GUID-8D2D3846-0F6A-41D2-B78A-2C0234B997D5 1 Translation approved 程序 1. 將手掌墊組件置於桌子的邊緣 , 喇叭朝著桌緣的反方向。 2. 將手掌墊組件上的螺絲孔與顯示器鉸接上的螺絲孔對齊。 3. 裝回將顯示器鉸接固定在手掌墊組件上的螺絲。 4. 貼上膠帶並將觸控螢幕纜線穿過風扇的固定導軌。 5.
33 Identifier Version Status GUID-35D5032D-9652-403C-9A8A-F98FFABA8776 2 Translation Validated 卸下電源變壓器連接埠 註: 拆裝電腦內部元件之前,請先閱讀電腦隨附的安全資訊,並按照拆裝電腦內部元件之前中的步驟進行操作。拆裝電腦內部元 件之後,請按照拆裝電腦內部元件之後中的指示進行操作。如需更多有關安全性的資訊最佳實務,請參閱 Regulatory Compliance (法規遵循) 首頁 www.dell.com/regulatory_compliance。 主題: • • 事前準備作業 程序 Identifier Version Status GUID-EBD7BEA6-36F7-4D5A-B99B-62B06D604F78 1 Translation approved 事前準備作業 1. 卸下基座護蓋。 2. 卸下電池。 3.
a. 螺絲 b. 電源變壓器連接埠 c.
34 Identifier Version Status GUID-A99140DB-7AF3-4218-B305-532FF94DF51D 2 Translation Validated 裝回電源變壓器連接埠 註: 拆裝電腦內部元件之前,請先閱讀電腦隨附的安全資訊,並按照拆裝電腦內部元件之前中的步驟進行操作。拆裝電腦內部元 件之後,請按照拆裝電腦內部元件之後中的指示進行操作。如需更多有關安全性的資訊最佳實務,請參閱 Regulatory Compliance (法規遵循) 首頁 www.dell.com/regulatory_compliance。 主題: • • 程序 後續必要作業 Identifier Version Status GUID-E41EC6BD-B917-481C-8262-5A39672CCE31 1 Translation approved 程序 1. 將電源變壓器連接埠置於手掌墊組件的插槽。 2. 將電源變壓器連接埠纜線穿過手掌墊組件上的固定導軌。 3. 裝回用來將電源變壓器連接埠固定至手掌墊組件的螺絲。 4.
35 Identifier Version Status GUID-2D298405-DB18-4207-B981-B7135F293956 1 Translation Validated 卸下天線蓋 註: 拆裝電腦內部元件之前,請先閱讀電腦隨附的安全資訊,並按照拆裝電腦內部元件之前中的步驟進行操作。拆裝電腦內部元 件之後,請按照拆裝電腦內部元件之後中的指示進行操作。如需更多有關安全性的資訊最佳實務,請參閱 Regulatory Compliance (法規遵循) 首頁 www.dell.com/regulatory_compliance。 主題: • • 事前準備作業 程序 Identifier Version Status GUID-3B715701-D3B2-4853-A349-E449EA773142 1 Translation approved 事前準備作業 1. 卸下基座護蓋。 2. 卸下電池。 3. 卸下無線網卡。 4.
2. 將天線蓋從顯示器組件抬起取出。 圖 5. 卸下天線蓋 a. 顯示器組件 b.
36 Identifier Version Status GUID-CDC36DAD-8593-48BA-A3B1-D9401C9DFE1D 1 Translation Validated 裝回天線蓋 註: 拆裝電腦內部元件之前,請先閱讀電腦隨附的安全資訊,並按照拆裝電腦內部元件之前中的步驟進行操作。拆裝電腦內部元 件之後,請按照拆裝電腦內部元件之後中的指示進行操作。如需更多有關安全性的資訊最佳實務,請參閱 Regulatory Compliance (法規遵循) 首頁 www.dell.com/regulatory_compliance。 主題: • • 程序 後續必要作業 Identifier Version Status GUID-7ACABB91-5AEC-4E93-9AA6-74128A6B65CF 1 Translation approved 程序 1. 將天線蓋裝回顯示器組件上。 2.
37 Identifier Version Status GUID-6C4E9746-B780-409D-B703-9A43273C227D 2 Translation Validated 卸下顯示器鉸接 註: 拆裝電腦內部元件之前,請先閱讀電腦隨附的安全資訊,並按照拆裝電腦內部元件之前中的步驟進行操作。拆裝電腦內部元 件之後,請按照拆裝電腦內部元件之後中的指示進行操作。如需更多有關安全性的資訊最佳實務,請參閱 Regulatory Compliance (法規遵循) 首頁 www.dell.com/regulatory_compliance。 主題: • • 事前準備作業 程序 Identifier Version Status GUID-E8E78492-49AC-44BC-A74F-956C88E9790E 1 Translation approved 事前準備作業 註: 這些說明僅適用於未配備觸控螢幕顯示器的筆記型電腦。 1. 卸下基座護蓋。 2. 卸下電池。 3. 卸下無線網卡。 4. 卸下顯示器組件。 5.
a. 膠帶 b. 顯示器鉸接 (2) 2. 卸下將顯示器鉸接固定在顯示器組件的螺絲。 3. 小心地將顯示器鉸接從顯示器組件抬起取出。 a. 螺絲 (6) b.
38 Identifier Version Status GUID-E3D5A4DB-BAB5-4F6F-B7B6-8BC4EF0CC57D 2 Translation Validated 裝回顯示器鉸接 註: 拆裝電腦內部元件之前,請先閱讀電腦隨附的安全資訊,並按照拆裝電腦內部元件之前中的步驟進行操作。拆裝電腦內部元 件之後,請按照拆裝電腦內部元件之後中的指示進行操作。如需更多有關安全性的資訊最佳實務,請參閱 Regulatory Compliance (法規遵循) 首頁 www.dell.com/regulatory_compliance。 主題: • • 程序 後續必要作業 Identifier Version Status GUID-62496B2B-2D15-4489-9210-F0183C0D0941 1 Translation approved 程序 1. 將顯示器鉸接上的螺絲孔與顯示板上的螺絲孔對齊。 2. 卸下將顯示器鉸接固定在顯示器組件上的螺絲。 3.
39 Identifier Version Status GUID-A84F666A-38B4-4C77-A8DE-7910F5831300 1 Translation Validated 卸下天線模組 註: 拆裝電腦內部元件之前,請先閱讀電腦隨附的安全資訊,並按照拆裝電腦內部元件之前中的步驟進行操作。拆裝電腦內部元 件之後,請按照拆裝電腦內部元件之後中的指示進行操作。如需更多有關安全性的資訊最佳實務,請參閱 Regulatory Compliance (法規遵循) 首頁 www.dell.com/regulatory_compliance。 主題: • • 事前準備作業 程序 Identifier Version Status GUID-44F4081B-579F-4BFF-BE3D-454178B6AA21 1 Translation approved 事前準備作業 註: 這些說明僅適用於未配備觸控螢幕顯示器的筆記型電腦。 1. 卸下基座護蓋。 2. 卸下電池。 3. 卸下無線網卡。 4. 卸下顯示器組件。 5. 卸下天線蓋。 6.
1. 膠帶 3. 螺絲 (4) 5. 顯示器組件 70 卸下天線模組 2. 天線纜線 4.
40 Identifier Version Status GUID-29CD5413-5042-412F-825D-11E3CCAAFC74 1 Translation Validated 裝回天線模組 註: 拆裝電腦內部元件之前,請先閱讀電腦隨附的安全資訊,並按照拆裝電腦內部元件之前中的步驟進行操作。拆裝電腦內部元 件之後,請按照拆裝電腦內部元件之後中的指示進行操作。如需更多有關安全性的資訊最佳實務,請參閱 Regulatory Compliance (法規遵循) 首頁 www.dell.com/regulatory_compliance。 主題: • • 程序 後續必要作業 Identifier Version Status GUID-DEA76A30-C614-4FE4-B140-18A4819C281D 1 Translation approved 程序 1. 將天線模組上的螺絲孔與顯示器組件上的螺絲孔對齊。 2. 裝回將天線模組固定至顯示器組件的螺絲。 3.
41 Identifier Version Status GUID-740BADE7-E98C-41E6-A2C7-D807C0482F9A 1 Translation Validated 卸下手掌墊組件 註: 拆裝電腦內部元件之前,請先閱讀電腦隨附的安全資訊,並按照拆裝電腦內部元件之前中的步驟進行操作。拆裝電腦內部元 件之後,請按照拆裝電腦內部元件之後中的指示進行操作。如需更多有關安全性的資訊最佳實務,請參閱 Regulatory Compliance (法規遵循) 首頁 www.dell.com/regulatory_compliance。 主題: • • 事前準備作業 程序 Identifier Version Status GUID-24F8FAEC-9DF2-4EBD-8D07-0D415CC546A7 1 Translation approved 事前準備作業 1. 卸下基座護蓋。 2. 卸下電池。 3. 卸下記憶體模組。 4. 按照「卸下硬碟」中程序的步驟 1 至步驟 4 操作。 5. 卸下無線網卡。 6. 卸下喇叭。 7. 卸下散熱器組件。 8. 卸下風扇。 9.
1.
42 Identifier Version Status GUID-C338CD8A-D6B9-47AE-9629-3FBE505948D9 1 Translation Validated 裝回手掌墊組件 註: 拆裝電腦內部元件之前,請先閱讀電腦隨附的安全資訊,並按照拆裝電腦內部元件之前中的步驟進行操作。拆裝電腦內部元 件之後,請按照拆裝電腦內部元件之後中的指示進行操作。如需更多有關安全性的資訊最佳實務,請參閱 Regulatory Compliance (法規遵循) 首頁 www.dell.
43 Identifier Version Status GUID-F5899359-C2E1-41C0-9663-4C79969506EB 14 Translation Validated 更新 BIOS 當有可用更新或更換主機板時,可能需要更新 BIOS。若要更新 BIOS: 1. 開啟您的電腦。 2. 請前往 www.dell.com/support。 3. 按一下 Product support (產品支援),輸入您電腦的服務標籤,然後按一下 Submit (提交)。 註: 如果您沒有服務標籤,請使用自動偵測功能或手動瀏覽您的電腦型號。 4. 按一下 Drivers & downloads (驅動程式與下載) > Find it myself (自行尋找)。 5. 選擇您的電腦上安裝的作業系統。 6. 向下捲動頁面,並展開 BIOS。 7. 按一下 Download (下載)以下載您電腦最新版本的 BIOS。 8. 下載完成後,導覽至儲存 BIOS 更新檔的資料夾。 9.
44 Identifier Version Status GUID-AF18382F-D265-43C2-85DA-28FFB5875F37 16 Translation Validated 獲得幫助和聯絡 Dell 公司 自助資源 您可以透過下列自助資源取得 Dell 產品和服務的資訊和協助。 表 1. 自助資源 自助資源 資源位置 有關 Dell 產品和服務的資訊 www.dell.com My Dell 秘訣 連絡支援 在 Windows 搜尋中,輸入 Contact Support,然後按下 Enter 鍵。 作業系統的線上說明 www.dell.com/support/windows www.dell.com/support/linux 故障排除資訊、使用手冊、設定指示、產品規格、技術說明部落 www.dell.com/support 格、驅動程式、軟體更新等資源 Dell 知識庫的文章為您解答各種不同的電腦疑問。 1. 請前往 https://www.dell.com/support/home/? app=knowledgebase。 2.