Můj Dell a já Pro počítače řad Inspiron, G, XPS a Alienware May 2020 Rev.
Poznámky, upozornění a varování POZNÁMKA: POZNÁMKA označuje důležité informace, které umožňují lepší využití produktu. VÝSTRAHA: UPOZORNĚNÍ varuje před možným poškozením hardwaru nebo ztrátou dat a obsahuje pokyny, jak těmto problémům předejít. VAROVÁNÍ: VAROVÁNÍ upozorňuje na potenciální poškození majetku a riziko úrazu nebo smrti. © 2011-2020 Dell Inc. nebo dceřiné společnosti Všechna práva vyhrazena. Dell, EMC a ostatní ochranné známky jsou ochranné známky společnosti Dell Inc.
Obsah Kapitola 1: Nastavení počítače.......................................................................................................... 7 Připojení k internetu...............................................................................................................................................................7 Připojení k internetu prostřednictvím sítě LAN............................................................................................................
Paměťový modul..................................................................................................................................................................20 Základní deska......................................................................................................................................................................20 Čipová sada...........................................................................................................................................
Visual Graphics Array (VGA)..............................................................................................................................................38 Digital Visual Interface (DVI).............................................................................................................................................. 38 Konektor DisplayPort................................................................................................................................................
Konfigurace chování tlačítka napájení......................................................................................................................... 57 Dell Power Manager...................................................................................................................................................... 57 Zlepšení výdrže baterie.......................................................................................................................................................
1 Nastavení počítače Postup při nastavení se u jednotlivých počítačů liší. Potřebujete-li specifické pokyny, jak nastavit svůj počítač nebo tablet, přečtěte si Quick Start Guide (stručnou úvodní příručku) dodávanou s počítačem, případně navštivte stránku Setup and Specifications (Nastavení a parametry) na adrese www.dell.com/support. Připojení k internetu Počítač lze připojit k internetu prostřednictvím kabelu, technologie DSL, vytáčeného připojení nebo připojení WWAN.
2. Klikněte na síť, ke které se chcete připojit. 3. Klepněte na položku Connect (Připojit). POZNÁMKA: Pokud se zobrazí výzva, zadejte heslo k síti. Heslo k síti mohlo být určeno při nastavení směrovače. Směrovač může být také přednastaven výchozím heslem k síti. Další podrobnosti získáte od výrobce směrovače. 4. Zapněte či vypněte sdílení souborů (volitelné).
Konfigurace 5.1kanálového a 7.1kanálového zvuku Nakonfigurujte počítač tak, aby poskytoval vícekanálový zvuk. Windows 10 a 8.1 1. Zadejte do pole pro hledání text Zvuk. POZNÁMKA: Chcete-li v systému Windows 10 zobrazit pole hledání, klikněte nebo klepněte na ikonu hledání. V systému Windows 8.1 zobrazíte pole hledání pomocí ovládacího tlačítka Hledání. 2. Klikněte nebo klepněte na možnost Spravovat zvuková zařízení. 3. Na kartě Přehrávání klikněte nebo klepněte na možnost Reproduktory nebo sluchátka. 4.
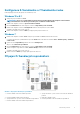
Připojení 7.1kanálových reproduktorů Obrázek 2. Připojení 7.1kanálových reproduktorů 1. Konektor zadního zvukového kanálu na počítači 3. 5. 7. 9. Konektor bočního zvukového kanálu na počítači Kabel pro 7.1kanálový zvuk Konektor předního zvukového kanálu na reproduktoru Konektor bočního zvukového kanálu na reproduktoru 2. Výstup středového / prostorového LFE zvukového kanálu na počítači 4. Konektor předního kanálu zvuku na počítači 6. Výstup středového / prostorového LFE kanálu na reproduktoru 8.
Windows 7 1. Klikněte na možnosti Start > Zařízení a tiskárny. 2. Klikněte na tlačítko Přidat tiskárnu. Objeví se okno Přidat tiskárnu. 3. Postupujte podle pokynů na obrazovce. POZNÁMKA: Při přidávání tiskárny můžete být vyzváni k instalaci ovladače tiskárny. Použijte média s ovladači k tiskárně nebo si stáhněte ovladače z webové stránky výrobce tiskárny. Další informace o nastavení tiskárny naleznete v dokumentaci, která byla dodána společně s vaší tiskárnou.
• Second Screen only (Pouze druhá obrazovka) – použije se pouze druhá obrazovka a na první se nezobrazí nic. Primární monitor se vypne a použije se pouze druhý monitor. Windows 8 Režim Windows 1. 2. 3. 4. Přejetím zprava nebo posunem kurzoru do jednoho z pravých rohů vyvolejte lištu Windows Charms. Zvolte možnost Devices (Zařízení). Zvolte možnost Second Screen (Druhá obrazovka).
2 Informace o počítači Tato část obsahuje podrobnější informace o součástech, které se nalézají ve vašem počítači. Napájecí adaptér Napájecí adaptéry se používají k napájení přenosných počítačů, tabletů a některých typů stolních počítačů. Sada napájecího adaptéru Dell obsahuje napájecí adaptér a napájecí kabel. Výkon napájecího adaptéru (90 W, 65 W atd.) se liší podle zařízení, pro které je určen. Typ napájecího kabelu závisí na zemi, do níž je napájecí adaptér zaslán.
Knoflíková baterie Knoflíková baterie napájí čip CMOS (Complementary Metal-Oxide Semiconductor), když je počítač vypnutý. Čip CMOS obsahuje datum a čas a další informace o konfiguraci počítače. Za normálních podmínek je životnost knoflíkové baterie několik let. Životnost knoflíkové baterie je ovlivněna typem základní desky, teplotou, dobou, po kterou je počítač vypnutý atd. Dotyková podložka Dotyková podložka je k dispozici u většiny notebooků a poskytuje stejné funkce jako myš.
POZNÁMKA: Funkce Wireless display nemusí být podporována na všech počítačích. Další informace naleznete na adrese www.intel.com. Kamera Webová kamera Webová kamera umožňuje komunikovat prostřednictvím videokonverzace, pořizovat fotografie a nahrávat videa. 3D kamera 3D kamera vám umožňuje zachycovat a streamovat trojrozměrné obrázky. Prostřednictvím zabudovaných čidel je tak možné vnímat vzdálenost, velikost či rozměry objektů.
Podsvícení klávesnice Podsvícení, které je k dispozici na některých fyzických klávesnicích, osvětluje symboly na klávesách, takže klávesnici můžete používat i ve tmě. Podsvícení můžete zapnout ručně, nebo můžete podsvícení nakonfigurovat tak, aby se v tmavém prostředí spouštělo automaticky. Podsvícené klávesnice na noteboocích Dell disponují různými režimy podsvícení. Mezi jednotlivými stavy podsvícení můžete přepínat stisknutím klávesy Fn a šipky doprava.
Typy připojení klávesnice Klávesnice lze k počítači připojovat kabelem (kabelová klávesnice) nebo prostřednictvím bezdrátových signálů (bezdrátová klávesnice). Kabelová klávesnice Kabelové klávesnice jsou k počítači připojeny prostřednictvím kabelu (obvykle USB) a nevyžadují další zdroj energie, jako jsou baterie. Bezdrátové připojení Bezdrátové klávesnice se k počítači připojují prostřednictvím rádiové frekvence (RF) nebo technologie Bluetooth (BT).
Interní paměťová zařízení Interní paměťová zařízení jsou nainstalována v počítači a obecně je nelze odstranit z počítače, dokud je počítač zapnut. Nejčastější interní úložná zařízení jsou pevné disky a disky SSD. Pevné disky a disky SSD používají k přenosu informací rozhraní SATA. Disky SSD se také fyzicky podobají pevným diskům, a proto jsou kompatibilní s existujícími počítači. Pevné disky obsahují diskové plotny.
Tabulka 1.
Tabulka 1. Příklady běžných typů paměťových karet (pokračování) Memory Stick (MS) / Memory Stick Pro (MS Pro) Smart Media / Smart Media XD Paměťový modul Na paměťový modul se ukládají dočasná data, která počítač potřebuje k provádění úloh. Než budete moci použít některý soubor nebo aplikaci, musí být načteny do paměťových modulů. Paměťové moduly se člení do kategorií na základě jejich kapacity (udávané v GB) a taktu (udáván v MHz). Vyšší takt a množství paměti obvykle znamená vyšší výkon.
Procesory obvykle dělíme dle: • • • počtu procesorových jader, rychlosti či frekvence měřené v gigahertzech (GHz) nebo megahertzech (MHz), paměti procesoru, také zvané mezipaměť (cache). Tyto aspekty také určují výkon procesoru. Vyšší hodnoty obvykle značí vyšší výkon. Některé procesory mohou být integrovány na základní desce. Mezi výrobce procesorů patří společnosti Intel, AMD, Qualcomm a další.
• • Integrované – jedná se o grafické karty, které jsou integrovány na základní desce. U některých počítačů je grafická karta integrována v procesoru. Integrované grafické karty obvykle sdílejí systémovou paměť (RAM) a mohou ke zpracování grafiky také využívat procesor. Čip APU (Accelerated Processing Unit) je integrovaný ve stejném pouzdře jako procesor, takže zajišťuje rychlejší přenos dat a snižuje spotřebu energie. Samostatné – samostatné grafické karty jsou na základní desce nainstalovány zvlášť.
POZNÁMKA: Chcete-li využívat 5.1kanálový nebo 7.1kanálový zvuk, musí jej vaše zvuková karta a reproduktory podporovat. 2.1kanálový zvuk 2.1 označuje systém se dvěma reproduktory (levý a pravý kanál) a jedním subwooferem. Zvuk 5.1 Číslo 5.1 popisuje počet zvukových kanálů ve většině konfigurací prostorového zvuku. Zvukový systém 5.1 využívá pět hlavních zvukových kanálů (přední levý, přední pravý, středový, levý prostorový a pravý prostorový) a jeden nízkofrekvenční zvukový kanál. Zvuk 7.1 Číslo 7.
Bezdrátová místní síť Zařízení jsou připojena bezdrátově a síť pokrývá relativně malou oblast, obvykle v rámci domu nebo budovy. K sestavení bezdrátového připojení v síti WLAN obvykle slouží technologie Wi-Fi (standard 802.11x; písmeno x zastupuje různé internetové protokoly standardu 802.11). Bezdrátová síť WWAN WWAN je též známá jako mobilní širokopásmové připojení. Tuto službu obvykle poskytují telefonní společnosti pro použití na mobilních zařízeních.
Bluetooth Technologie Bluetooth slouží k připojení dalších zařízení s technologií Bluetooth k počítači nebo tabletu na krátkou vzdálenost. Mezi zařízení vybavená technologií Bluetooth mohou patřit telefony, sluchátka, klávesnice, myši, tiskárny atd. Adaptéry Bluetooth mohou být interní (jako rozšiřující karty nebo jsou součástí základní desky) nebo externí. Sofistikovanější směrovače, jako jsou podnikové směrovače, slouží k připojení velkých podniků nebo sítí poskytovatelů internetových služeb.
3 Používání počítače Nabíjení baterie Chcete-li nabít baterii ve svém počítači nebo tabletu, připojte k nim napájecí adaptér. Nabíjení baterie bude probíhat při používání počítače/tabletu, nebo pokud je zařízení vypnuto. Vnitřní obvody baterie chrání baterii před přílišným nabitím. POZNÁMKA: Pokud se baterie nachází v horkém prostředí a příliš se zahřívá, nemusí se po připojení napájecího adaptéru nabíjení spustit. Než budete v nabíjení pokračovat, nechejte baterii vychladnout.
Tabulka 2. Seznam klávesových zkratek (pokračování) F10 Aktivuje v aktivním programu řádek nabídek. Kombinace kláves Ctrl a C Kopíruje vybranou položku. Kombinace kláves Ctrl a X Vyjme vybranou položku. Kombinace kláves Ctrl a V Vloží vybranou položku. Kombinace kláves Ctrl a Z Vrátí akci zpět. Kombinace kláves Ctrl a A Vybere všechny položky v dokumentu nebo v okně. Kombinace kláves Ctrl a F4 Uzavře aktivní okno (v programech, které umožňují mít zároveň otevřeno několik dokumentů).
Tabulka 3. Seznam klávesových zkratek (pokračování) Kombinace kláves Ctrl a - Oddálí velké množství položek na obrazovce, jako jsou např. aplikace připnuté na Úvodní obrazovce. Kombinace kláves Windows a C Otevře postranní panel s ovládacími tlačítky. Kombinace kláves Windows a F Otevře ovládací tlačítko Hledání k vyhledávání souborů na počítači. Kombinace kláves Windows a H Otevře ovládací tlačítko Hledání. Kombinace kláves Windows a I Otevře ovládací tlačítko Nastavení.
3. Pokud je okno Ovládací panely přepnuto do zobrazení Kategorie, klikněte nebo klepněte na rozevírací nabídku Zobrazit podle: a vyberte možnost Malé ikony nebo Velké ikony. 4. Klikněte nebo klepněte na možnost Klávesnice. 5. Změňte příslušná nastavení klávesnice a kliknutím nebo klepnutím na tlačítko OK nastavení uložte a zavřete okno. Windows 7 1. Klikněte na tlačítka Start > Ovládací panely. 2.
POZNÁMKA: Nastavení gest na dotykové podložce lze změnit dvojitým kliknutím na ikonu dotykové podložky v oznamovací oblasti. Váš počítač může podporovat gesta pro posouvání, zvětšování, otáčení, listování a rychlé spuštění. Tabulka 4. Seznam gest dotykové podložky Posunování Zaměření – slouží ke změně zaměření na vybraný objekt v případě, že objekt není viditelný celý. Po vybraném objektu se přemístíte, pohnete-li dvěma prsty v požadovaném směru.
Tabulka 4. Seznam gest dotykové podložky (pokračování) Listování Listujte obsahem dopředu nebo dozadu. Rychlým pohybováním třemi prsty doleva či doprava lze listovat obsahem dopředu nebo dozadu. Rychlé spuštění Otevře vaše oblíbené položky. Klepnutím třemi prsty na dotykovou podložku spustíte přednastavenou aplikaci. POZNÁMKA: K výběru aplikace, která má být spuštěna, použijte nástroj ke konfiguraci dotykové podložky.
Tabulka 5. Seznam gest pro dotykovou obrazovku (pokračování) Chcete-li zmenšit obsah, položte na dotykovou obrazovku dva prsty a stáhněte je k sobě. Funkce Dwell Kontextovou nabídku otevřete klepnutím na položku na obrazovce a jejím podržením. Listování Rychle pohybujte prstem požadovaným směrem, což vám umožní listovat obsahem v aktivním okně jako v knize. Listování funguje i při svislém procházení obsahu, jako jsou například fotografie nebo skladby v seznamu stop.
Tabulka 5. Seznam gest pro dotykovou obrazovku (pokračování) Svislý posuv – umožňuje vám přejít v aktivním okně nahoru nebo dolů. Posunování svisle spustíte pohybováním prstu nahoru nebo dolů. Vodorovný posuv – umožňuje vám přejít v aktivním okně vlevo nebo vpravo. Posunování vodorovně spustíte pohybováním prstu doprava nebo doleva.
POZNÁMKA: Na vašem počítači nebo tabletu a zařízení se může zobrazit přístupový kód. Jakmile je připojení zařízení dokončeno, zobrazí se potvrzující zpráva. Windows 8.1 1. Zapněte v počítači nebo tabletu i v příslušném zařízení funkci Bluetooth. Zapněte v notebooku Dell bezdrátové připojení, abyste mohli povolit připojení Bluetooth. POZNÁMKA: Chcete-li získat postup zapnutí funkce Bluetooth ve svém zařízení, přečtěte si dokumentaci dodanou se zařízením. 2.
Výběr kamery a mikrofonu Je-li váš počítač vybaven více webovými kamerami nebo mikrofony (integrovanými nebo externími), můžete si s pomocí aplikace Dell Webcam Central zvolit, kterou webovou kameru a mikrofon chcete používat. 1. 2. 3. 4. 5. 6. Otevřete aplikaci Dell Webcam Central. Klikněte nebo klepněte na rozevírací šipku vedle ikony kamery v levém dolním rohu okna. Klikněte nebo klepněte na požadovanou kameru. Klikněte nebo klepněte na kartu Record Videos (Záznam videí).
4 Porty a konektory Nastavení zvuku Zvukové konektory vám umožňují připojovat reproduktory, sluchátka, mikrofony, zvukové systémy, zesilovače nebo zvukový výstup televize. POZNÁMKA: Váš počítač nemusí disponovat všemi konektory zvuku. Chcete-li získat informace o dostupných portech v počítači nebo tabletu, přečtěte si Quick Start Guide (stručnou úvodní příručku) dodávanou s počítačem, případně navštivte stránku Setup and Specifications (Nastavení a parametry) na adrese www.dell.com/support.
Tabulka 6. Typy zvukových portů (pokračování) Port prostorového bočního zvukového kanálu – slouží k připojení levého/pravého reproduktoru. Port RCA S/PDIF – slouží k přenosu digitálního zvuku, aniž by bylo třeba provádět konverzi zvuku na analogový signál. Optický port S/PDIF – slouží k přenosu digitálního zvuku pomocí optických signálů, aniž by bylo třeba provádět konverzi zvuku na analogový signál. USB Rozhraní USB (Universal Serial Bus) slouží k připojení periferních zařízení k počítači nebo tabletu.
Tabulka 8. Standardy USB (pokračování) USB 3.1 1. generace Tento standard je označován také jako připojení SuperSpeed USB. Tento port podporuje periferní zařízení, jako jsou například paměťová zařízení, tiskárny atp. Poskytuje rychlost přenosu dat až 5 Gb/s. Systémy se staršími porty USB 3.0 jsou nyní USB 3.1 1. generace. USB 2.0 Tento standard je označován také jako připojení USB Hi-Speed. Takto získáte širší pásmo pro multimediální a paměťová využití. Standard USB 2.
Konektor DisplayPort Rozhraní DisplayPort zajišťuje digitální připojení mezi počítačem a zobrazovacími zařízeními, jako jsou monitory, projektory atp. Podporovány jsou obrazové i zvukové signály. Rozhraní DisplayPort bylo navrženo specificky pro používání s počítačovými monitory. Mini DisplayPort Rozhraní Mini-DisplayPort je menší verze portu DisplayPort. POZNÁMKA: Rozhraní DisplayPort a Mini DisplayPort jsou vzájemně kompatibilní, ale velikost portů a konektorů se liší.
5 Software a aplikace Produkty Absolute Produkty Absolute zajišťují trvalá řešení koncového zabezpečení a posouzení datových rizik pro počítače, tablety a chytré telefony. Technologie Persistence vám umožňuje konzistentně posuzovat rizika, zabezpečit životní cyklus jednotlivých zařízení a včas reagovat na události zabezpečení. POZNÁMKA: Technologie Persistence nemusí být podporována na všech počítačích.
• • • Windows 10 – na Úvodní obrazovce klikněte nebo klepněte na ikonu Dell Help & Support. Windows 8.1 – na Úvodní obrazovce klikněte nebo klepněte na ikonu My Dell. Windows 7 – klikněte na tlačítka Start > Všechny programy > Dell > My Dell > My Dell. Kontrola počítače POZNÁMKA: Nástroj PC checkup je k dispozici pouze u vybraných modelů. Nástroj PC Checkup slouží ke kontrole používání pevného disku, k diagnostice hardwaru a ke sledování změn provedených v počítači.
Tabulka 9. Nabídky obchodu Solution Station (pokračování) Typ Nabídky Přenos souborů a zálohování dat Řešení potíží a oprava Zrychlení počítače Odstraňování virů a spywaru Obnovení dat Chyby počítače a řešení potíží Chyby sítě a řešení potíží Quickset Nástroj QuickSet zahrnuje sadu softwarových aplikací, které zajišťují přenosným počítačům Dell vylepšené funkce. Tento nástroj poskytuje snadný přístup k různým funkcím, které za normálních okolností vyžadují několik kroků.
Tabulka 10. Klávesové zkratky pro 3D hry (pokračování) Klávesy Popis Funkce POZNÁMKA: Herní výkon může v režimu HD 3D klesnout, i když je aplikace 3DTV Play zakázána. Chcete-li výkon maximalizovat, vyberte režim HD nebo SD, když je aplikace 3DTV Play zakázána. Zvyšuje hloubku 3D Zvyšuje hloubku 3D v právě spuštěné hře. Snižuje hloubku 3D Snižuje hloubku 3D v právě spuštěné hře. Zachytí 3D snímek obrazovky aktuální hry a soubor uloží do složky Dokumenty.
6 Obnovení operačního systému Možnosti obnovení systému VÝSTRAHA: Použití aplikace Dell Factory Image Restore nebo disku operačního systému trvale odstraní všechny soubory v počítači. Pokud to je možné, vytvořte si zálohu dat, než přistoupíte k těmto možnostem. Operační systém vašeho počítače lze obnovit prostřednictvím jedné z následujících možností: Tabulka 11. Možnosti obnovení systému Možnost Popis Dell Backup and Recovery Tuto možnost použijte jako první řešení při obnovování operačního systému.
Tabulka 12. Funkce aplikace Dell Backup and Recovery (pokračování) Funkce Basic Premium Vytvoření kompletní zálohy systému (včetně aplikací a nastavení) spojení několika záloh a archivaci starých záloh, Zálohování a obnova souborů dle typu Dell Backup and Recovery Basic Spuštění aplikace Dell Backup and Recovery Windows 10 1. Klikněte na tlačítko Start a do vyhledávacího pole zadejte slovo Zálohování. 2. Klikněte na ikonu aplikace Dell Backup and Recovery a postupuje podle pokynů na obrazovce.
Obnovení dat ze zálohy systému 1. Spusťte aplikaci Dell Backup and Recovery. 2. Klikněte na dlaždici Backup (Záloha) a vyberte možnost System backup (Záloha systému). 3. Postupujte podle pokynů na obrazovce. Obnovení konkrétních souborů či složek z kompletní zálohy systému 1. 2. 3. 4. Spusťte aplikaci Dell Backup and Recovery. Klikněte nebo klepněte na dlaždici Recovery (Obnovení) a vyberte možnost Data Recovery (Obnovení dat). Klikněte nebo klepněte na položku Yes, Continue (Ano, pokračovat).
2. Jakmile se zobrazí logo DELL, stiskněte několikrát klávesu F8, čímž získáte přístup k oknu Rozšířené možnosti spuštění. POZNÁMKA: Jestliže čekáte příliš dlouho a zobrazí se logo operačního systému, počkejte na zobrazení plochy systému Windows. Poté počítač restartujte a opakujte akci. 3. Vyberte možnost Opravit tento počítač. Zobrazí se okno Možnosti obnovení systému. 4. Vyberte rozložení klávesnice a klikněte nebo klepněte na možnost Další. 5. Přihlaste se k místnímu počítači. 6.
Windows 8.1 Používání nástroje Obnovení systému 1. 2. 3. 4. 5. Klikněte nebo klepněte na možnost Nastavení v postranním panelu ovládacích tlačítek. Klikněte nebo klepněte na možnost Ovládací panely. Zadejte do pole pro hledání text Obnovení. Klikněte nebo klepněte na možnost Obnovení a poté klikněte nebo klepněte na možnost Spustit nástroj Obnovení systému. Postupujte podle pokynů na obrazovce. Vrácení posledního obnovení systému 1. 2. 3. 4. 5.
1. Vložte disk s operačním systémem a restartujte počítač. 2. Jakmile se zobrazí logo DELL, ihned stiskněte klávesu F12, čímž přejdete do nabídky spuštění. POZNÁMKA: Jestliže čekáte příliš dlouho a zobrazí se logo operačního systému, počkejte na spuštění operačního systému počítače. Poté počítač restartujte a pokus opakujte. 3. Vyberte v seznamu jednotku CD/DVD a stiskněte Enter. 4. Postupujte podle pokynů na obrazovce.
7 Řešení potíží Základní kroky při řešení potíží V této části naleznete základní kroky, které lze použít k řešení běžných potíží s počítačem. • • • • • • • Ověřte, že je počítač zapnutý a že všechny komponenty jsou napájeny. Ověřte, že jsou všechny kabely pevně připojeny k příslušným portům. Ověřte, že kabely nejsou poškozené ani roztřepené. Ověřte, že se na konektorech nenachází žádné ohnuté ani zlomené kolíky. Restartujte počítač a zkontrolujte, zda problém přetrvává.
Enhanced PSA Pomocí diagnostického testu ePSA můžete diagnostikovat různé hardwarové problémy. Test ePSA se zaměřuje na zařízení, jako je základní deska, klávesnice, displej, paměť, pevný disk a další. POZNÁMKA: Test ePSA nemusí být podporován na všech počítačích. Úvodní obrazovka testu ePSA je rozdělena do tří oblastí: • • Devices window (Okno zařízení) – nachází se na levé straně úvodní obrazovky testu ePSA. Zobrazuje všechna zařízení v počítači a umožňuje vybrat požadovaná zařízení.
Jestliže dochází k problémům s pamětí, stiskněte klávesu . V ostatních případech stisknutím klávesy dokončete test. Jestliže dojde během testu ePSA k výskytu chyb, objeví se na obrazovce následující zpráva: Testing completed. One or more errors were detected. Chyby, ke kterým během testů ePSA došlo, zobrazí karta Event Log (Protokol událostí) v okně Status (Stav). Kódy zvukových signálů Dojde-li k chybě nebo problému, může počítač během spouštění vydávat série zvukových signálů.
8 Systém BIOS V systému BIOS jsou uloženy všechny informace o hardwaru počítače. Tyto informace jsou při zavádění systému předány operačnímu systému. Program pro nastavení systému BIOS umožňuje měnit základní hardwarové nastavení uložené v systému BIOS. Program pro nastavení systému BIOS lze používat k: • • • Nastavení nebo změně uživatelsky volitelných možností, jako je uživatelské heslo. Zjištění, jaká zařízení jsou v počítači nainstalovaná, jako je množství paměti, typ pevného disku atd.
Téměř všechny základní desky stolních počítačů obsahují spojku, která slouží k vymazání nastavení systému CMOS společně s heslem k systému BIOS. Umístění této spojky se liší v závislosti na základní desce. Vyhledejte spojku poblíž baterie paměti CMOS. Obvykle je označena CLR, CLEAR, CLEAR CMOS atp. Postup vymazání hesel a nastavení paměti CMOS naleznete v servisní příručce k počítači na adrese www.dell.com/support.
9 Nápověda a kontakt na společnost Dell Zdroje pro vyhledání nápovědy Informace a nápovědu k produktům a službám Dell můžete získat v těchto zdrojích samoobslužné pomoci. Tabulka 14. Zdroje pro vyhledání nápovědy Zdroje pro vyhledání nápovědy Umístění zdrojů Informace o produktech a službách společnosti Dell www.dell.com Můj Dell Tipy Kontaktujte oddělení podpory V hledání Windows zadejte text Contact Support a poté stiskněte klávesu Enter. Nápověda k operačnímu systému online www.dell.
10 Reference Údržba počítače Chcete-li předejít běžným potížím s počítačem, doporučujeme provádět následující úkony: • • • • • • Zajistěte počítači přímý přístup ke zdroji energie, dostatečné větrání a umístěte jej na rovný povrch. Nezakrývejte větrací otvory. Dbejte na to, aby se do nich nedostaly žádné předměty a aby se v nich neukládal prach. Pravidelně zálohujte data. Pravidelně provádějte vyhledávání virů.
Windows 7 1. Klikněte na nabídku Start > Ovládací panely > Možnosti napájení. 2. Ze seznamu dostupných možností můžete vybrat schéma odpovídající využití počítače. 3. Chcete-li upravit nastavení napájení, klikněte na možnost Změnit nastavení plánu. Konfigurace chování tlačítka napájení Chcete-li konfigurovat chování tlačítka napájení: Windows 10 a 8.1 1. Klikněte nebo klepněte na tlačítka Start > Všechny aplikace. 2. V části Systém Windows klikněte nebo klepněte na možnost Ovládací panely.
• Nastavení obrazovky s vysokým jasem, 3D spořiče obrazovky nebo jiné programy s vysokou spotřebou energie, jako jsou složité 3D grafické aplikace a hry. Výkon baterie lze zlepšit: • • • Připojením notebooku k elektrické zásuvce tak často, jak je to možné. Životnost baterie se snižuje, čím častěji se baterie vybíjí a nabíjí. Konfigurace nastavení řízení spotřeby pomocí příslušných možností systému Microsoft Windows a optimalizace spotřeby počítače (viz Správa napájení).
Migrace z operačního systému Windows na jeho novější verzi Při migraci na novější operační systém nahlédněte do pokynů společnosti Microsoft týkajících se migrace z jednoho operačního systému na jiný. Další informace naleznete na stránce www.microsoft.com. Pokyny k dodržování ergonomie VÝSTRAHA: Nesprávné nebo dlouhodobé používání klávesnice může vést k újmě na zdraví. VÝSTRAHA: Sledování obrazovky monitoru delší dobu namáhá zrak.
1. Monitor v úrovni očí nebo níže 3. Stojan monitoru 5. Ruce na úrovni stolu 2. Monitor a klávesnice umístěny přímo před uživatelem 4. Chodidla rovně na podlaze 6. Zápěstí volně a rovně POZNÁMKA: Nejnovější pokyny k ergonomii naleznete na adrese www.dell.com/regulatory_compliance. Společnost Dell a životní prostředí Ekologie nepřináší omezení, ale možnosti. Jedná se o úsilí najít lepší směr. Každý den máte příležitost dát ekologii větší prostor.
Tabulka 15. Společnost Dell a životní prostředí (pokračování) zodpovědné získávání zdrojů je pro vás důležité, takže bambus na obaly získáváme z lesů daleko od oblastí, kde žijí pandy. Připojte se k programu Plant a tree Společnost Dell vytvořila program Plant a Tree (Zasaď strom) s cílem pomoci vám kompenzovat skleníkové plyny, které vaše počítačové vybavení vyprodukuje. Pomůžete tak budovat zdravější planetu – strom po stromu. Více informací naleznete na stránkách www.dell.com/plantatree.