Eu și computerul meu Dell Pentru computerele Inspiron, Seria G, XPS și Alienware May 2020 Rev.
Notă, atenționări și avertismente NOTIFICARE: O NOTĂ indică informații importante care vă ajută să utilizați mai bine produsul dvs. AVERTIZARE: O ATENȚIONARE indică o deteriorare potențială a componentelor hardware sau o pierdere de date și vă comunică cum să evitați problema. AVERTISMENT: Un AVERTISMENT indică posibilitatea provocării unei daune a bunurilor, a unei vătămări corporale sau a decesului. © 2011-2020 Dell Inc. sau filialele sale. Toate drepturile rezervate.
Cuprins Capitolul 1: Configurarea computerului............................................................................................. 7 Conectarea la Internet...........................................................................................................................................................7 Conectarea la Internet prin LAN....................................................................................................................................
Modulul de memorie............................................................................................................................................................20 Placa de sistem.................................................................................................................................................................... 20 Chipset.................................................................................................................................................
VGA (Visual Graphics Array - Matrice vizuală grafică)...................................................................................................38 Interfaţa vizuală digitală (DVI)........................................................................................................................................... 38 Port DisplayPort...................................................................................................................................................................
Configurarea comportamentului butonului de alimentare........................................................................................ 58 Dell Power Manager......................................................................................................................................................58 Îmbunătăţirea duratei de viaţă a bateriei.......................................................................................................................... 58 Sfaturi pentru migrări.......
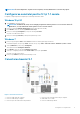
1 Configurarea computerului Procedura de configurare variază în funcţie de computerul dvs. Pentru instrucţiunile de configurare specifice computerului sau tabletei, consultaţi Quick Start Guide (Ghidul de pornire rapidă) livrat împreună cu computerul sau consultaţi Setup and Specifications (Configurare şi specificaţii) la www.dell.com/support. Conectarea la Internet Vă puteţi conecta computerul la Internet prin cablu, DSL, dial‑up, sau o conexiune WWAN.
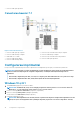
Windows 7 1. Faceţi clic sau atingeţi pictograma wireless din meniul de notificare. 2. Faceţi clic pe reţeaua la care doriţi să vă conectaţi. 3. Faceţi clic pe Connect (Conectare). NOTIFICARE: Introduceţi parola de reţea, dacă vi se cere acest lucru. Este posibil ca dvs. să fi configurat cheia de reţea când aţi configurat routerul sau se poate ca routerul să aibă o cheie de reţea implicită. Pentru detalii, contactaţi producătorul routerului. 4. Activaţi sau dezactivaţi partajarea de fişiere (opţional).
NOTIFICARE: În cazul computerelor cu placă de sunet separată, conectaţi difuzoarele la conectorii de pe placă. Configurarea sunetului pentru 5.1 și 7.1 canale Configurați computerul pentru a asigura ieșirea sunetului pe mai multe canale. Windows 10 și 8.1 1. Tastați Audio în caseta de căutare. NOTIFICARE: În Windows 10, faceți clic sau atingeți pictograma de căutare pentru a accesa caseta de căutare. În Windows 8.1, accesați simbolul de căutare pentru a accesa caseta de căutare. 2.
7. Conector audio spate pe difuzor Conectarea boxelor 7.1 Figura 2. Conectarea boxelor 7.1 1. 3. 5. 7. 9. Conector audio spate pe computer Conector audio lateral pe computer Cablu audio cu 7.1 canale Conector audio faţă pe difuzor Conector audio lateral pe difuzor 2. 4. 6. 8.
imprimanta în această listă pentru a o instala. Pentru mai multe informații legate de configurarea imprimantei, consultați documentația care a fost livrată împreună cu imprimanta. Windows 7 1. Faceți clic pe Start > Devices and Printers. (Dispozitive și imprimante). 2. Faceți clic pe Add a Printer (Adăugare imprimantă). Apare fereastra Add Printer (Adăugare imprimantă). 3. Urmaţi instrucţiunile de pe ecran.
• • • • PC Screen only (Doar pe ecranul computerului) – Se utilizează numai afişajul 1 şi nu se afişează nimic pe afişajul 2. Al doilea monitor este ignorat şi se utilizează numai monitorul principal. Duplicate (Dublare) (denumită şi clonare) – Afişează desktopul complet pe ambele afişaje. Al doilea şi următoarele monitoare prezintă o imagine în oglindă a monitorului principal. Extend (Extins) – Desktopul se extinde pe ambele afişaje.
2 Despre computerul dvs. Această secţiune vă oferă mai multe informaţii despre componentele din computer. Adaptor de alimentare Adaptoarele de alimentare se utilizează pentru a alimenta computere portabile, tablete şi anumite computere desktop. Kitul de adaptor de alimentare Dell cuprinde adaptorul de alimentare şi cablul de alimentare. Puterea nominală a adaptorului de alimentare (90 W, 65 W etc.
Baterie rotundă Bateria rotundă alimentează cipul CMOS (Complementary Metal Oxide Semiconductor) atunci când computerul este oprit. Cipul CMOS conţine data, ora şi alte informaţii despre configurarea computerului. În condiţii normale de utilizare, bateria rotundă poate dura mai mulţi ani. Factorii care influenţează durata de viaţă a bateriei rotunde sunt tipul plăcii de sistem, temperatura, timpul cât computerul este oprit şi aşa mai departe.
NOTIFICARE: Este posibil ca afişajul wireless să nu fie acceptat pe toate computerele. Pentru mai multe informaţii, consultaţi www.intel.com. Cameră Camera web Camera web vă permite să efectuaţi conversaţii video, să fotografiaţi şi să înregistraţi clipuri video. Cameră video 3D Camera video 3D vă permite să captaţi şi să trimiteţi imagini tridimensionale, oferindu-vă, totodată, posibilitatea să percepeţi distanţa, mărimea şi dimensiunile obiectelor, prin senzorii încorporaţi.
Retroiluminarea tastaturii Retroiluminarea existentă la unele tastaturi fizice iluminează simbolurile de pe taste pentru utilizarea tastaturii în medii întunecate. Puteţi activa manual retroiluminarea sau o puteţi configura să se activeze automat când computerul este introdus într-un mediu întunecat. Tastaturile retroiluminate de pe laptopurile Dell au diferite stări de iluminare. Apăsaţi pe Fn şi pe tasta cu săgeată la dreapta pentru a comuta între diferite stări de iluminare.
Tipuri de conexiune pentru tastatură Tastaturile pot fi conectate la computerul dvs. cu un cablu (cu fir) sau folosind semnale wireless (fără fir). Cu fir Tastaturile cu fir sunt conectate la computer printr-un cablu (în general, USB) şi nu necesită o sursă de alimentare suplimentară, ca de exemplu baterii . Wireless Tastaturile wireless folosesc transmisia prin radiofrecvenţa (RF) sau prin Bluetooth (BT) pentru a se conecta la computerul dvs.
Dispozitive de stocare interne Dispozitivele de stocare interne sunt instalate în computer şi, în general, nu pot fi scoase cât timp computerul este pornit. Dispozitivele de stocare interne cele mai întâlnite sunt unităţile de hard disk (HDD) şi unităţile cu circuite integrate (SSD). Unităţile HDD şi SSD utilizează interfaţa SATA pentru transferarea informaţiilor. Unităţile SSD seamănă din punct de vedere fizic cu hard diskurile, ceea ce le face compatibile cu computerele existente.
Tabel 1. Exemple de tipuri uzuale de carduri de memorie (continuare) Multimedia Card (MMC) MultiMedia Card plus (MMC+) MultiMedia Card (MMC) Mobile RS MMC Extreme Digital (xD) Memory Stick XC (MSXC) Compact Flash I, II/Compact Flash MD Memory Stick Duo Memory Stick Pro Duo Memory Stick Pro-HG Duo Despre computerul dvs.
Tabel 1. Exemple de tipuri uzuale de carduri de memorie (continuare) Memory Stick (MS)/Memory Stick Pro (MS Pro) Smart Media/Smart Media XD Modulul de memorie Un modul de memorie stochează temporar datele necesare computerului pentru a executa o activtate. Orice fişier sau aplicaţie se încarcă mai întâi în modulele de memorie înainte de deschidere sau utilizare. Modulele de memorie sunt catalogate în funcţie de capacitate (în GB) şi viteză (în MHz).
Procesoarele sunt clasificate în principal în funcţie de următoarele criterii: • • • Numărul de nuclee de procesare Viteza sau frecvenţa măsurate în Gigahertz (GHz) sau Megahertz (MHz) Memoria instalată, cunoscută şi sub denumirea de cache Aceste aspecte determină şi randamentul procesorului. Valorile mai mari înseamnă, în general, performanţe mai bune. Unele procesoare pot fi integrate pe placa de sistem. Câţiva dintre producătorii de procesoare sunt Intel, AMD, Qualcomm etc.
• • Integrată – numită deseori placă video încorporată, aceasta este integrată pe placa de sistem. La unele computere, placa video este integrată în procesor. În general, plăcile video integrate partajează memoria sistemului (RAM) şi pot utiliza procesorul pentru a efectua procesări video. O unitate de procesare accelerată (APU) este integrată pe acelaşi element ca şi procesorul şi oferă viteze mai ridicate de transfer a datelor, reducând în acelaşi timp consumul.
NOTIFICARE: Placa de sunet şi difuzoarele trebuie să accepte 5.1/7.1 canale pentru a produce sunet prin canalele 5.1/7.1. Sistemul audio 2.1 2.1 se referă la un sistem cu două difuzoare (canalul stâng şi canalul drept) şi un subwoofer. Sistemul audio 5.1 5.1 se referă la numărul de canale audio din majoritatea configuraţiilor cu sunet surround. Un sistem audio 5.
Reţeaua locală wireless (WLAN) Dispozitivele sunt conectate fără fir şi acoperă o zonă relativ mică, de regulă o casă sau o clădire. Conexiunea wireless folosită pentru configurarea reţelei WLAN este de regulă Wi-Fi (802.11x unde x se referă la alte protocoale 802.11). Reţeaua de arie largă wireless (WWAN) Cunoscută şi ca reţea de bandă largă, acest serviciu este de regulă oferit de companiile de telefonie pentru dispozitivele mobile.
Bluetooth Tehnologia Bluetooth vă permite să conectaţi la computer sau la tabletă, de la mică distanţă, un alt dispozitiv compatibil Bluetooth. Dispozitivele cu Bluetooth pot include telefoane, căşti, tastatură, mouse, imprimante şi alte. Adaptoarele Bluetooth pot fi interne (plăci de extensie sau plăci integrate pe placa de bază), sau externe.
3 Utilizarea computerului Încărcarea bateriei Conectaţi adaptorul de alimentare la computer sau tabletă pentru a încărca bateria. Bateria se încarcă atunci când computerul sau tableta este în uz sau oprită. Circuitele interne ale bateriei o împiedică să se supraîncălzească. NOTIFICARE: Dacă bateria devine prea caldă din cauză că este pusă într-un mediu cald, este posibil să nu se încarce când conectaţi adaptorul de alimentare. Aşteptaţi până se răceşte pentru a relua procesul de încărcare.
Tabel 2. Lista comenzilor rapide de la tastatură (continuare) F6 Comută prin elementele de ecran dintr-o fereastră sau de pe desktop. F10 Activează bara de meniu în programul activ. Ctrl şi c Copiază un element selectat. Ctrl şi x Decupează un element selectat. Ctrl şi v Lipeşte un element selectat. Ctrl şi z Anulează o acţiune. Ctrl şi a Selectează toate elementele dintr-un document sau o fereastră.
Comenzi rapide de la tastatură în Windows 8.1 şi Windows RT Acest tabel prezintă câteva comenzi rapide de la tastatură specifice pentru Windows 8.1 şi Windows RT. Aceste comenzi rapide de la tastatură vin în completarea celor deja disponibile în versiunile anterioare de Windows. Tabel 3. Lista comenzilor rapide de la tastatură Tasta Windows şi începeţi să tastaţi Se efectuează o căutare în computerul dvs.
• • • • Schimbaţi intervalul dinaintea repetării caracterelor de pe tastatură când apăsaţi şi ţineţi apăsată o tastă Schimbaţi viteza la care caracterele tastaturii se repetă Schimbaţi frecvenţa de clipire a cursorului Particularizaţi secvenţele de taste pentru limbile tastaturii Pentru a particulariza tastatura: Windows 10 şi 8.1 1. Tastaţi Control Panel (Panou de control) în caseta de căutare. NOTIFICARE: În Windows 10, faceţi clic sau atingeţi pictograma de căutare pentru a accesa caseta de căutare.
• • Pentru a muta cursorul, glisaţi uşor degetul peste touchpad; Pentru a selecta sau pentru a face clic stânga pe un obiect, apăsaţi pe butonul din stânga al touchpadului sau atingeţi suprafaţa touchpadului o singură dată. Pentru a face clic dreapta pe un obiect, atingeţi o singură dată butonul din dreapta al touchpadului. Pentru a face dublu clic pe un obiect, apăsaţi de două ori pe butonul din stânga al touchpadului sau atingeţi de două ori touchpadul.
Tabel 4. Lista gesturilor pentru touchpad (continuare) Two‑finger zoom (Panoramare cu două degete) – Măriţi sau micşoraţi folosind două degete. Puneţi două degete pe touchpad şi depărtaţi-le pentru a mări imaginea. Puneţi două degete pe touchpad şi apropriaţi-le pentru a micşora imaginea. Rotire Twist (Răsucire) – Rotiţi conţinutul activ în trepte de 90°, folosind două degete.
Tabel 5. Lista gesturilor pentru ecranul tactil (continuare) Puneţi două degete pe ecranul tactil şi apropriaţi-le pentru micşorare. Menţinere Apăsaţi şi menţineţi degetul pe ecranul tactil pe element pentru a deschide meniul contextual. Mişcare Deplasaţi rapid un deget în direcţia dorită pentru a naviga prin conţinutul din fereastra activă, precum paginile unei cărţi. Răsucirea funcţionează şi pe verticală, atunci când navigaţi printre fotografii sau printre melodiile dintr-o listă de redare.
Tabel 5. Lista gesturilor pentru ecranul tactil (continuare) Derulare Panoramare – Mută focalizarea pe obiectul selectat când nu este vizibil întregul obiect. Deplasaţi două degete în direcţia dorită pentru a panorama obiectul selectat. Derulare pe verticală – Derulare în sus sau în jos în fereastra activă. Deplasaţi un deget în sus sau în jos pentru a începe derularea pe verticală. Derulare pe orizontală – Derulare spre dreapta sau spre stânga în fereastra activă.
NOTIFICARE: Este posibil ca un cod de acces să fie afișat pe computerul sau tableta dvs. și dispozitiv. Când împerecherea este finalizată, se va afişa un mesaj de confirmare a împerecherii dispozitivului. Windows 8.1 1. Activaţi funcţia Bluetooth pe computerul sau tableta dvs. şi pe dispozitivul pe care îl împerecheaţi. La laptopul Dell, porniţi conexiunea wireless pentru a activa funcţia Bluetooth.
NOTIFICARE: Pentru a configura opţiuni precum dimensiunea înregistrării video, autodeclanşatorul, înregistrarea la intervale de timp, calitatea înregistrării şi altele, faceţi clic sau atingeţi săgeata verticală de lângă pictograma de înregistrare. Selectarea camerei şi microfonului Dacă computerul dvs. are mai multe camere web sau microfoane (integrate sau externe), puteţi selecta camera web şi microfonul pe care doriţi să le folosiţi în Dell Webcam Central (Centrala Dell pentru camera web). 1. 2. 3. 4.
4 Porturi şi conectori Audio Conectorii audio vă permit să conectaţi difuzoare, căşti, microfoane, sisteme de sunet, amplificatoare sau televizoare pentru ieşire audio. NOTIFICARE: Computerul poate să nu accepte toate mufele de sunet. Pentru informaţii despre porturile disponibile pe computer sau tabletă, consultaţi Quick Start Guide (Ghidul de pornire rapidă) livrat împreună cu computerul sau consultaţi Setup and Specifications (Configurare şi specificaţii) la www.dell.com/support.
Tabel 6. Tipuri de mufe de sunet (continuare) Port sunet surround lateral – Conectează boxele din stânga/ dreapta. Port RCA S/PDIF – Transmite sunetul digital fără a necesita conversie audio analogică. Port S/PDIF optic – Transmite sunetul digital, folosind semnale optice, fără a necesita conversie audio analogică. USB Magistrala serială universală (USB) vă permite să conectaţi dispozitive periferice la un computer sau la o tabletă.
Tabel 8. Standarde USB (continuare) USB 3.1 Gen 1 Se mai numeşte şi SuperSpeed USB. Această mufă acceptă dispozitive periferice, cum ar fi dispozitive de stocare, imprimante şi altele. Oferă viteze de până la 5 Gb/s pentru transferul de date. Sistemele cu porturi USB 3.0 de generaţie veche sunt acum USB 3.1 Gen 1. USB 2.0 Se numeşte şi Hi-Speed USB. Asigură lăţimea de bandă suplimentară pentru aplicaţii multimedia şi aplicaţii de stocare. USB 2.
• DVI- I (DVI-Integrated) – DVI-I este un conector integrat care poate trimite un semnal digital sau analogic. Această mufă este mai flexibilă, deoarece poate fi folosită atât pentru conexiunile analogice, cât şi pentru cele digitale. Port DisplayPort DisplayPort vă asigură conexiunea digitală între computer și dispozitivele de afișare cum ar fi monitorele, proiectoarele etc. Acceptă atât semnale video, cât și audio.
5 Software şi aplicaţii Absolute Absolute furnizează o securitate durabilă pentru punctele finale şi soluţii de gestionare a riscurilor în ceea ce priveşte datele pentru computere, tablete şi smartphone-uri. Tehnologia durabilă vă permite să evaluaţi temeinic riscurile, să asiguraţi durata de viaţă a fiecărui dispozitiv şi să răspundeţi preventiv la incidentele de securitate. NOTIFICARE: Este posibil ca tehnologia durabilă să nu fie acceptată pe toate computerele.
Software-ul SupportAssist este deja instalat pe toate computerele şi tabletele Dell noi. Pentru a reinstala SupportAssist, descărcaţi aplicaţia şi rulaţi programul de instalare. Accesarea software-ului SupportAssist • • • Windows 10 – Faceţi clic sau atingeţi pictograma Dell Help & Support (Ajutor şi asistenţă Dell) din ecranul Start. Windows 8.1 – Faceţi clic sau atingeţi pictograma My Dell (Computerul meu Dell) din ecranul Start.
Tabel 9.
Comenzi rapide de la tastatură În continuare, vă prezentăm câteva comenzi rapide de la tastatură disponibile pentru jocuri 3D: Tabel 10. Comenzi rapide de la tastatură pentru jocurile 3D Taste Descriere Funcţie Afişează/Ascunde efectele 3D stereoscopice Activează/dezactivează aplicaţia 3DTV Play. NOTIFICARE: Performanţa jocurilor se poate reduce în modul HD 3D chiar dacă aplicaţia 3DTV Play este dezactivată.
6 Restabilirea sistemului de operare Opţiuni de restabilire a sistemului AVERTIZARE: Utilizarea funcţiei Dell Factory Image Restore (Restaurarea din fabrică a imaginii Dell) sau a discului cu sistemul de operare şterge definitiv toate fişierele de pe computer. Dacă este posibil, realizaţi copii de rezervă ale fişierelor de date înainte să utilizaţi aceste opţiuni. Puteţi restabili sistemul de operare de pe computerul dvs. utilizând una dintre următoarele opţiuni: Tabel 11.
Tabel 12. Funcţii Dell Backup and Recovery (continuare) Caracteristici Basic Premium Creaţi o copie de rezervă a întregului sistem (inclusiv aplicaţii şi setări) Îmbinaţi mai multe copii de rezervă şi arhivaţi copiile de rezervă vechi Creaţi copii de rezervă pentru fişiere şi restabiliţi fişiere după tipul acestora Dell Backup and Recovery Basic Accesarea Dell Backup and Recovery Windows 10 1. Faceți clic pe Start, tastați Backup (Copie de rezervă) în caseta de căutare. 2.
Restaurarea datelor dintr-o copie de rezervă a sistemului 1. Lansați Dell Backup and Recovery. 2. Faceți clic sau atingeți pictograma Backup (Copie de rezervă) și selectați System Backup (Copie de rezervă a sistemului). 3. Urmaţi instrucţiunile de pe ecran. Restabilirea anumitor fişiere sau fişiere dintr-un Full System Backup 1. 2. 3. 4. Lansați Dell Backup and Recovery. Faceți clic sau atingeți pictograma Recovery (Recuperare), apoi selectați Data Recovery (Recuperare date).
2. Când apare sigla DELL, apăsaţi tasta F8 de mai multe ori pentru a accesa fereastra Advanced Boot Options (Opţiuni avansate de pornire). NOTIFICARE: Dacă aţi aşteptat prea mult şi a apărut sigla sistemului de operare, continuaţi să aşteptaţi afişarea desktopului Microsoft Windows; apoi reporniţi computerul şi încercaţi din nou. 3. Selectaţi Repair Your Computer (Reparare computer). Apare fereastra System Recovery Options (Opţiuni recuperare sistem). 4.
Windows 8.1 Utilizarea funcţiei de restabilire a sistemului 1. 2. 3. 4. 5. Faceți clic sau atingeți Settings (Setări) din bara laterală cu pictograme interactive. Faceți clic sau atingeți Control Panel (Panou de control). Tastați Recovery (Recuperare) în caseta de căutare. Faceți clic sau atingeți Recovery (Recuperare), apoi Open System Restore (Deschidere Restabilire sistem). Urmaţi instrucţiunile de pe ecran. Anularea ultimei restabiliri a sistemului 1. 2. 3. 4. 5.
Reinstalarea sistemului de operare utilizând discul Operating System (Sistem de operare) Pentru a reinstala sistemul de operare: 1. Introduceţi discul Operating System (Sistem de operare) şi reporniţi computerul. 2. Când apare sigla DELL, apăsați imediat pe tasta F12 pentru a accesa meniul de pornire. NOTIFICARE: Dacă aşteptaţi prea mult şi apare sigla sistemului de operare, atunci continuaţi să aşteptaţi până ce este afişat desktopul; apoi reporniţi computerul şi încercaţi din nou. 3.
7 Depanare Etapele de bază privind depanarea Această secţiune precizează indicaţiile de bază privind depanarea pe care le puteţi utiliza pentru a rezolva problemele obişnuite care apar la computerul dvs. • • • • • • • Asigurați-vă că computerul dvs. este pornit și că toate componentele sunt conectate la alimentare. Asigurați-vă că toate cablurile sunt bine conectate la porturile aferente. Asigurați-vă că cablurile nu sunt deteriorate și nici uzate.
PSA îmbunătăţit Puteţi utiliza Enhanced Pre-Boot System Assessment (ePSA) pentru diagnosticarea diverselor probleme hardware. ePSA testează dispozitive, cum ar fi placa de bază, tastatura, afişajul, memoria, hard diskul etc. NOTIFICARE: Este posibil ca utilitarul ePSA să nu fie acceptat pe toate computerele. Ecranul de pornire ePSA este împărţit în trei zone: • • Fereastra Devices (Dispozitive) – apare în partea stângă a ecranului de pornire ePSA. Acesta afişează toate dispozitivele de pe computerul dvs.
minutes or more. Do you want to continue? (Recommended). (Doriți să executați testele de memorie rămase? Acestea vor dura aproximativ 30 de minute sau mai mult. Doriți să continuați? (Se recomandă). Apăsați pe pentru a continua dacă întâmpinați probleme de memorie; în caz contrar, apăsați pe pentru a încheia testul. Dacă ePSA se încheie cu erori, pe ecran se afișează următorul mesaj: Testing completed. One or more errors were detected. (Teste finalizate. S-au detectat una sau mai multe erori.
8 BIOS Sistemul BIOS stochează informaţiile despre hardware-ul computerului şi le transmite sistemului de operare atunci când acesta se încarcă. Puteţi efectua modificări la setările de hardware de bază memorate în BIOS folosind programul de configurare BIOS. Puteţi utiliza programul de configurare BIOS pentru: • • • Setarea sau schimbarea unei opţiuni ce poate fi selectată de către utilizator, precum parola de utilizator. Identificarea dispozitivelor instalate pe computerul dvs.
Utilizarea punţii plăcii de sistem NOTIFICARE: Puntea plăcii de sistem există numai la computerele desktop. Aproape toate plăcile de sistem ale computerelor desktop au o punte pentru ştergerea setărilor CMOS împreună cu parola BIOS. Locul acestei punţi depinde de placa de sistem. Căutaţi punţile aflate lângă bateria CMOS, etichetate de obicei cu CLR, CLEAR, CLEAR CMOS etc. Pentru procedura de ştergere a parolelor şi setărilor CMOS, consultaţi Manualul de service al computerului la adresa www.dell.
9 Obținerea asistenței și cum se poate contacta Dell Resurse automate de asistență Puteți obține informații și asistență privind produsele și serviciile Dell utilizând aceste resurse automate de asistență: Tabel 14. Resurse automate de asistență Resurse automate de asistență Locația resurselor Informații despre produsele și serviciile Dell www.dell.com Computerul meu Dell Sfaturi Contactați asistența În căutarea Windows, tastați Contact Support și apăsați pe tasta Enter.
Cum se poate contacta Dell Pentru a contacta Dell pentru vânzări, asistență tehnică sau probleme privind serviciile pentru clienți, consultați adresa www.dell.com/ contactdell. NOTIFICARE: Disponibilitatea diferă în funcție de țară/regiune și de produs și este posibil ca unele servicii să nu fie disponibile în țara/regiunea dvs.
10 Referinţe Întreţinerea computerului Pentru a evita probleme generale la computer, este recomandat să efectuaţi următoarele operaţii: • • • • • • Asiguraţi acces direct la o sursă de alimentare, la ventilaţie adecvată şi la o suprafaţă orizontală pe care să amplasaţi computerul. Nu blocaţi, nu introduceţi obiecte şi nu permiteţi acumularea prafului în orificiile de ventilaţie. Faceţi periodic copii de rezervă a datelor. Efectuaţi periodic o scanare de viruşi.
6. Pentru a modifica setările de alimentare, faceţi clic sau atingeţi Change plan settings (Modificare setări plan). Windows 7 1. Faceţi clic pe Start > Control Panel (Panou de control) > Power Options (Opţiuni de alimentare). 2. Puteţi alege un plan din lista de opţiuni disponibile, în funcţie de tipul de utilizare a computerului. 3. Pentru a modifica setările de alimentare, faceţi clic pe Change plan settings (Modificare setări plan).
Durata de funcţionare a bateriei este redusă semnificativ dacă utilizaţi: • • • Unităţi optice Dispozitive de comunicaţie wireless, plăci Express Card, carduri media sau dispozitive USB, Setări de luminozitate ridicată a afişajului, economizoare de ecran 3D sau alte programe cu consum ridicat de energie, cum ar fi aplicaţiile şi jocurile complexe, cu grafică 3D. Puteţi îmbunătăţi performanţa bateriei dacă: • • • Utilizaţi computerul alimentându-l cu c.a. când este posibil.
Sfaturi pentru migrări Migrarea computerelor înseamnă mutarea datelor şi a aplicaţiilor între două computere diferite. Două dintre cele mai frecvente motive pentru migrarea computerelor sunt achiziţionarea unui nou computer şi trecerea la un nou sistem de operare. AVERTIZARE: Deşi există mai multe utilitare care simplifică migrarea, se recomandă să faceţi backup pentru fişierele dvs., precum fotografii, muzică, documente şi altele.
1. Monitor la nivelul ochilor sau mai jos 3. Suport pentru monitor 5. Braţe la nivelul biroului 2. Monitor şi tastatură aşezate direct în faţa utilizatorului 4. Picioare cu tălpile pe podea 6. Încheieturi relaxate şi drepte NOTIFICARE: Pentru cele mai recente instrucţiuni de ergonomie, consultaţi www.dell.com/regulatory_compliance. Dell şi mediul înconjurător Ecologia nu înseamnă limite, ci posibilităţi. Înseamnă găsirea unei metode mai bune.
Tabel 15. Dell şi mediul înconjurător (continuare) drept urmare, lemnul de bambus pe care îl utilizăm provine dintr-o pădure îndepărtată de habitatele cunoscute ale urşilor panda. Înscrieţi-vă în programul Plantaţi un copac Dell a creat programul Plantaţi un copac pentru a vă permite să compensaţi emisiile de gaze cu efect de seră ale computerelor dvs. şi pentru a vă ajuta să trăiţi pe o planetă mai sănătoasă – cu fiecare copac şi pădure de pe planetă. Găsiţi informaţii suplimentare la www.dell.