RDM-3P v.1.0 - PAPER MOISTURE METER ADDENDUM This addendum is to be used in conjunction with the Owner’s Manual for the RDM3 Wood Moisture Meter (attached). The Owner’s Manual details the various functions of the RDM3 meter, including the optional PC interface. This addendum contains information specific to the paper, paper core, baled paper and corrugated applications. We recommend the user read the Owner’s Manual and addendum completely, before using the RDM3-P.
The meter tends to read the highest moisture content that is in contact with both pins. If thick samples are not well equalized, it may be necessary to make tests at different depths to determine the degree of uniformity of moisture distribution in the sample. If the meter is used on stock so thin that the full length of the pins is not entirely embedded in the thickness of the sample, the readings tend to indicate a lower than actual MC. This can be overcome by testing more than one sample in stacks.
The level of accuracy of meter readings depends on a number of factors: similarity between the material tested and samples on which the calibration was made; moisture distribution; and chemical application or processing which may affect the electrical properties of the paper product. The required electrode is the H-4 with a #830-series prod. (10”or 18”). A sharp, steel rod to open the hole for the prod may be helpful if the bale is very dense.
RDM 3 WOOD MOISTURE METER Owner’s Manual US version - 1.5 For RDM-3 Meters starting with Serial #11925 Delmhorst Instrument Co.
TABLE OF CONTENTS PAGE GENERAL DESCRIPTION & SPECIFICATIONS 3 OPERATING INSTRUCTIONS 4 NAVIGATION 4 BATTERY 4 POWER UP 7 METER USE 7 MAIN MENU 7 MOISTURE CONTENT READING 8 MODE – CONTINUOUS /TRIGGERED 10 TEMPERATURE COMPENSATION 10 CREATE/EDIT A JOB 11 SPECIES 12 ALARM 13 APENDING DATA TO A JOB 14 STORAGE MENU 15 VIEW STATISTICS 16 STORED READINGS 17 CLEAR MEMORY 19 RESTORE DEFAULTS 19 IR LINK TO PC 19 SETUP MENU 22 TAKING A READING 24 CARE OF YOUR METER 25 SER
1. GENERAL DESCRIPTION Thank you for your purchase of Delmhorst Instrument Co.’s newly designed RDM3 handheld wood moisture meter. The RDM3 follows a long line of “RDM” meters with data acquisition capabilities, and offers the latest in features and functionality. Even with its wide range of functions, the RDM3 is intuitive and easy to operate. We recommend that you read the following pages in detail to take full advantage of all that the RDM3 has to offer.
2. Operating Instructions -User GuideThis guide provides step-by-step instructions on powering up, using and powering down the meter. NAVIGATION: The meter uses an on-screen, menu-driven approach to navigate through the meter features, allowing for an intuitive understanding of keypad functions. Each screen presents the user with a number of selectable options. One of the options is always selected and the user can move (navigate) the selection to any other available option.
are important, DO NOT store additional readings. Turn the meter back on and perform a PC download. Beware that any readings stored during the power cycle that included the battery removal WILL NOT be available and CANNOT be recovered. Once the download is complete, perform a meter reset by choosing “RESTORE DEFAULTS” in the Storage Menu. If a download is not necessary, go directly to “RESTORE DEFAULTS”.
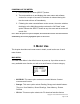
Fig. 1 Keypad Layout Copyright 2005, Delmhorst Instrument Co.
POWERING UP THE METER: 1. Press and hold the center (SELECT) button. 2. The meter switches on and displays the meter name and software version for a couple of seconds. If the button is released during this time the meter will turn off immediately. 3. Following the meter name/software version screen, the meter switches the display to the Main Menu and pre-selects the “MC Read” mode option. Release the SELECT button at any time now and the meter will remain ON.
o Setup: This menu option selects access to the rest of the meter features: Set Date and Time, Set Power-off Time, Set Backlight and Conversions o Off: This menu options turns the meter off. It should be noted here that the meter will remember certain configurable parameters through to the next power-up. Meter functions: MC READ: The RDM3 operates on the principle of electrical resistance - it uses wood as the element in a circuit by driving two electrode pins into it.
o Default species: Douglas Fir o Default Temperature : 70F o Default Job Number: 1 o Default Electrode: 4P Nonins(ulated) o Alarm Off o Mode Trig An example of the main MC READ screen is shown below: This screen provides a complete snapshot of the current meter settings, as well as the current reading. In the upper left corner the meter indicates the current species being measured. The large text in the line below shows the current MC measurement.
o T° (Temperature Compensation) o JOB (current job) o ALARM (current alarm setting) o MODE (current measurement mode) o EXIT (leave MC READ Mode) NOTE: The default selection on this screen is MC reading, which places the meter in measurement mode. Pressing the SELECT key causes a single reading to be taken (Triggered mode) or initiates a reading stream (Continuous mode). READ MODE – CONTINUOUS/TRIGGERED The meter has two measurement modes: Triggered and Continuous.
UP and DOWN keys can be used to select one of three available options. If COMP TEMP is selected, use the LEFT and RIGHT keys to respectively decrease or increase the compensation temperature value. NOTE: The compensation temperature increments and decrements in steps of 5 deg F and 3 (or 2) deg C. Choose “DONE” to update the meter with the newly chosen temperature value, or “CANCEL” to ignore changes and return to the original compensation temperature setting.
Select “JOB” and use the LEFT or RIGHT keys to change the job number to the one desired. When finished, select “DONE”. To abandon, select “CANCEL”. If the selected job does not already exist, a “Create Job” screen appears, such as this: This screen offers the opportunity to configure the complete measurement environment, as applied to the new job. All parameters are alterable while taking readings in the new job, except for the species.
Once a new material/specie is selected, control returns to the Create Job screen. Click SELECT on the ALARM entry to configure meter’s set-point values: The “ALARM” feature in the meter provides the user with a set-point: readings above a specified value (considered “WET” or unacceptable) generate an audible alarm. The first reading breaking the alarm set-point will be signaled by four short beeps in quick sequence. Subsequent readings that remain above the setpoint will be signaled by a single short beep.
APPENDING DATA TO A JOB: If the chosen job does already exist, the user does not have the option to edit the existing job settings. An “Append Readings” screen appears: If YES is selected, the meter will retrieve the selected job’s settings (during this time a “PROCESSING…” message appears) and then switch back to the Pin Mode screen with the restored settings. If NO is selected, the meter returns to the Select Job screen. o ALARM: See the ALARM section described above.
job and associated information. The maximum storage capability of the meter is therefore determined by way in which it is used. Heavy use of the meter’s flexibility capabilities (i.e. measurements accompanied by frequent job or reading type changes), forces the meter to add additional internal tracking information to memory records and thereby reduces storage capacity. Depending on meter use, up to 1,416 readings can be stored in the RDM3.
o View Statistics: This menu option selects the meter’s statistical analysis option. Selecting this option gives the user access to two sets of statistical data. A screen shot example of the first set is shown below: o The first line indicates the Moisture Content (MC) job being analyzed. o The second line shows the number of readings stored in the specific job o The third line shows the Average MC value for all stored readings in the specific job.
o The fifth line shows the value of the highest MC reading stored in the specific job. There are no control entries present in this screen, such as “MORE”, “CANCEL” or “DONE”. The only available option is to return to the storage menu screen, by pressing any key. o Stored Readings: This menu option selects the measurement review feature of the meter, allowing the user access to measurements stored in memory. Only readings belonging to the selected job will be retrieved.
A selected job containing readings offers two other selectable options: “VIEW SET” and “DONE”. o VIEW SET: This option allows the user to view a specific range of readings in a particular job, as opposed to the entire set, by providing a configurable start point. It becomes useful when large numbers of readings are present in the meter. View Set always begins by displaying “1 TO XXX”, where XXX is the maximum number of readings in the selected job.
o Cancel: This feature returns the meter to the Storage Menu o Clear Memory: This menu option will erase the storage memory while keeping the default meter settings intact. This feature offers accidental feature access protection through the use of a subsequent memory deletion confirmation screen: NOTE: Memory deletion is irreversible. o Restore Defaults: This menu option will erase the storage memory AND restore pre-programmed meter defaults.
Requirements: The wireless communication technology employed in the meter requires line-of-sight access between the red side window of the meter and the receiving window of the Base Unit. Simply place the meter and Base Unit on a flat surface, with the red side window of the meter facing the receiving window of the Base Unit. Separation requirements between the meter and Base Unit are anywhere from 0 to 12 in. Operation: 1.
delays built in to allow the other link components to come online in any sequence. Troubleshooting The I/R Link: Most problems tend to occur due to the positioning of the meter relative to the Base Unit. There are a few error messages that may appear on the meter’s screen: a. Timeout: This error message occurs when too much time has passed between data sent by the meter and the response that should have been received from the Base Unit.
SETUP MENU: The Setup group of features allows access to the configurable parameters of the meter. They are: Date and Time, Power-off time, Backlight, and Conversions (temperature mode and electrode type). All can only be accessed in the Setup Menu. Storage Menu entry descriptions: o Return to Main Menu: This menu option returns the meter to Main Menu. The meter also returns to Main Menu if no user input is detected for 20 Seconds.
decremented using the LEFT key. The DAY parameter moves forward through weekdays using the RIGHT key and backward using the LEFT key. The SELECT (center) key is only active when menu selection is applied to “HOURS” (switch between standard or military time), “DONE” or “CANCEL”. Selecting “DONE” exits this screen back to the SETUP MENU and updates the clock with the newly chosen values. Selecting “CANCEL” exits this screen back to the SETUP MENU without updating the clock.
NOTE: Except for clock settings, all other parameters will return to their default values, as indicated above, when the “RESTORE DEFAULTS” option is selected in the Storage Menu. The values chosen for the Setup Menu parameters will remain in effect even if the meter is turned off, and even if the battery is removed. TAKING A READING The contact pins provided are best for stock up to 6/4. On stock over 6/4 or for hardwoods over 4/4 we recommend using a remote probe such as the 26-ES ram-type electrode.
CARE OF YOUR METER ¾ Store your meter in a clean, dry place. The protective carrying case provided is an ideal storage place when the meter is not in use. ¾ Re-charge the 9-Volt battery as needed. Continued use with a low battery may cause the meter to go out of calibration. ¾ Change contact pins as needed. Keep pin retainers hand tightened. ¾ Clean the meter and contact pins with any biodegradable cleaner. Use the cleaner sparingly and on external parts only. Keep cleaner out of the external connector.
SERVICE FOR YOUR METER ¾ Before sending in your meter we recommend you give one of our trained technicians a call. Many times troubleshooting can be taken care of over the phone. Call us at 877-DELMHORST. ¾ Pack your meter securely. Enclose a purchase order or letter with a brief description of the problem. ¾ There is no need to call us for a return authorization number if you are within the U.S. Customers outside the U.S. must contact us for more specific instructions prior to returning a meter.
WARRANTY Delmhorst Instrument Co., referred to hereafter as Delmhorst, guarantees its (Model RDM3) meter for one year from date of purchase and any optional electrodes against defects in material or workmanship for 90 days. If, within the warranty period of the (Model RDM3), you find any defect in material or workmanship return the meter following the instructions in the “Service for Your Meter” section.
SPECIES LIST: The following 69 species are programmed in the meter. The default species is Douglas Fir.