TotalCheck MOISTURE METER/THERMO-HYGROMETER Owner’s Manual Version 3.02 For Total Check Meters starting with Serial #12468 Delmhorst Instrument Co.
TABLE OF CONTENTS PAGE GENERAL DESCRIPTION & FEATURES 4 OPERATING INSTRUCTIONS 5 NAVIGATION 5 INSTALLING THE BATTERY 5 TO POWER THE METER ON 7 METER USE 7 BASIC & ENHANCED MODES 7 USING THE METER IN BASIC MODE 7 To Take Pins Readings in Basic Mode 7 To Set the Alarm in Basic Pin Mode 8 To Change the Temperature Correction 9 To Take Scan Readings in Basic Mode 9 To Set the Alarm in Basic Scan Mode 10 To Take TEMP/RH Readings in Basic Mode 10 To Reset the Meter to Default Settings
TAKING A READING – PRACTICAL APPLICATIONS 24 Testing Wood 24 Paint Failure & Moisture 25 EIFS 25 Using the 0-100 Numerical Reference Scale 26 Testing Concrete Slabs for Flooring Applications 26 Measuring RH in Concrete Slabs 27 Testing Insulation 27 Testing Drywall 29 Care of Your Meter 29 Service for Your Meter 30 Warranty 31 Species List 32 Copyright 2006, Delmhorst Instrument Co.
GENERAL DESCRIPTION/FEATURES: Thank you for your purchase of Delmhorst Instrument Co.’s TotalCheck handheld combination moisture meter/thermo-hygrometer. TotalCheck provides the user with a host of data acquisition capabilities, and offers the latest in features and functionality. Even with its wide range of functions, TotalCheck is intuitive and easy to operate. We recommend that you read the following pages in detail to take full advantage of all that TotalCheck has to offer.
OPERATING INSTRUCTIONS -USER GUIDEThis guide provides step-by-step instructions on powering up, using and powering down the meter. NAVIGATION: The meter uses an on-screen, menu-driven approach to navigate through the meter features, allowing for an intuitive understanding of keypad functions. Each screen presents the user with a number of selectable options. One of the options is always selected and the user can move (navigate) the selection to any other available option.
2. Ensure correct polarity, and push the battery in flush with the bottom board until the connectors snap together on both sides. Use only Duracell or Energizer alkaline 9V. 3. Replace the battery compartment lid. IMPORTANT NOTE: DO NOT REMOVE THE BATTERY WITHOUT TURNING THE METER OFF FIRST. BATTERY REMOVAL WHILE THE METER IS ON MAY CAUSE LOSS OF STORED READINGS AND MAY CORRUPT THE STORAGE MEMORY. IF THIS OCCURS, CERTAIN FUNCTIONS (SUCH AS STATISTICS, READING RECALL, ETC) WILL FAIL AND LOCK UP THE METER.
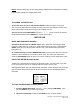
NOTE: Stored readings are not lost during battery replacement or low battery conditions. Current meter settings are maintained as well. TO POWER THE METER ON: To turn the meter on, press and hold the SELECT button for approx. 2 seconds. The first screen will temporarily display the meter name and the software revision level. Refer to this revision level whenever you call Customer Service. The next screen is the MAIN MENU.
3. Use the key to highlight the default material (Douglas Fir) if you wish to change it to a different material. Press the SELECT key to get into the SELECT MATERIAL sub menu. 4. Use the keys to highlight the material you are testing. Press the SELECT key to choose that material. This will bring you back to the main %MC READ screen. 5. Use the keys to highlight the pin type selection. Press the SELECT key to toggle between 4-pin (non-insulated) pins and 2-pin (insulated) pins.
Default alarm settings in pin mode are as follows for different materials: All wood materials: Drywall: Concrete: 15% 1.0% 68 (on the 0-100 relative scale) Note: The default alarm setting in scan mode is 300. TO CHANGE THE TEMPERATURE CORRECTION: TotalCheck defaults to a temperature of 70ºF. As wood temperature increases, its electrical resistance decreases and indicated moisture content rises. Lower wood temperatures result in lower indicated moisture content.
2. You may begin taking readings by firmly pressing the back of the meter onto the material. This will display a relative reading that ranges between 0 and 300. TO SET THE ALARM IN BASIC SCAN MODE: 1. If you wish to set the alarm to beep after a pre-selected relative value is reached, use the keys from the SCAN screen to highlight the ALARM. Press the SELECT key to enter the alarm sub menu. 2. The default status of the alarm is “OFF.” Press the SELECT key to turn it on. 3.
2. The meter will begin taking readings. As a default setting the RH reading will be the most prominent on the screen. If you would like to make another variable (temperature, GPP/GPK or dew point), the prominent reading, use the and keys to highlight your selection. Press the SELECT key to choose that variable. TO RESET THE METER TO DEFAULT SETTINGS IN BASIC MODE: 1. Use the keys from the BASIC main menu to highlight #4: DEFAULTS. Press the SELECT key.
laptop via Infrared connection. Jobs may be defined only when using the meter in pin mode or RH-T mode. Scanned readings cannot be part of a job. TO CREATE OR MODIFY A JOB IN PIN MODE: 1. From the Enhanced Main Menu, highlight PIN MODE. 2. Use the keys to highlight JOB. Press SELECT to enter the job sub menu. 3. Use the key to change the job number. Press the key and highlight DONE. Press SELECT to save that job number.
TO SET TEMPERATURE CORRECTION: TotalCheck defaults to a temperature of 70ºF. As wood temperature increases, its electrical resistance decreases and indicated moisture content rises. Lower wood temperatures result in lower indicated moisture content. A correction is necessary if the wood temperature is outside the range of 50ºF (10ºC) to 90ºF (32ºC). Set the temperature accordingly and the meter will make the correction. 1.
All wood materials: Drywall: Concrete: 15% 1.0% 68 (on the 0-100 relative scale) TO TAKE PIN READINGS IN ENHANCED MODE: 1. From the Enhanced Main Menu, use the keys to highlight #1, PIN MODE. 2. Press the SELECT key to get into the ENHANCED READ screen. The current location will stay the same while toggling between scan and pin modes. This screen contains the following information: material, pin setting, temperature correction, Job #, alarm setting, mode, and memory used. 3.
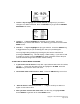
1. In the MAIN Menu, highlight option #2: SCAN The screen will look as follows: 2. You may begin taking readings by firmly pressing the back of the meter onto the material. 3. This will display a relative reading that ranges between 0 and 300. TO SET THE ALARM IN ENHANCED SCAN MODE: 1. If you wish to set the alarm to beep after a pre-selected relative value is reached, highlight option #1: SCAN MODE from the ENHANCED main menu. This will bring you to the SCAN screen. 2.
1. From the ENHANCED Main Menu, use the key to highlight RH-T MODE. Then, press the SELECT key to get into the RH-T mode main menu. The meter will display the main RH-T mode main menu, as shown below: 2. The meter will begin taking readings. As a default setting the RH reading will be the most prominent on the screen. If you would like to make another variable (temperature, GPP/GPK or dew point), the prominent reading, use the and keys to highlight your selection.
• The first line indicates the Moisture Content (MC) job being analyzed. • The second line shows the number of readings stored in the specific job • The third line shows the Average MC value for all stored readings in the specific job. • The fourth line shows the Standard Deviation for the specific job. • The fifth line shows the Coefficient of Variation for the specific job. • Selecting “MORE” gives the user access to the second set of statistical data.
• STORED READINGS: 1. From the storage sub menu, use the keys to highlight “STORED READINGS.” Press the SELECT key to enter the stored readings sub menu. There are two available selections from this menu, as follows: 2. Use the keys to highlight MC readings or RH-T readings. Press the SELECT key to choose your selection. 3. By using the keys you may select which job and location you wish to view.
A selected job containing readings offers two other selectable options: “VIEW SET” and “DONE”. o VIEW SET: This option allows the user to view a specific range of readings in a particular job, as opposed to the entire set, by providing a configurable start point. It becomes useful when large numbers of readings are present in the meter. View Set always begins by displaying “1 TO XXX”, where XXX is the maximum number of readings in the selected job.
EXIT: This menu option returns the meter to Main Menu. IR LINK: This meter option initiates a wireless communication session during which the currently stored readings will be downloaded to a PC. Before using this feature, the target PC must be loaded with Delmhorst Instrument Co.’s Universal Application Program and a Delmhorst base unit must be connected to an available USB port.
established with the base unit. The base unit will also indicate communication established by turning off the green LED and turning on a red LED. 3. Press the “MANAGE DATA” button in the Delmhorst Instrument Co. Universal Application Program.
NOTE: Individual records cannot be downloaded to the PC. The entire storage content is delivered to the PC during a link session. SETUP MENU: The Setup group of features allows access to the configurable parameters of the meter. They are: Date and Time, Power-off time, Backlight, and Conversions (temperature mode and electrode type). All can only be accessed in the Setup Menu. To get to the Setup Menu, use the keys to highlight option #6: SETUP.
• Set Power Off time: This menu option allows the user to change the amount of time allowed to lapse between the last key press and meter shut-down. Allowable range is 1min – 9min, with a default value of 2min. • Set Backlight: This menu option allows the user to change the amount of time allowed to lapse between the last key press and backlight shutdown. The default setting for this feature is “NO”, where the backlight is completely disabled. Backlight shutdown delays are 10, 20, 30sec.
TAKING A READING – PRACTICAL APPLICATIONS The following application notes are intended for use with the meter in PIN MODE. TESTING WOOD: Use the 26-ES electrode on hard materials, wood over 2 inches thick, or for any application where using the insulated pins are needed for best accuracy. The 2-E electrode, with pins that penetrate 5/16” maximum are best for drywall and wood up to 2 inches. The 22-E with 1/2in non-insulated pins is also an excellent option for wood or drywall.
PAINT FAILURE AND MOISTURE Moisture is by far the most frequent cause of paint failure. The key to preventing paint failure is to insure that moisture is not absorbed through the wood to the back of the paint film. So, in order to insure quality paint jobs, wood must remain dry after the application of paint. Outdoor wood can be safely painted without danger of peeling if the %MC is 15% or less. In drier climates, the maximum reading should be 10% to 11%.
new reading until the SELECT button is pressed and released again during the reading cycle. *If the sheathing is plywood, set the meter to the proper species if known. If the species is unknown, use Douglas Fir. If the sheathing is gypsum material, set the species to Drywall. USING 0-100 NUMERICAL REFERENCE SCALE (REL 0-100) When taking a reading on hard materials such as concrete or masonry, set the meter to REL 0-100 for a qualitative indication of the moisture level.
Drive two hardened-steel masonry nails about 3/4" apart into the finish coat of concrete floor. Drive them about 1/8" deep so they make firm contact with the concrete and do not move when touch Touch the nails with the contact pins. Press the select key and read the meter. If the meter reads less than “68”, the surface is dry. However, sub-surface tests should be made to verify if the slab is dry throughout. Taking subsurface readings: Drill two 1/4" holes, 3/4" apart and 1/2" to 2" deep.
surface. Use a hammer to insure the sleeve is fully inserted into the hole and sealed to the concrete. ⇒ Insert the protective yellow cap into the sleeve and let the hole acclimate for 72h. Optional plugs (p/n CS-Plug) are available in three sizes that will isolate a 0.062 space at the hole bottom during acclimation time. ⇒ Remove the cap and immediately insert the RH probe sensor to full hole depth. Wait minimum 1h.
⇒ To add a reading to the previously stored readings, release the SELECT button if you are in triggered mode. If you are in continuous mode, the meter will not store a new reading until the SELECT button is pressed and released again during the reading cycle. Note: Readings between 0.1% and 0.5% indicate a sufficiently dry moisture level. Readings between 0.5% and 1% indicate a borderline situation. Readings greater than 1% indicate material that is too wet for painting or wallpaper.
CARE OF YOUR METER Store your meter in a clean, dry place. The protective carrying case provided is an ideal storage place when the meter is not in use. If the meter has been left in a hot or cold environment overnight or for an extended period, the calibration of the pinless mode may be adversely affected. Under these conditions, allow the meter to acclimate to the temperature conditions in which it will be used for minimum 1-2 hours, or as long as possible.
WARRANTY Delmhorst Instrument Co., referred to hereafter as Delmhorst, guarantees the TotalCheck meter for one year from date of purchase and any optional electrodes against defects in material or workmanship for 90 days. If, within the warranty period of the Model TotalCheck, you find any defect in material or workmanship, return the meter following the instructions in the “Service for Your Meter” section.
SPECIES LIST: The following 71 species are programmed in the meter. The default species is Douglas Fir.