
Use and Care Manual


6
Description/Use
en
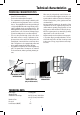
DESCRIPTION
A) Front panel
B) Washableprelter
C) HEPA lter/active carbon lter
D) Nano-silver lter (Model AC230 only)
E) Photocatalytic lter with UVC lamp
F) Air quality sensor
G) AQS (Air Quality System) Air quality LED indicator
H) Handle
I) Filtered air outlet grille
L) Power cable with plug
M) Cable compartment
N) Control panel
O) ON/OFF
P) Fan speed icons
Q) AUTO icon
R) Ionizer icon
S) AQS (Air Quality System) air quality LED indicator on/
o
T) Auto-o
U) Reset button
V) Fan speed LED display
W) LED timer (1-2-4-8 h)
X) HEPA lter exhausted LED
Y) Safety microswitch
USE
Read these instructions before using the appliance.
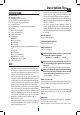
• Unpacktheairpurierandplaceonastableatsurface
so that the air intake in the front panel and air outlet
(top grille) are not blocked. A good position in the room
might be at least 3 feet (1 m) from the wall.
•
Remove the front panel (g. 3). Inside the purier you
will nd the prelter (B) and HEPA lter/active carbon l-
ter (C) and the nano-silver lter (D) (Model AC230 only)
packed, depending on the model, in a plastic bag. And
the photocatalytic lter (E) xed to the air intake grill.
• Removethelter(s)(dependingonthemodel)fromthe
bag, as shown in g. 2, then place them in the following
order: nano lter, with the silver side adhering to the
appliance, HEPA lter with the black active carbon side
resting directly on and adhering to the nano-silver, then
the prelter, slotting it in place as shown in g. 4.
• Replacethefrontpanel;
• Aftermakingsurethevoltageinyourhomecorresponds
to the voltage indicated on the appliance, plug the ap-
pliance into the mains socket.
• Removetheprotectivelmfromthecontrolpanel.
• TurntheapplianceonbytouchingtheON/OFFicon(O).
The corresponding icon lights up and the appliance co-
mes on automatically at minimum speed. The AUTO icon
(Q) ashes and the air quality LED indicators (G) light up
orange for 3 minutes.
This time is necessary for the appliance to detect air
quality, then the AUTO icon becomes steady and the air
quality LED indicators (G) change colour depending on
the air quality detected and also the fan speed changes
accordingly:
BAD AIR QUALITY:
orange + max. fan speed
SATISFACTORY AIR QUALITY:
green + med. fan speed
GOOD AIR QUALITY:
blue + min. fan speed
Please note: the change in colour of the air quality
indicator (G) is always sequential:
ORANGE <-----> GREEN <-----> BLUE
Please note: to vary the set fan speed, touch the icon
(P) corresponding to the required fan speed (Min/
Med/Max).
• TheLEDcorrespondingtotheselectedspeedlightsup.
Please note: When the appliance starts after having
been turned o, using a light pressure on the ON/
OFF, it starts with the last function set with the ex-
ception of the auto-o function).
“AUTO” operation (Q)
Tap the “AUTO” icon, the appliance independently decides the fan
speed according to the air quality detected (min, med, max).
Ionizer icon (R)
For the release of negative ions into the environment through
puried air, touch the ionizer icon (R). The corresponding LED
lights up.
Auto-o (T)
This function can be used to turn the appliance o automati-
cally after a given period of time.
Withtheapplianceon,touchtheauto-oicon(T) to select