
Use and Care Manual


5
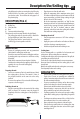
Description/Use/Grilling tips
en
plug fully into the outlet, try reversing the plug. If the plug
should still fail to t, contact your electrician to replace
your obsolete outlet. Do not defeat the safety purpose of
the polarized plug.
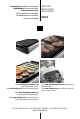
DESCRIPTION PAG. 3
1. Double-sided Grill Plate with non-stick coating
2. Oil Drip Tray
3. Safety interlock
4. Base
5. Connector with indicator light
The unit can be used in two ways (Double-sided grill plate).
• The grilling plate with the grooved surface is suitable for
the typical grilling of steaks, cutlets or the like.
• The frying plate with the smooth surface is used to fry
shellsh, eggs, sliced vegetables or the like.
USE
Before rst use
• Remove all packaging materials and any promotional
labels from the cooking plate and the tray.
• Detach the connector and clean the cooking plate and base
by washing with soap and water in a sink. Rinse and dry
thoroughly.
Make sure the connector inlet on the plate is fully dry.
• Condition the cooking surface by applying a light coating of
vegetable oil or use a non-stick cooking spray.
Wipe o excess oil.
Preparing the unit
• Set base on countertop. Put in the metal drip tray. Match
the cooking plate to the base. The terminal / socket of
the grill plate should be on the same side as the safety
interlock.
• Do not use the appliance if it is not installed following the
sequence as shown on page 3.
Switching the unit on
• Plug the connector fully into the terminal of the cooking
plate (see gure). The connector cannot be plugged in
completely unless the cooking plate is tted properly to
the base.
• Plug the power cord into the wall outlet.
• Adjust the temperature dial to maximum setting (sear).
The indicator light will light on and will remain on till the
preset temperature is reached. During cooking, the light
will cycle on and o. This is normal.
• Be sure the temperature control dial is on "high" for best
browning results and "sear" when barbecuing hamburgers,
steaks, hot dogs, sausage, sh steaks, chicken breasts and
other meat. Use "low" or "medium" setting to reheat
previously cooked foods and when grilling more delicate
foods with lower cooking temperature.
Switching the unit o
• Turn the temperature connector to "o" when cooking is
completed.
• Unplug the power cord from the wall outlet and allow to
cool before cleaning or removing any part.
• Hold the unit by the handles when turning it over.
Cooking times
Use the following table as a guideline for food amounts and
cooking times. Recipe cooking times are estimated.
Cooking time will vary based on the temperature of the grill, the
surrounding air, and the food itself.
The food to be cooked should always be at room temperature.
Never put frozen food directly onto the cooking plate, it could
become hard.
Watch food carefully and adjust the cooking time as necessary.
Turn frequently for more even cooking.
GRILLING TIPS
• For best results, preheat the cooking plate before grilling.
• Tender slices of meat are generally more suitable for
grilling. Somewhat tougher meat will become tender if it
has been marinated overnight.
• To prevent scratching the cooking surface when turning
over the food, always use a plastic or wooden spatula.
Fish and meat should be turned only once if possible.
Repeated turning is unnecessary and dries out the food
being cooked. Never cut foods on the plate surface.
• If cooking vegetables, sh, or lean meat, spray the cooking
surface with a cooking spray or a light coating of vegetable
oil.
• If cooking meat with any amount of fat, or if the food has
been marinated, there is no need to treat the grill.
• Never cook meat too long otherwise it becomes tight.
• If the food being cooked sticks to the cooking plate, wipe
down the cooking plate from time to time with a paper
towel dipped in oil.