GB 18-11-2003 13:57 Pagina 1 CF 210 • Use and maintenance manual . . . . pag. 4 • Mode d’emploi et d’entretien . . . . . pag. 15 • Instrucciones de uso . . . . . . . . . . pag. 21 • Manual de instruções . . . . . . . . . . pag. 41 • Istruzioni per l’uso . . . . . . . . . . . . pag.
GB 18-11-2003 13:57 Pagina 2 I m p o r t a n t s a f e g u a rd s • Use this appliance only as described in this instruction manual. As with any electrical appliance, the instructions aim to cover as many eventualities as possible. Caution and common sense should be used when operating and installing this air conditioner. • This appliance has been manufactured to cool and dehumidify domestic environments and should not be used for other purposes.
GB 18-11-2003 13:57 Pagina 3 Introduction The portable air conditioner is a compact unit for regulating air temperature and humidity. Its extremely flexible characteristics make it easy to use at any time and in any room. It can be operated in multiple modes including cooling, dehumidifying and ventilating. The appliance has been designed for domestic use and may be used in the home, office, etc. It must be connected to an outlet with an impedance of less than 0.197 Ohms.
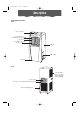
GB 18-11-2003 13:57 Pagina 4 Description DESCRIPTION OF PARTS Front Control panel Air flow direction fins (right hand – left hand) Air outlet Air flow direction fins (high – low) Handle Water tank Castors Back Top air intake grille for cooling, dehumidifying and ventilating.
GB 18-11-2003 13:57 Pagina 5 Control panel All functions of the unit can be controlled from the control panel or the remote control unit (certain models only). SET TEMP buttons TIMER ON/OFF button Press this button to activate the timer function (turns the appliance off if already on and vice versa). These buttons can be used to set the required room temperature in a range between 17°C (62°F) and 31°C (87°F). The temperature set is increased or reduced by 1°C (33°F).
GB 18-11-2003 13:57 Pagina 7 O p e ra t i o n SETTING THE REMOTE CONTROL CLOCK Remove the cover of the battery compartment on the back of the remote control unit. After inserting two 1.5 V alkaline batteries in the compartment, the clock is automatically set at 12:00. If you want to set the time to 10:30, proceed as follows: CLK 1 Press the CLK button (in the battery compartment) with a pointed object such as a pencil. The time indicator on the display flashes and the correct time can be set.
GB 18-11-2003 13:57 Pagina 8 O p e ra t i o n TIMER FUNCTION When the air conditioning unit is off (but plugged into the outlet), to turn it on at the required time press the "TIMER ON/OFF" button (" " will appear on the display), then press the " TIMER HOUR" button until the number of hours to elapse before the appliance comes on appears on the display.
Installation CHOOSING THE INSTALLATION SITE Position the air conditioning unit on a flat surface where the air outlet grilles cannot be obstructed. Position the appliance at least 50 cm (19.7) away from walls or obstacles. INSTALLING THE AIR EXHAUST HOSE 1. Open out the end of the hose and screw the two adapters on counterclockwise (see figure). 2. Fit the square adapter on the air exhaust hose to the air exhaust outlet on the appliance. 3. Connect the other end (flange) to the nearest window.
Installation If the flange hose must be curved to expel the air, you should follow the measurements given in the figure: 50 cm (19.7 in) 10 MOUNTING THE ADJUSTABLE WINDOW CLOSURE CROSSPIECE ( Only for some models ) The appliance is provided with an adjustable bracket. If you have a sliding window, position the crosspiece in the window frame, extend it completely then close the window onto the crosspiece.
GB 18-11-2003 13:57 Pagina 11 Installation CONDENSATION DRAINAGE When the air conditioning unit is operating in air conditioning or dehumidifying mode, the condensation is collected in a special tank. When the tank is full, the "tank full" indicator light on the control panel flashes. Remove the condensation tank, empty and replace on the unit as shown in the following figures. 3.
GB 18-11-2003 13:57 Pagina 12 Maintenance MAINTENANCE • Turn the appliance off and unplug from the outlet before cleaning. • Make sure the unit is disconnected from all voltage before proceeding with maintenance. This avoids the risk of electric shock. • Never use chemical solvents (such as benzene and alcohol) to clean the surface of the unit. This could scratch or damage the surface or even distort the external part.
GB 18-11-2003 13:57 Pagina 13 Tr o u b l e s h o o t i n g Before contacting an authorized technical service center, check the following: Problem The appliance does not work.
GB 18-11-2003 13:57 Pagina 14 L i m i t e d W a r ra n t y De’Longhi is the distributor of Kenwood home appliances. This warranty applies to all home appliances with De’Longhi or Kenwood brand names. FOR CONTIGUOUS UNITED STATES ONLY Limited Warranty We warrant each De’Longhi AIR CONDITIONER to be free from defects in material and workmanship.