INSTALLATION and SERVICE INSTRUCTIONS USE and CARE INSTRUCTIONS DOMINO VITROCERAMIC HOB model DE302HB distributed by DèLonghi Pty Ltd
Dear Customer, Thank you for having purchased and given your preference to our product. The safety precautions and recommendations reported below are for your own safety and that of others. They will also provide a means by which to make full use of the features offered by your appliance. Please keep this booklet in a safe place. It may be useful in future, either to yourself or to others in the event that doubts should arise relating to its operation.
BEFORE USING FOR THE FIRST TIME • Read the instructions carefully before installing and using the appliance. • After unpacking the appliance, make sure it is not damaged. In case of doubt, do not use the appliance and contact your supplier or a qualified engineer. • Remove all packaging and do not leave the packing material (plastic bags, polystyrene, bands etc) in easy reach of children as they may cause serious injury. The packaging materials are recyclable.
INSTALLATION CAUTION: This appliance shall only be serviced by authorized personnel. • This appliance is to be installed only by an authorised person according to the current local regulations and in observation of the manufacturer’s instructions. • Incorrect installation, for which the manufacturer accepts no responsibility, may cause personal injury of damage. • Always disconnect the cooktop from mains power supply before carrying out any maintenance operations or repairs.
This cooktop can be built into a working surface 20 to 40 mm thick and 600 mm deep. In order to install the ceramic hob into the kitchen fixture, a hole with the dimensions shown in figure 1 has to be made, keeping in consideration the following: • Within the unit, between the bottom of the hob and the upper surface of a shelf there must be a clearance of at least 30 mm (fig. 2b). • It is absolutely essential that you place a separator between the base of the hob and the built-in unit.
FASTENING THE COOKTOP Each cooktop is supplied with a set of tabs and screws to fasten it on units with a working surface from 2 to 4 cm deep. The kit includes 4 tabs A and 4 self-threading screws B (fig. 4). • • • • • • • • Cut the unit. Turn the hob upside down and rest the glass side on a cloth. Spread the seal C around the edge of the hob (fig. 3). Put tabs A into the mountings; only tighten screws B a few turns. Make sure that the tabs are mounted correctly as shown in the figure 4.
ELECTRICAL SECTION IMPORTANT: Installation must be carried out according to the manufacturer's instructions. Incorrect installation may cause harm and damage to people, animals or property, for which the manufacturer accepts no responsibility. Before carrying out any work on the electrical section of the appliance, it must be disconnected from the mains. Connection to a good earth wiring system is absolutely essential.
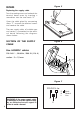
Figure 5 REPAIRS Replacing the supply cable Turn the cooktop over and unhook the terminal board cover by inserting a screwdriver into the two hooks “A”. A Open the cable gland by unscrewing screw “F”, unscrew the terminal screws and remove the cable. The new supply cable, of suitable type and section, is connected to the terminal board following the diagrams shown below. SECTION OF THE SUPPLY CABLE Figure 6 Use H05RR-F cables 220-240 V ~, 50/60 Hz, 2900 W (12.
ELECTRIC DIAGRAM Figure 8 4 4A S H 2 4 P2 2 S H P1 On S2 Hot S1 F1 F2 (PHASE) 532008 INVENSYS MP-101-FPC (LOAD) L N (N) M (PILOT) (PHASE) (LOAD1) 532009 INVENSYS MDP-110-FPC (N) (LOAD2) (PILOT) ELECTRIC DIAGRAM KEY F1 F2 S2 S1 P1/P2 M T Radiant heater energy regulators Radiant heater energy regulators Line pilot lamp Radiant heaters pilot lamp Radiant heaters Terminal block Earth connection 9
VITROCERAMIC HOB Figure 9 2 1 MIN MAX MIN 6 5 MAX MIN MAX 4 3 FEATURES - Electrical insulation Class I. GENERAL FEATURES 1. Hi-light cooking zone Ø 140 mm - 1200 W 2. Double hi-light cooking zone Ø 180/120 mm - 1700/700 W CONTROL PANEL DESCRIPTION 3. 4. 5. 6.
How to use your Ceramic Hob The ceramic surface of the hob allows a fast transmission of heat in the vertical direction, from the heating elements underneath the ceramic glass to the pans set on it. The heat does not spread in a horizontal direction, so that the glass stays “cool” at only a few centimeters from the cooking plate. The cooking zones are shown by painted disks on the ceramic surface. Before switching on the cooktop make sure that it is clean.
HI-LIGHT DOUBLE ZONE (fig. 12) The heating element is formed of a 2 coils of resistant material which reaches the working temperature quickly. These zones are controlled by a continuous energy regulator switch (fig. 13). You may choose to use the inner zone only ( ) or the fual dual cooking zone ( ). The heat intensity can be regulated continuously from “MIN” to “MAX”. Check that the hob is clean and then switch on by turning the control knob. When the hob is working, the pilot light will be on.
RESIDUAL HEAT INDICATOR The hob also features a warning lamp which is wired to the cooking zones. When the temperature of a cooking plate is over 60°C, the warning lamp is also lit-up to warn of heat on the surface of the hob. This lamp also stays on after the cooking plates have been switched off to shown that the hob surface is still hot. This residual heat will lasts for a long time after the cooking plate has been switched off.
SAFETY HINTS • Before you switch the hob on, make knob controls sure you know which touch controlsthe the required cooking zone. We advise you to set the pan over the cooking zone before switching it on. • Do not use pots and pans with rough bases (pay attention to cookware made of cast-iron). Rough bases can damage the glass surface of the hob (scratches). • Always ensure that the base of your saucepan is clean and dry before placing on the hob.
Cleaning and Maintenance Before you begin cleaning make sure that the hob is switched off. • Remove spillages and other types of incrustations. • Dust or food particles can be removed with a damp cloth. • If you use a detergent, please make sure that it is not abrasive or scouring. Abrasive or scouring powders can damage the glass surface of the hob. • All traces of the cleaner must be removed with a damp cloth. • Dust, fat and liquids from food that has boiled over must be removed as soon as possible.
Descriptions and illustrations in this booklet are given as simply indicative. The manufacturer reserves the right, considering the characteristics of the models described here, at any time and without notice, to make eventual necessary modifications for their construction or for commercial needs. cod.