DeLonghi DW67S/W
..................1 This manual contains sections of Safety Instructions,Operating Instructions, Installation Instructions and Troubleshooting Tips etc. Carefully reading it before using the dishwasher will help you to use and maintain the dishwasher properly. To review the section on Troubleshooting Tips will help you to solve some common problems by yourself and not need to ask for the help of professional technicians. Contro l Panel . . . . . . . . . . . . . . . . . . . . . . . .
Under certain conditions, Hydrogen gas may be produced in a hot-water system that has not been used for two weeks or more. HYDROGEN GAS IS EXPLOSIVE. If the hot-water system has not been used for such a period, before using the dishwasher turn on all hot-water faucets and let the water flow from each for several minutes. This will release any accumulated hydrogen gas. As the gas is flammable, do not smoke or use an open flame during this time. This appliance must be grounded.
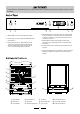
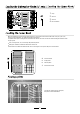
To get the best performance from your dishwasher,read all operating instructions before using it for the first time. auto DeLonghi 5 1 2 3 4 6 7 4 Delayed Start Button: Press this button to set the delayed hours for washing. You can delay the start of washing up to 24 hours. One press on this button delays the start of washing by one hour. 1 ON/OFF Button: To turn on/off the power supply. 2 Power Light : To come on when the ON/OFF Button is Pressed down.
Intensive Heavy 2 Pre-wash (45℃) wash(50℃/ 70℃ ) Rinse Rinse Rinse (70℃) Drying. For heavy soiled loads, such as pots , plates,glasses and lightly soiled pans. Pre-wash Pre-wash Wash (50℃) Rinse Rinse (70℃) Drying. For normal soiled loads, such as pots, plates,glasses and pans. standard daily cycle. Pre-wash Pre- Wash Wash(50℃) Rinse 60℃ Drying. Rinse For dishes that need to rinsed and dried only Rinse Rinse (70℃) Drying. Rapid A shorter wash for lightly soiled loads that do not need drying.
The dispenser must be refilled before the start of each wash cycle following the instructions provided i n the" Wash Cycle Table".Your dishwashers use less detergent and rinse aid than conventional dishwashers. Generally, only one tablespoon of detergent is needed for a normal wash load. Also, more heavily soiled items need more detergent. Always add the detergent just before starting dishwasher, otherwise it could get damp and will not dissolve properly.
To open the dispenser, turn the cap to the "open" (left) arrow and lift it out. Pour in rinse -aid into the container is fill (approx . 140 ml) , Being careful not to overfill. Replace the cap by inserting it aligned w ith "open" arrow and turning i t to the closed (right) arrow. Your dishwashers are designed to use liquid rinse aids. The rinse aid dispenser is located inside the door next to the detergent dispenser.
If there is no rinse aid warning light in the control panel, you can judge the amount of rinse aid by the following means. The black dot on the rinse aid dispenser indicates the amount of rinse aid in the dispenser. As the rinse aid diminishes, the size of the black dot decreases. You should never let the rinse aid get below 1 / 4 full. As the rinse aid diminishes, the size of the black dot on the rinse aid level indi cator changes, as illustrated below.
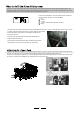
1 2 2 2 2 3 1 1 2 3 4 2 2 Cups Glasses Saucers Dessert dishes 1 4 We recommend that you place large items which are most difficult to clean into the lower rack: pots, pans, lids, serving dishes and bowls, as shown in the figure to the right. It is preferable to place serving dishes and lids on the side of the racks in order to avoid bl ocking the rotation of the top spray arm. Pots, serving bowls, etc, must always be placed top down. Deep pots should be slanted to allow water to flow out.
Silverware should be placed in the silverware basket with handles at the bottom: If the rack has side baskets, the spoon should be loaded individually into the appropriate slots, Especially long utensils should be placed in the horizontal position at the front of the upper rack.
For your convenience, we have placed the drain pump and filtering system within easy reach inside the tub. There are three components of the filtering system: the main filter, the coarse filter, and the fine filter. 1 Main filter Food and soil particles trapped by this fil ter are pulverized by a special jet on the lower spray arm and washed down the drain. 2 Coarse fi lter Larger items, such as pieces of bone or glass, that could clog the drain are trapped in the coarse filter.
The dishwasher must never be used without the fi lters in pl ace . Improper replacement of the filter may reduce the performance level of the appliance and cause damage to the appliance . When cleaning the filters, don't knock on them .Otherwise the filters could be contorted and the performance of dishwasher could be debased. To clean the edge around the door, you should use only a soft warm, damp rag.
Connect the cold water supply hose to a threaded 3/4(inch) connector and make sure that it is fastened tightly in place. If the water pipes are new or have not been used for an extended period of time, let the water run to make sure that the water is clear and free of impurities. If this precaution is not taken, there is a risk that the water inlet can get blocked and damage the appliance.
' ' Fuse blown, or the circuit breaker acted Replace fuse or reset circuit breaker. Remove any other appliances sharing the same circuit with the dishwasher Power supply is not turned on Make sure the dishwasher is turned on and the door is closed securely. Make sure the power cord is properly plugged into the wall socket. Water pressure is low Check that the water supply is connected properly and the water is turned on. Overflow The system is designed to detect an overflow.
Combination of soft water and too much detergent Use less detergent if you have soft water and select a shortest cycle to wash the glassware and to get them clean. Tea or coffee stains using a solution of 1/2 cup of bleach and 3 cups warm water to remove the stains by hand. You have to wait for 20 minutes after a cycle to let the heating elements cool down before cleaning interior; otherwise, burns will happen.
600 600 850 1155 Height : Width : Depth : Voltage connected Load : Water pressure: Hot water connection : Power supply: Capacity: 850mm 600mm 600mm see rating label 0.04-1.