
Technical data


8
Instructions for use
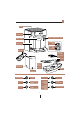
Installing the appliance
Attention!
The following safety measures must be complied with when
installing the appliance:
t 5IFBQQMJBODFDPVMECFEBNBHFECZXBUFSJOöMUSBUJPO
Do not position the appliance near to water taps or sinks.
t 5IFBQQMJBODFDPVMECFEBNBHFEJGUIFXBUFSJUDPOUBJOT
freezes.
Do not install the appliance in a room where the
temperature can fall below freezing point.
t 1PTJUJPOUIFQPXFSTVQQMZDBCMFJOBXBZUIBUJUDBOOPUCF
damaged by sharp edges or by contact with hot surfaces
(e.g. electric plates).
Connecting the appliance
Attention!
.BLF TVSF UIBU UIF FMFDUSJD NBJOT WPMUBHF DPSSFTQPOET XJUI
that indicated on the data plate on the base of the appliance.
Insert the power supply cable connector in the socket on the
CBDLPGUIFBQQMJBODFöHUIFOJOTFSUUIFQMVHJOUIFQPXFS
outlet.
Check that the mains power supply voltage corresponds to
the value indicated on the rating plate on the bottom of the
appliance.
If the power socket does not match the plug on the appliance,
IBWFUIF TPDLFUSFQMBDFEXJUI B TVJUBCMF UZQFCZBRVBMJöFE
professional.
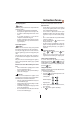
Activation of the water lter and lling of the water
tank
t 3FNPWFUIF öMUFSGSPNUIF QBDLBHJOH BOE SJOTFJU XJUI
BCPVUMPGSVOOJOHXBUFSöH
t 5VSOUIF DBMFOEBS EJTD TFF öHVOUJMUIFGPMMPXJOH
months of use are displayed.
Please note
UIFöMUFSIBT B UXP NPOUI EVSBUJPO JG UIF BQQMJBODF JT VTFE
normally, whereas if the machine remains unused with the
öMUFSJOTUBMMFEJUIBTBNBYJNVNNPOUIEVSBUJPO
t 3FNPWFUIFXBUFSUBOLBOEöMMJUXJUIGSFTIXBUFSEPOPU
FYDFFEUIF."9MJOFöH
t $PNQMFUFMZEJQUIFöMUFSJOUIFXBUFSUJMUJOHJUUPFOBCMF
BJSCVCCMFTUPDPNFPVUöH
t *OTFSUUIFöMUFSJOUIFBQQSPQSJBUFTFBUöHQSFTTEPXO
and close the tank with the lid.
t 1MBDFUIFUBOLCBDLJOUPUIFNBDIJOF&OTVSFUIFXBUFS
MFWFMJTOPUPWFSUIF."9MJOFöH
5IFöMUFSJTOPXBDUJWBUFEBOEUIFNBDIJOFDBOCFVTFE
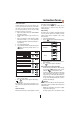
Appliance rst use
t 5VSOUIFBQQMJBODFPOCZQSFTTJOHUIF*0NBJOTXJUDIBU
rear in pos. I: the appliance performs a self-test, signalled
by the sequential ashing of the lights.
t 0ODF UIF TFMGUFTU JT DPNQMFUFE UIFiIPU XBUFS TQPVUw
light B8 ashes while the others turn-o: the appliance
TJHOBMTJUJTOFDFTTBSZUPJOTFSUUIFIPUXBUFSTQPVUöH
8).
t 1MBDFB DPOUBJOFS VOEFSOFBUIUIFTQPVUXJUINJOJNVN
DBQBDJUZPGNMöH
t 1SFTTUIFiIPUXBUFSwCVUUPO
: delivery starts and
interrupts automatically.
t 5IF DPòFF BOE XBUFS TQPVU MJHIUT øBTI UP JOEJDBUFUIF
appliance is reaching temperature: when the lights stop
ashing and remain permanently on, the appliance is
ready for use.
Please note: upon rst use
t *GMJHIUT
and ash, press the button
again.
t 6QPOöSTUVTFJUJTOFDFTTBSZUPNBLFDPòFFTPS
cappuccinos before the machine gives a satisfying result.
Settings of the programming menu
To access the menu, ensure the appliance is in stand-by,
simultaneously press buttons
and until the ON/
Standby light ashes: the appliance is in programming mode.
4FUUIFNBDIJOFBT XBOUFEUPFYJUUIFQSPHSBNNJOHNFOV
press button
again.
Setting the temperature
If wanting to modify the water temperature with which coee
is delivered, proceed as follows:
"DDFTTUIFQSPHSBNNJOHNFOV
2. Keep button
pressed until the lights relative to the
wanted temperature turn-on:
Low temperature:
.FEJVNUFNQFSBUVSF
High temperature:
3. When the lights relative to the desired selection turn-on,
release the button.
1SFTT
to turn the appliance o (stand-by).
en