
Get Started Guide


WATER FILTER
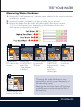
8.
Press the button to
enter the menu.
9. Press the or
button until “Install Filter”
is displayed.
10. Press the button.
11. The message “Enable?” is
displayed.
12. Press the button to
confirm the selection. “Hot
Water Confirm?” is displayed.
13. Position a container with a
minimum capacity of 3.4 oz. /
100 ml under the hot water
spout.
14. Press the button to
confirm the selection. The
appliance begins delivering
hot water and the message
“Please Wait“ is displayed.
15. After delivery, the appliance returns
automatically to the “Ready for Coffee”
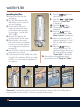
A C D E
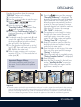
Please note! The filter lasts about two
months if the appliance is used normally.
If the coffee maker is
left unused with
the filter installed, it will last a maximum
of three weeks.
B
Installing the filter
1. Remove the filter from the
packaging.
2. Turn the date indicator disk
(A) until the next 2 months of
use are displayed.
3. To activate the filter, put it
under tap water until water
overflows the side openings
for more than 1 minute (min.
500 ml) (B).
4. Remove the tank from the
appliance and fill with water.
5. Insert the filter in the water
tank and immerse it completely
for ten or so seconds, sloping
it to enable the air bubbles to
escape (C).
6. Insert the filter in the filter housing (D) and
press as far as it will go.
7. Close the tank with the lid (E), then place
the tank in the machine. When you install
the filter, you must notify the appliance of
its presence.