CAFFETTIERA ELETTRICA ELECTRIC MOKA COFFEE MAKER MOKA ÉLECTRIQUE ELEKTRISCHER ESPRESSOKOCHER KOFFIE-APPARAAT CAFETERA CAFETEIRA ∏ÏÂÎÙÚÈ΋ ηÊÂÙȤڷ ELEKTRISK KAFFEMASKINE ELEKTRISK ESPRESSOBRYGGARE ELEKTRISK KAFFEMASKIN SÄHKÖKAHVINKEITIN ùãÖäíêàóÖëäÄü äéîÖÇÄêäÄ ELEKTRICK¯ MOKA KÁVOVAR ELEKTRYCZNY EKSPRES DO KAWY ELEKTROMOS KÁVÉFŐZŐ ISTRUZIONI PER L’USO OPERATING INSTRUCTIONS MODE D’EMPLOI BEDIENUNGSANLEITUNG GEBRUIKSAANWIJZINGEN INSTRUCCIONES PARA EL USO INSTRUÇÕES √‰ËÁ›Â˜ ¯Ú‹Û˘ BRUGSANVISNING BRUKSANVISN
ELECTRICAL CONNECTION (UK ONLY) A) If your appliance comes fitted with a plug, it will incorporate a 13 Amp fuse. If it does not fit your socket, the plug should be cut off from the mains lead, and an appropriate plug fitted, as below. WARNING: Very carefully dispose of the cut off plug after removing the fuse: do not insert in a 13 Amp socket elsewhere in the house as this could cause a shock hazard. With alternative plugs not incorporating a fuse, the circuit must be protected by a 15 Amp fuse.
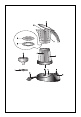
ITALIANO • • Leggere con attenzione questo libretto istruzioni prima di installare ed usare l’apparecchio. Solo così potrete ottenere i migliori risultati e la massima sicurezza d’uso. DESCRIZIONE DELL’APPARECCHIO La seguente terminologia sarà continuamente usata nelle pagine successive. A. Coperchio caraffa B. Caraffa C. Caldaia D. Filtro a disco E. Guarnizione F. Base di appoggio G. Cavo di alimentazione H. Interruttore acceso/spento I. Lampada spia J. Valvola di sicurezza K. Filtro a imbuto L.
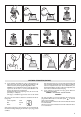
COME PREPARARE IL CAFFÈ 1) Assicurarsi che la caffettiera sia fredda e svitarla tenendo la caldaia con una mano e con l’altra ruotare il raccoglitore in senso antiorario (fig. 1). 2) Togliere il filtro a imbuto e, se si desidera preparare l’intera caffettiera, riempire la caldaia con acqua fresca fino a raggiungere la valvola di sicurezza (visibile all’interno della caldaia) senza superarla (fig. 2).
facendo attenzione che l’acqua non penetri nel connettore. Nota: quando si toglie il filtro a disco per operazioni di pulizia (vedi fig. 9) o per sostituzione della guarnizione, ricordarsi poi (prima di utilizzare la caffettiera) di re-inserirlo correttamente per evitare pericolosi spruzzi di acqua calda. Non risciacquare mai la caldaia sotto il rubinetto e non immergere mai nell’acqua.
ENGLISH Carefully read this instruction booklet before installing and using the appliance. This is the only way to ensure the best results and maximum safety for the user. DESCRIPTION OF THE APPLIANCE The following terminology will be used repeatedly on the following pages. A. Pitcher lid B. Carafe C. Boiler D. Disk filter E. Gasket F. Support base G. Power cable H. On/off switch I. Pilot light J. Safety valve K. Funnel filter L. Half pot adapter disk M. Coffee slits N.
HOW TO PREPARE THE COFFEE 1) Check that the coffee maker is cold, and then unscrew it by holding the boiler with one hand and turning the pitcher anticlockwise with the other (Fig. 1). 2) Remove the funnel filter and, to prepare a full pot of coffee, fill the boiler with fresh water until reaching the safety valve (visible inside the boiler), without exceeding it (Fig. 2). On the other hand, to prepare half a pot of coffee maker, fill the boiler with water to the circular mark under the safety valve (Fig.
Never rinse the boiler under the tap water and never immerse it in water. DESCALING Over time, after making a large number of coffees, a layer of lime scale may form on the bottom of the boiler. This may make percolation times excessively long. To prevent this, the layer of lime scale must be removed regularly by descaling. Use commercially available products specifically for descaling coffee machines (citric acid for example). To descale, proceed as follows: 1.
FRANÇAIS Lisez attentivement ce mode d’emploi avant d’installer et d’utiliser votre appareil. Vous pourrez ainsi en tirer les meilleurs résultats et l’utiliser en toute sécurité. DESCRIPTION DE L’APPAREIL Les termes suivants seront utilisés dans la suite de la notice A. Couvercle du compartiment supérieur B. Verseuse C. Chaudière D. Disque filtre E. Joint F. Base d’appui G. Cordon d’alimentation H. Interrupteur marche/arrêt I. Lampe témoin J. Valve de sécurité K. Filtre entonnoir L.
COMMENT PRÉPARER LE CAFÉ elle s’arrête automatiquement. 1) Assurez-vous que la cafetière est froide. Tenez le bas d’une main et, de l’autre, dévissez le haut (fig. 1). IMPORTANT : lors de la première mise en service de la cafetière, lavez tous les accessoires et les circuits intérieurs à l’eau chaude et préparez plusieurs cafés que vous jetterez.
de le remettre correctement en place afin d’éviter les éclaboussures d’eau chaude. Remarque : quand vous retirez le disque filtre pour effectuer un nettoyage ou remplacer le joint, n’oubliez pas (avant d’utiliser la cafetière) de le repositionner correctement afin d’éviter les éclaboussures d’eau chaude. Ne jamais rincer la chaudière sous l’eau courant et ne pas la plonger dans l’eau.
DEUTSCH Lesen Sie vor Installation und Gebrauch des Gerätes die vorliegende Bedienungsanleitung aufmerksam durch. Sie erzielen dadurch optimale Ergebnisse und höchste Betriebssicherheit. BESCHREIBUNG DES GERÄTES Die folgende Terminologie gilt für alle darauf folgenden Seiten. A. Deckel des Oberteils B. Kanne C. Wasserbehälter D. Scheibensieb E. Dichtung F. Untersatz G. Netzkabel H. EIN/AUS-Taste I. Kontrolllampe J. Sicherheitsventil K. Trichtersieb L. Zwischenscheibe für halbe Espressokochermenge M.
ZUBEREITUNG VON ESPRESSOKAFFEE 1) Stellen Sie sicher, dass der Espressokocher kalt ist und drehen Sie diesen auf, indem Sie mit einer Hand den Wasserbehälter festhalten und mit der anderen das Oberteil, in dem sich der gebrühte Kaffee sammelt, gegen den Uhrzeigersinn, d.h. nach links, aufdrehen (Abb.1). 2) Das Trichtersieb entnehmen. Zur Zubereitung des ganzen Espressokochers, den Wasserbehälter mit frischem Wasser bis zum Sicherheitsventil (innen im Wasserbehälter sichtbar) füllen (Abb.2).
• Ab und an überprüfen, dass die Löcher des Scheibensiebs nicht verstopft sind. Bei Verstopfungen die Löcher mit einer Nadel reinigen (Abb.9). • DEN ESPRESSOKOCHER NICHT IM GESCHIRRSPÜLER REINIGEN. • Für die Reinigung keine Lösungsmittel oder scheuernde Spülmittel verwenden. Es reicht, den Espressokocher mit einem Schwamm abzuwaschen.
NEDERLANDS Lees aandachtig deze gebruiksaanwijzingen alvorens het apparaat te installeren en in gebruik te nemen. Alleen op die manier staat u borg voor de beste resultaten en een veilig gebruik. BESCHRIJVING VAN HET APPARAAT De volgende termen worden voortdurend gebruikt op de hiernavolgende pagina’s. A. Deksel reservoir B. Kannetje C. Verwarmingselement D. Schijffilter E. Pakking F. Steunbasis G. Voedingssnoer H. Schakelaar aan/uit I. Controlelampje J. Veiligheidsventiel K. Trechtervormige filter L.
HOE KOFFIE TE ZETTEN 1) Zorg ervoor dat het koffiezetapparaatje koud is. Schroef het open door het verwarmingselement vast te houden en het reservoir tegen de wijzers van de klok in te draaien (fig. 1). 2) Verwijder de trechtervormige filter en, ingeval u het hele koffiezetapparaat wilt zetten, vul het verwarmingselement met fris water tot aan het niveau van het veiligheidsventiel (zichtbaar aan de binnenkant van het verwarmingselement), zonder dit niveau te overschrijden (fig. 2).
een vochtige doek te gebruiken. Zorg ervoor dat geen water in de stekker sijpelt. • Maak voor de reiniging geen gebruik van oplosmiddelen of schurende reinigingsproducten. Het volstaat een spons te gebruiken. Opmerking: wanneer de schijffilter verwijderd wordt voor de reiniging of vervanging van de pakking, wordt niet vergeten deze (vóór het koffiezetapparaatje aan te zetten) correct terug te plaatsen, om gevaarlijke spatten heet water te voorkomen.
ESPAÑOL Lea detenidamente este manual de instrucciones antes de instalar y usar el aparato. Sólo así podrá obtener los mejores resultados y la máxima seguridad durante el uso. DESCRIPCIÓN DEL APARATO La siguiente terminología se repetirá continuamente en las páginas sucesivas. A. Tapadera del recipiente B. Jarra C. Caldera D. Filtro en forma de disco E. Goma F. Base de apoyo G. Cable de alimentación H. Botón encendido/apagado I. Lámpara piloto J. Válvula de seguridad K. Filtro en forma de embudo L.
CÓMO PREPARAR EL CAFÉ 1) Asegúrese de que la cafetera esté fría. Debe desenroscarla sujetando con una mano la caldera y con la otra debe darle vueltas al cuerpo superior en el sentido contrario de las agujas del reloj (fig. 1). 2) Extraiga el filtro en forma de embudo y para preparar la cafetera entera, llene la caldera con agua fresca hasta la válvula de seguridad (visible en el interior de la caldera) sin superarla (fig. 2).
siones que las de las juntas incluidas en el equipamiento. • NO LAVE LA CAFETERA EN EL LAVAVAJILLAS. • No use disolventes o detergentes abrasivos para limpiar externamente la caldera o la base de apoyo. Es suficiente limpiarlas con un paño húmedo, teniendo cuidado de que el agua no penetre en el conector. Nota: cuando quite el filtro en forma de disco para efectuar operaciones de limpieza (fig.
PORTOGHESE Leia atentamente este manual de instruções antes de instalar e utilizar o aparelho. Só assim poderá obter os melhores resultados e a máxima segurança de utilização. DESCRIÇÃO DO APARELHO A seguinte terminologia será continuamente utilizada nas páginas seguintes. A. Tampa do colector; B. Jarro C. Caldeira; D. Filtro de disco E. Vedação F. Base de apoio; G. Cabo de alimentação; H. Interruptor ligado/desligado; I. Luz piloto; J. Válvula de segurança; K. Filtro de funil; L.
COMO PREPARAR O CAFÉ 1) Certifique-se de que a cafeteira está fria e desenrosque-a. Segure a caldeira com uma mão e, com a outra, rode o colector no sentido contrário ao dos ponteiros do relógio (fig. 1). 2) Retire o filtro de funil e, se desejar preparar toda a cafeteira, encha a caldeira com água fresca até atingir a válvula de segurança (visível no interior da caldeira), sem a ultrapassar (fig. 2).
quente e secá-la com um pano húmido e macio. Nota: quando retirar o filtro de disco para operações de limpeza ou para a substituição do anel de vedação, insira-o correctamente (antes de utilizar a cafeteira) para evitar perigosos salpicos de água quente. Durante a limpeza, nunca mergulhe a base e a caldeira na água: trata-se de um aparelho eléctrico.
∂§§∏¡π∫∞ ¢È·‚¿ÛÙ ÚÔÛÂÎÙÈο ÙÔ ·ÚfiÓ ÂÁ¯ÂÈÚ›‰ÈÔ Ô‰ËÁÈÒÓ ÚÈÓ ÂÁηٷÛÙ‹ÛÂÙÂ Î·È ¯ÚËÛÈÌÔÔÈ‹ÛÂÙ ÙË Û˘Û΢‹. ªfiÓÔÓ ¤ÙÛÈ ı· ÂÍ·ÛÊ·Ï›ÛÂÙ ٷ ηχÙÂÚ· ·ÔÙÂϤÛÌ·Ù· Î·È ÙË Ì¤ÁÈÛÙË ·ÛÊ¿ÏÂÈ· ¯Ú‹Û˘. ¶∂ƒπ°ƒ∞º∏ ∆∏™ ™À™∫∂À∏™ √È ·ÎfiÏÔ˘ıÔÈ fiÚÔÈ ¯ÚËÛÈÌÔÔÈÔ‡ÓÙ·È ÛÙȘ ÂfiÌÂÓ˜ ÛÂÏ›‰Â˜. A. ∫·¿ÎÈ ‰Ô¯Â›Ô˘ Û˘ÏÏÔÁ‹˜ B. ∫·Ó¿Ù· C. §¤‚ËÙ·˜ D. ¢›ÛÎÔ˜ Ê›ÏÙÚÔ˘ E. §¿ÛÙÈ¯Ô F. µ¿ÛË ÛÙ‹ÚÈ͢ G. ∏ÏÂÎÙÚÈÎfi ηÏÒ‰ÈÔ H. ¢È·ÎfiÙ˘ ON/OFF I. ∂Ó‰ÂÈÎÙÈ΋ Ï˘¯Ó›· J. µ·Ï‚›‰· ·ÛÊ·Ï›·˜ K. Èӛ Ê›ÏÙÚÔ˘ L. ∞ÓÙ¿ÙÔÚ·˜ ÁÈ· ÌÈÛ‹ ηÊÂÙȤڷ M.
¶ø™ ¡∞ º∆π∞•∂∆∂ ∫∞º∂ ÁÈ· Ó· ·ÔÎÙ‹ÛÂÈ ÔÌÔÈÔÁ¤ÓÂÈ· 1) µÂ‚·Èˆı›Ù fiÙÈ Ë Î·ÊÂÙȤڷ Â›Ó·È ÎÚ‡· Î·È Í‚ȉÒÛÙ ÙËÓ ÎÚ·ÙÒÓÙ·˜ ÙÔ Ï¤‚ËÙ· Ì ÙÔ ¤Ó· ¯¤ÚÈ Î·È Á˘ÚÓÒÓÙ·˜ ·ÚÈÛÙÂÚfiÛÙÚÔÊ· Ì ÙÔ ¿ÏÏÔ ¯¤ÚÈ ÙÔ ‰Ô¯Â›Ô Û˘ÏÏÔÁ‹˜ (ÂÈÎ. 1). ∞Ó ı¤ÏÂÙ ӷ ÊÙÈ¿ÍÂÙ ÌfiÓÔ ÌÈÛ‹ ηÊÂÙȤڷ, Û˘ÓÈÛÙ¿Ù·È Ó· ·Ê‹ÛÂÙ ÙËÓ Î·ÊÂÙȤڷ ¿Óˆ ÛÙË ‚¿ÛË ÂÚ›Ô˘ ÁÈ· 5 ÏÂÙ¿ ÌÂÙ¿ ÙÔ Ù¤ÏÔ˜ Ù˘ Âί‡ÏÈÛ˘ ÒÛÙ ٷ ÊÙ¿ÛÂÈ ÛÙËÓ È‰·ÓÈ΋ ıÂÚÌÔÎÚ·Û›·.
›‰È˜ Ì ÂΛӘ ÙˆÓ ·Ú¯fiÌÂÓˆÓ. ∂ϤÁ¯ÂÙ ÂÚÈÔ‰Èο ÙȘ Ùڇ˜ ÙÔ˘ ‰›ÛÎÔ˘ Ê›ÏÙÚÔ˘ Î·È ·Ó ¤¯Ô˘Ó ‚Ô˘ÏÒÛÂÈ Î·ı·Ú›ÛÙ ÙȘ Ì ̛· ‚ÂÏfiÓ· (ÂÈÎ. 9). ñ °È· ÙÔÓ Î·ı·ÚÈÛÌfi, ÌË ¯ÚËÛÈÌÔÔț٠‰È·Ï‡Ù˜ ‹ ·ÔÚÚ˘·ÓÙÈο Û ÛÎfiÓË. ∞ÚΛ Ó· ÙËÓ Ï‡ÓÂÙ Ì ¤Ó· ÛÊÔ˘ÁÁ¿ÚÈ, Ó· ÙËÓ Í‚Á¿ÏÂÙ Ì η˘Ùfi ÓÂÚfi Î·È Ó· ÙËÓ ÛÎÔ˘›ÛÂÙ Ì ¤Ó· ˘ÁÚfi Î·È Ì·Ï·Îfi ·Ó›.