GB•30lt.
GB•30lt.DL 11-09-2001 14:15 Pagina 2 Data and instruction for Performance Tests according to IEC 705 and further Amendment Document 59H/69/CD. The International Electrotechnical Commission SC 59H, has developed a Standard for comparative testing of heating performances of microwave ovens. The Draft of the new Edition of this Standard has been circulated with Document 59H/69/CD, which also describes the tests marked, in this table, with (*). We recommend the following for this oven: Test Nr.
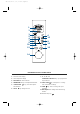
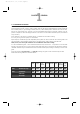
GB•30lt.DL 11-09-2001 14:15 Pagina 3 1 2 3 5 4 7 9 10 6 15 12 13 8 11 14 DESCRIPTION OF THE CONTROL PANEL 1. Time and mode display 7 - 8 - 9 - 10 - 11 2. Oven temperature display AUTOMATIC FUNCTION keys: pre programmed 3. FUNCTION KEY: mode selection rapid selection 4. TEMPERATURE °C key: oven temperature selection 5. POWER LEVEL key: microwave power level selection 6. CLOCK key: setting the clock 12. STOP/CLEAR key: interruption of cooking and cancellation of settings 13.
GB•30lt.
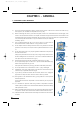
GB•30lt.DL 11-09-2001 14:15 Pagina 5 INDEX CHAP. 1 – GENERAL 1.1 1.2 1.3 1.4 1.5 1.6 Important safety warnings .....................................pag. Technical data ......................................................pag. Installation and electrical connection ......................pag. Accessories supplied.............................................pag. Ovenware to use ..................................................pag. Rules and general suggestions for using the oven ...pag. CHAP.
GB•30lt.DL 11-09-2001 14:15 Pagina 6 CHAPTER 1 – GENERAL 1.1 IMPORTANT SAFETY WARNINGS Read these warnings carefully before starting to use the oven to obtain the best results. 1) This oven has been designed to defrost, reheat and cook food in the home. It must not be used for any other purpose, nor modified or tampered with in any way. 2) Before connecting this oven to your electrical system, check to be certain that the door closes tightly.
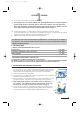
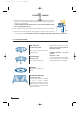
GB•30lt.DL 11-09-2001 14:15 Pagina 7 1 CHAPTER 1 - GENERAL 14) Do not heat spirits,alcohol,or large quantities of oil. 15) After heating baby food or liquid ALWAYS check the temperature before it is consumed (fig.5).It is important to stir the food,or shake the liquid in order to ensure that it is of an even temperature.
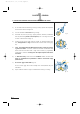
GB•30lt.DL 11-09-2001 14:15 Pagina 8 1 CHAPTER 1 - GENERAL 7) Place the support (I) in the centre of the circular groove and attach the turntable (H) to it. The spindle (D) should be inserted in the corresponding groove in the centre of the turntable. N.B. The appliance must not be placed on or near sources of heat (for example on the refrigerator) (fig. 8). 8) After installation the power cord and isolating switch must be easily accessible. fig.
GB•30lt.DL 11-09-2001 14:15 Pagina 9 1 CHAPTER 1 - GENERAL 1.5 OVENWARE TO BE USED In the “Microwave Only” and In In In the “Microwave Only”and “Microwave Combined” modes, glass containers (preferably Pyrex), ceramic, china and terra-cotta may be used provided that they are undecorated and free of metal parts (i.e. gilt trimmings, handles, feet etc.). Heat resistant plastic containers can also be used, but only for “Microwave Only” cooking.
GB•30lt.DL 11-09-2001 14:15 Pagina 10 1 CHAPTER 1 - GENERAL 1.6 RULES AND GENERAL SUGGESTIONS FOR USING THE OVEN 1) Sir the food several times during cooking to evenly spread the temperature.Which will reduce cooking time. 2) It is also advisable to turn food during cooking. 3) Food with skin, shell or peel (e.g. apples, potatoes, tomatoes, frankfurters and fish) should be pierced in several places prior to cooking with a fork in order to let the steam out(fig. 9).
GB•30lt.DL 11-09-2001 14:16 Pagina 11 CHAPTER 2 – USING THE CONTROLS AND SETTING THE MODES 2.1 SETTING THE CLOCK • When the appliance is connected to the domestic power supply for the first time, or after a power cut, four dashes will appear on the display (----). In order to set the time of day, proceed as described below: 1 Press the CLOCK key (6). (The hours flash on display 1) 2 Set the desired time by turning the TIME ADJUST knob (14). (The hours flash on display 1) 3 Press the CLOCK again.
GB•30lt.DL 11-09-2001 14:16 Pagina 12 2 CHAPTER 2 – USING THE CONTROLS AND SETTING THE MODES 2.2 PROGRAMMING THE COOKING 1 INDICATOR Press the FUNCTION key (3) (mode selection) and select the desired mode.The corresponding symbols will apear above the display.
GB•30lt.DL 11-09-2001 14:16 Pagina 13 2 CHAPTER 2 – USING THE CONTROLS AND SETTING THE MODES 4 In the modes: Combined microwave + fan oven Fan oven only select the cooking temperature by repeatedly pressing the TEMPERATURE °C key (4) until the desired temperature is displayed.To select the temperature, consult the tables shown in Chapter 3.
GB•30lt.DL 11-09-2001 14:16 Pagina 14 2 CHAPTER 2 – USING THE CONTROLS AND SETTING THE MODES 2.3 AUTOMATIC DEFROSTING AND COOKING SEQUENCE To programme an automatic defrosting and cooking sequence follow these instructions: 1 Set the automatic defrosting mode by pressing the FUNCTION key (3) twice (mode selection) . The corresponding automatic defrosting symbol will appear on the display. 2 Set the length of time required for the defrosting (in minutes) by turning the TIME ADJUST knob (14).
GB•30lt.DL 11-09-2001 14:16 Pagina 15 2 CHAPTER 2 – USING THE CONTROLS AND SETTING THE MODES 2.4 USING THE PRE-PROGRAMMED RECIPES (AUTOMATIC FUNCTION KEYS) 1 Press the desired AUTOMATIC FUNCTION key. (The indicators of the length and temperature set will flash on the display and the pre-memorised mode and power level indicators will come on.) Consult paragraph 3.8 in order to choose the most suitable menu. 2 Press the START 3 key (13) in order to start cooking.
GB•30lt.DL 11-09-2001 14:16 Pagina 16 CHAPTER 3 – USING THE OVEN: SUGGESTIONS AND TIME CHART 3.1 DEFROSTING E N G L I S H • Frozen food in plastic bags, plastic film or cardboard packets can be placed directly in the oven for defrosting as provided the packet has no metal parts (e.g. metal ties or staples). • Certain foods, such as vegetables and fish, do not require complete defrosting before being cooking.
GB•30lt.DL 11-09-2001 14:16 Pagina 17 3 3.2 REHEATING Reheating food is one of the key features in which your microwave oven displays its usefulness and efficiency. Compared to traditional methods, a microwave saves time and electricity. • It is advisable to reheat food (especially if it is frozen) to a temperature of at least 70°C. This means the food will not be ready to eat immediately (because it is too hot!) but it will be completely sterilised.
GB•30lt.DL 11-09-2001 14:16 Pagina 18 3 CHAPTER 3 – USING THE OVEN: SUGGESTIONS AND TIME GRIDS 3.3 - COOKING ANTIPASTI AND FIRST COURSES Soups in general require less liquid because in a microwave oven evaporation is rather minimal. Salt must be added only at the end of cooking or during standing time as it dehydrates the food. It is fair to say that the time needed to cook rice in the microwave oven is more or less equal to the time taken to cook it on a stove in the traditional manner.
GB•30lt.DL 11-09-2001 14:16 Pagina 19 3 CHAPTER 3 – USING THE OVEN: SUGGESTIONS AND TIME GRIDS 3.5 - COOKING SIDE DISHES AND VEGETABLES Vegetables cooked in a microwave oven preserve their colour and nutritional value better than traditional cooking. Wash and peel the vegetables before starting to cook. Larger vegetables should be cut into evenly-sized pieces. Add approx. 5 spoonfuls of water for every 500g of vegetables (vegetables which have a high fibre content will require more water).
GB•30lt.DL 11-09-2001 14:16 Pagina 20 3 CHAPTER 3 – USING THE OVEN: SUGGESTIONS AND TIME GRIDS 3.6 - COOKING FISH Fish cooks very quickly and with excellent results. It can be dressed with a little butter or oil (if so desired). Cover it with transparent film. If skin is left on, this must be scored, and the fillets should be arranged evenly. It is not advisable to cook fish battered or crumbed.
GB•30lt.DL 11-09-2001 14:16 Pagina 21 3 CHAPTER 3 – USING THE OVEN: SUGGESTIONS AND TIME GRIDS 3.
GB•30lt.DL 11-09-2001 14:16 Pagina 22 CHAPTER 4 – CLEANING AND MAINTENANCE 4.1 CLEANING Before any cleaning and maintenance are carried out, always disconnect the plug from the power socket and wait for the appliance to cool down. The internal cavity of your oven is covered with a special enamel to which splashes and food particles do not stick, making cleaning simple. Always keep the microwave outlet cover (C) clean and free from grease and fat.
GB•30lt.DL 11-09-2001 14:16 Pagina 23 4 CHAPTER 4 – CLEANING AND MAINTENANCE 4.2 MAINTENANCE If something does not quite work right or if a foult devalops, contact technician for service.Please check the following faults before calling technician: PROBLEM The appliance does not work Condensation on the work surface, inside the oven or around the door. Sparks inside the oven CAUSE/SOLUTION • • • The door is not closed properly. The plug is not correctly inserted.
GB•30lt.DL 11-09-2001 14:16 Pagina 24 ELECTRICAL A) CONNECTION If your appliance comes fitted with a plug, it will incorporate a 13 Amp fuse. If it does not fit your socket, the plug should be cut off from the mains lead, and an appropriate plug fitted, as below. WARNING: Very carefully dispose of the cut off plug after removing the fuse: do not insert in a 13 Amp socket elsewhere in the house as this could cause a shock hazard.