5793106200/03.
Limpia superficies mediante vapor a presión Pressurized steam cleaner Manual de instrucciones Instructions for use
ESPAÑOL Distinguido cliente, Alegrándonos por su elección, le agradecemos la confianza que nos ha dado. Nuestros productos son el resultado de minuciosos testes técnicos y de un estudio profundizado. Hemos preparado este manual de uso para permitir utilizar de la manera mejor el producto y para apreciar todas sus cualidades. Estamos seguros que, siguiendo nuestras sugerencias, podrá utilizarlo durante mucho tiempo y con los mejores resultados.
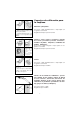
Descripción 1 4 6 7 5 2 17 3 9 Accesorios 11 8 12 1. Regulador del flujo de vapor (en los modelos donde está previsto) 2. Interruptor general con luz indicadora 3. Interruptor del generador de vapor 4. Empuñadura 5. Tapón de la caldera 6. Luz indicadora generador de vapor 7. Luz indicadora de encendido del aparato. 17. Manómetro (en los modelos donde está previsto) 10 14 16 15 13 3 8. Tubo flexible con empuñadura (en algunos modelos extraìble) 9. Lanza 10. Cepillo triangular 11.
Advertencias 1) 2) 3) 4) 5) 6) 7) 8) 9) 10) 11) 12) 13) 14) 15) 16) 17) 18) 19) 20) 21) 22) 23) 24) 25) Leer atentamente las instrucciones El aparato en funcionamiento contiene vapor bajo presión: un uso indebido puede resultar peligroso. El aparato está destinado a un uso doméstico y al uso en el ámbito del jardín, hobby y bricolaje; se excluye cualquier utilización de tipo industrial.
Montaje y preparación para el uso Uso de la caldera Antes de iniciar cualquier manutención o preparación del aparato, asegúrense de que el enchufe esté desconectado. Para abrir la caldera ejercer una presión sobre el tapón de seguridad girándolo. Les aconsejamos llenar el depósito con una cantidad máxima de 1,5 litros de agua del grifo (una cantidad mayor podría causar un mal funcionamiento del aparato). Enroscar el tapón, ejerciendo una presión enroscando hasta el fondo.
Para sacar un accesorio, efectuar la operación inversa. Sacar con cuidado el accesorio teniendo cuidado en no pellizcar el dedo que empuja el pulsador. 2 7 6 Funcionamiento del aparato 3 Introducir el enchufe en la toma eléctrica, encender el interruptor general (2), la luz indicadora se enciende y la caldera se pone en funcionamiento accionando el interruptor general del vapor (3).
Consejos de utilización para la limpieza Alfonbras y moquetas Advertencias: * verificar la resistencia de los tejidos y de los colores en puntos escondidos * se aconseja aspirar antes el polvo con un aspirador o con una aspiradora para alfombras Advertencias * testar siempre la resistencia de los tejidos o de los colores en un punto escondido * se aconseja aspirar antes el polvo con un aspirador Accesorios: cepillo alfombras/suelos + trapo fijado con los ganchos con muelle.
Baño (mampara de la ducha, sanitarios, pilas, piscinas). Accesorios: lanza + cepillo directamente en el tubo flexible o en el tubo rígido de prolongación Regulación del vapor: máximo Espejos, ventanas, cristales del coche, galerías e invernaderos. Accesorios: tubos rígidos de prolongación + rastrillo Regulación del vapor: mínimo Advertencias: * cuando fuera hace frío, atención a los cambios de temperatura, que podrían romper los cristales. Éstos tienen que ser calentados con un ligero chorro de vapor.
Uso de la plancha (si es suministrada) Para la puesta en funcionamiento de la caldera, seguir las instrucciones dadas precedentemente. Preparación del sistema de planchado Para conectar la plancha con el aparato: Introducir en la toma el dispositivo de la plancha, ejercer una presión para hacer saltar el pulsador de extracción; verificar que el dispositivo esté bien introducido intentando sacarlo sin actuar sobre el pulsador de extracción.
A Consejos útiles ✔ Tejidos de terciopelo, lana, etc., así como guantes, bolsas, etc. podrán recuperar su aspecto y suavidad originales, pasando lentamente la plancha a poca distancia de los mismos con el vapor en funcionamiento. ✔ Las alfombras podrán quedar como nuevas, eliminando los hoyos de los muebles apoyados sobre las mismas, haciendo penetrar el vapor en donde el pelo está aplastado y luego cepillando ligeramente. ✔ No apoye ni use la plancha sobre cremalleras, ganchos, anillas, etc.
Tabla para un planchado perfecto Acetato - Acrílico - Nailon • PLANCHADO EN SECO MUY LIGERO Poliéster - Rayón • PLANCHADO EN SECO SOBRE EL REVÉS DE LA PRENDA A TEMPERATURA MÍNIMA Seda •• PLANCHADO EN SECO SOBRE EL REVÉS DE LA PRENDA Lana - Algodón Fino - Lino fino •• PLANCHADO EN VAPOR SOBRE EL REVÉS DE LA PRENDA USANDO UNA TELA DELGADA ENCIMA DE LOS TEJIDOS Algodón - Lino fino - Tejidos almidonados ••• PLANCHADO DE VAPOR SOBRE EL DERECHO DE LAS PRENDAS BLANCAS O CLARAS Y SOBRE EL REVÉS DE LAS PRE
ENGLISH Dear customer Congratulations on your purchase and thank for your confidence in our brand. Our products represent the fruit of rigorous testing and in-depth study. We have prepared this user manual to enable you to get the most out of the product. We are sure that compliance with the instructions will ensure the lenghty service life of the appliance and your lasting satisfaction. By exploiting the power of steam, it helps reduce air pollution caused by the dispersion of chemical detergents.
Description 1 4 6 7 5 2 17 3 1. Steam flow regulator (where this is one of the model’s features) 2. Illuminated on/off switch 3. Steam generator switch 4. Handle 5. Filler cap 6. Steam generator light 7. Appliance operating light 17. Pressure gauge (where this is one of the model’s features) 9 Accessories 11 8 12 10 14 16 15 13 13 8. Flexible hose with handgrip (some models are provided with detachable hose) 9. Nozzle 10. Triangular brush 11. Two rigid extension tubes 12.
Important 1) 2) 3) 4) 5) 6) 7) 8) 9) 10) 11) 12) 13) 14) 15) 16) 17) 18) 19) 20) 21) 22) 23) 24) 25) Read the instructions carefully The appliance contains pressurised steam. Incorrect or improper use could be dangerous. The appliance is designed for household use or for gardening, hobbies or DIY. All types of industrial use are excluded. The manufacturer declines all liability for damage deriving from improper use of the product. Do not leave the iron unattended when plugged in.
Assembling and preparing for use Using the boiler Before commencing any maintenance, or preparing the appliance for use, make sure that the plug is disconnected. In order to open the boiler, press down on the safety cap and turn at the same time. It is advisable to fill the tank with a maximum of 1,5 litres of tap water (greater quantities may result in the appliance’s poor operation). Screw on the tap, applying pressure and screwing down tight.
In order to disconnect the accessory, follow the reverse procedure. Remove the accessory carefully, taking care not to catch your finger which is holding the button down. 2 7 6 Operating the appliance Plug the appliance in, turn on the on/off switch (2), the light comes on and the boiler starts working, activating the main steam switch (3). 3 Wait approx. 15 minutes; when the light (6) goes off the appliance is ready for use.
Cleaning advice Rugs and carpets Warning: * check the resistance of fabrics or colours in places which can not be readily seen * it is advisable to remove dust using a vacuum cleaner before starting Accessories: carpet/floor brush + wash cloth held on by the snap hooks. Steam setting: central position. Armchairs, sofas, cushions, mattresses, car interiors, blinds, vertical walls, garden furniture, gazebos, garden umbrellas and loungers.
Bathroom (shower cubicle, sanitary fittings, basins, swimming pools) Accessories: nozzle + mini-brush directly on flexible hose or on the rigid extension tube Steal setting: maximum Mirrors, windows, car windows, verandas, greenhouses Accessories: rigid extension tubes + raclette Steam setting: minimum Warning * when it is cold outside, take care to avoid sudden changes in temperature which could break the glass. The glass should be heated with a slight jet of steam.
Using the iron (if provided) To operate the boiler, see the above instructions. Setting up the ironing system To connect the iron to the appliance: Plug the iron into the socket and press until the release button clicks. Make sure the plug is fully inserted by attempting to remove it without using the release button. To turn on the appliance, follow the above instructions.
A Tips for perfect ironing. ✔ The original appearance and softness of velvet, wool or similar materials as well as glove and bags etc. can be restored by holding the iron a few cm above the fabric whilst pressing the steam button (A). ✔ Carpets and rugs can be restored to new, eliminating the marks made by furniture, by allowing the steam to penetrate into the squashed pile and brushing lightly. ✔ Do not rest or use the iron on zips, hooks, rings etc to avoid scratching the plate.
Perfect ironing table Acetate - Acrylic - Nylon • DRY IRON, VERY LIGHTLY Polyester - Rayon • DRY IRON ON REVERSE SIDE OF GARMENT AT MINIMUM TEMPERATURE Silk •• DRY IRON ON REVERSE SIDE OF GARMENT Wool - Fine Cotton - Fine Linen •• STEAM IRON ON REVERSE SIDE OF GARMENT PLACING A THIN CLOTH OVER THE FABRIC Cotton - Fine Linen - Starched Articles ••• STEAM IRON ON FRONT OF WHITE OR LIGHT COLOURED GARMENTS, ON REVERSE SIDE OF DARKER ARTICLES Linen ••• STEAM IRON WITH PLENTY OF STEAM ON REVERSE SIDE