
User guide

Print
44
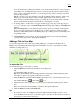
8. Click Save to File . The Save to File dialog area displays.
Note: Save to File is a toggle button; when clicked, its name switches to Print Info. To cancel
saving the file and return to the Map dialog area, click Back to Print.
9. Under Map, type the desired file name in the File text box and click Save. The map is saved as a
bitmap (.bmp file); a progress bar indicates the save status. When the save is completed, the Map
dialog area displays.
Manually Assembling a Multipage Map
After you have printed the sheets for your multipage map, you are ready to assemble the map.
Before you begin, be sure you have a clear work surface large enough to accommodate the final map size.
You will need the following tools to assemble your map:
• Pencil
• Razor knife
• Straight Edge Ruler (longer than the edge of the longest sheet)
• Permanent Tape ("invisible" or "magic" type)
• Removable Tape
Note: For convenience, you can use the DeLorme MapPack to display and store your map pages. The
MapPack holder is available separately from DeLorme.
To Manually Assemble a Multipage Map
Use the following steps to manually assemble a multipage map.
1. Using the straight edge ruler and razor knife, trim each sheet to the thin black line bordering the
map.
Note: For adjacent sheets, trim only one page. This makes piecing the sheets together easier.
2. For each sheet that needs to be trimmed, mark the edges of the sheet to indicate the areas that
need to be trimmed.
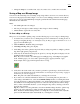
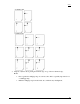
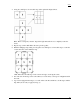
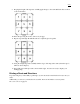
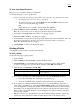
The following diagrams of a 2 x 2 and 3 x 3 multipage map provide additional information on
where to trim the sheets. The arrows indicate the edges to be trimmed.