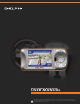
DELPHI MOBILE NAVIGATION USER MANUAL Important: This manual and the Delphi Mobile Navigation Quick Start Guide contain important safety and operating information. Please read and follow the instructions in these manuals. Failure to do so could result in personal injury, death, and/or damage to your Delphi Mobile Navigation and/or to your vehicle.
WELCOME Congratulations on the purchase of your Delphi Mobile Navigation. This unit will direct you without the need for map books and second-hand instructions. The Global Positioning System (GPS) is available free-ofcharge at any time, and is accurate to within 16.5 feet. The maps in the Delphi Mobile Navigation package provide street-level detail, allowing door-to-door navigation. They even include points of interest such as hotels, parks, and airports. With this unit, you will never be lost again.
CONTENTS Section 1 What is GPS? . . . . . . . . . . . . . . . . . . . . . . . . . . . . 4 Section 2 Unpacking Delphi Mobile Navigation . . . . . . . . . . . . . 4 Memory Cards . . . . . . . . . . . . . . . . . . . . . . . . . . 5 Accessories and Replacement Parts . . . . . . . . . . . 5 Section 3 Installing Software and New Maps . . . . . . . . . . . . Installing Delphi Mobile Navigation Desktop . . . . . Step 1: Connecting Delphi Mobile Navigation to Your Computer . . . . . . . . . . . . . . . . . . . . .
SECTION 1: WHAT IS GPS? The Global Positioning System (GPS) is a network of satellites launched by the U.S. military in the 1970s. The satellites continuously transmit accurate time and position information, which is freely used by commercial and military applications worldwide. GPS receivers, such as Delphi Mobile Navigation, are designed to pick up the high-frequency radio signals from these satellites and use the information to help determine your exact location.
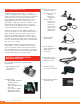
Memory cards Delphi Mobile Navigation has 64 megabytes of internal memory available for storing maps. If this is not sufficient for your needs, extra memory in the form of MMC (multimedia card) or SD (secure digital) memory cards is available for purchase. A memory card can be plugged into the slot in the top of the Delphi Mobile Navigation unit, and can be purchased with various memory capacities. A memory card with 256 megabytes of memory or less can be used in the Delphi Mobile Navigation unit.
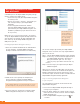
SECTION 3: INSTALLING SOFTWARE AND NEW MAPS A CD-ROM pack in the Delphi Mobile Navigation package contains software that allows you to: • Install new maps onto your Delphi Mobile Navigation or memory cards. • Back up any settings, shortcuts, and favorites you have saved previously in your Delphi Mobile Navigation. • Install and upgrade the SmartST software onto your Delphi Mobile Navigation. (SmartST is preinstalled on your Delphi Mobile Navigation.
4. If this is the first time you have powered up your Delphi Mobile Navigation, a display prompts you to connect the USB cable (supplied). Plug the USB cable into a USB port on your computer. Plug the other end into the underside of the Delphi Mobile Navigation unit. The display will change to indicate that you are connected and ready to download new software or maps. 5. If you have loaded software to your unit previously, the main menu will be displayed.
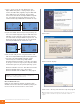
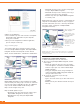
Microsoft Windows 2000 users Under Windows 2000, you may see the screens below. If you do not see these screens, then the installation has completed automatically. Enter the location of the Delphi Mobile Navigation USB driver disk D:\USBDRIVER. Note: The “D” drive may not be your CD-ROM drive. Use the letter designating your CD-ROM drive. Select “OK.” You may now continue to step 2. Step 2: Installing SmartST application Enter the location of the Delphi Mobile Navigation USB driver disk D:\USBDRIVER.
• Download new maps onto a memory card plugged into your Delphi Mobile Navigation. • Download new maps onto a memory card using a memory card writer on your computer. • Remove maps from your Delphi Mobile Navigation or memory card. Before beginning, make sure the unit is connected to the computer via the USB port. Refer to step 1 on page 6 for more information. (Your unit is correctly connected if the display shows a computer and Delphi Mobile Navigation connected.
Installing maps on MMC or SD memory cards Installing maps onto a memory card can be done in two ways: 1. Plug the memory card into the slot in the top of your Delphi Mobile Navigation. When using maps from an MMC or SD card, do not remove the card while navigating or the unit will reset. 2. Select “Install Maps” from the main menu. To install a map to the memory card, choose either option: • Select the region you wish to install. The region’s name will appear in the lower left window.
SECTION 4: INSTALLING DELPHI MOBILE NAVIGATION IN YOUR VEHICLE Warning: To avoid personal injury, follow the safety guidelines and installation instructions provided so that Delphi Mobile Navigation does not obstruct the view of the driver, interfere with the operation of any airbags and safety features in the vehicle, or become airborne in the case of an accident. Do not attempt to install the Delphi Mobile Navigation unit while driving.
8. Snap Delphi Mobile Navigation onto the socket clip. First, position the two locating tabs (found on the bottom of the unit) into the corresponding slots on the socket clip. Then, snap the top side of Delphi Mobile Navigation onto the clip.
4. Hold the suction cup firmly against the dash or center on the suction pad. Press the lever down until it snaps shut. (To remove the suction cup, pull the lever up. Pull the release tab to release the suction.) 5. The ball foot should now be securely fixed on the dash. Slip the locking nut loosely over the ball foot, with the flat side facing upward. 9. Snap Delphi Mobile Navigation onto the socket clip.
5. Place the assembly into position on the dash. Use the three screws provided to fix the assembly firmly to the dash. Press the screw caps over the screw heads. Screw mount to dash Warning: To avoid personal injury, follow the safety guidelines and installation instructions provided so that Delphi Mobile Navigation does not obstruct the view of the driver, interfere with the operation of any airbags and safety features in the vehicle, or become airborne in the case of an accident.
10. Snap Delphi Mobile Navigation onto the socket clip. First, position the two locating tabs (found on the bottom of the unit) into the corresponding slots on the socket clip. Then, snap the top side of Delphi Mobile Navigation onto the clip. To unclip Delphi Mobile Navigation from the mounting bracket, press down on the back of the upper plastic clip. Release the top of the unit. Then lift the unit out of the bottom two slots. 11. Flip the GPS antenna outward so that the antenna points horizontally.
SECTION 5: CONTROLS AND KEYBOARD Warning: For your safety, program your Delphi Mobile Navigation and enter information about your destination BEFORE you start your journey. Do not operate Delphi Mobile Navigation while driving. The most frequently used buttons are “OK,” “ESC,” “Page,” and the eight-way toggle. Use the “OK” button to confirm or make a selection. “ESC” returns you to the previous screen or deletes the text you entered. With the “Page” button, you can jump from one screen to the next.
Using the menus Entering text with the on-screen keyboard Many of the screens used with Delphi Mobile Navigation contain a menu of options. To enter your destination information, you will use the controls and an on-screen keyboard. You can enter a street name or area by typing the full name, or by entering the beginning of the name and then selecting from the list on the lower half of the screen.
Changing the brightness and volume To change the brightness of the display: 1. Press until you see the brightness bar on the display. This can be done at any time. 2. Press to make the display brighter, or to dim the display. Note: The unit heats up more quickly if the display brightness is set higher than 70 percent. The bar is red when the brightness level is set higher than 70 percent. To adjust the volume: 1. Hold down the volume button until the volume bar is displayed. This can be done at any time.
Driver protection SECTION 6: GETTING STARTED Warning: For your safety, program your Delphi Mobile Navigation and enter information about your destination BEFORE you start your journey. Do not operate Delphi Mobile Navigation while driving. Powering up 1. Press for 1 second. 2. A brief tutorial is available to show you how to use Delphi Mobile Navigation. Press to scroll through the instructional screens. This tutorial can be disabled in the settings function.
Getting a GPS fix Delphi Mobile Navigation receives GPS signals every second via the antenna. In order for your antenna to receive signals, ensure that: 1. The unit is outside or in a vehicle parked outside. 2. The antenna is pointing horizontally out through your windshield and has a clear view of the sky. When you first power on the unit and program a route, it may take several minutes for the unit to get its first GPS fix.
SECTION 7: SETTING YOUR DESTINATION 2. Use the up/down function of the eight-way toggle button to choose from the list. Then press to confirm your selection. Warning: For your safety, program Delphi Mobile Navigation and enter information about your destination BEFORE you start your journey. Do not operate Delphi Mobile Navigation while driving. There are three ways that you can program your destination: • Use the “Favorites” menu option to select destinations used on a regular basis.
1. From the main menu, select “Destination” and then “Address.” 2. Select “State.” To enter a state, choose one of the following methods: • In the text entry screen, type in the name. After you finish, position the cursor on the text entry line. Press to confirm your selection. • Use the up/down function of the eight-way toggle button to choose from the list. Then press to confirm your selection. 3. Select “Town.” As above, type in a town name or choose from the list. 4. Select “Road.
6. When the unit has enough information, the details are displayed. If you wish to change the intersection, simply press or select “ESC” on the screen to re-enter information. 7. Choose one of the following: • Select “Save.” This allows you to save the destination as a shortcut or favorite. Refer to section 9, beginning on page 29. • Select “Show.” The unit does not calculate the route, but will simply display the address using the map browser mode.
2. Enter a ZIP code using the numeric keypad. 5. After you enter all the information in the “Destination – POI” screen, press . 6. To select a point of interest, choose one of the following methods: • In the text entry screen, type in the name. After you finish, position the cursor on the text entry line. Press to confirm your selection. • Use the up/down function of the eight-way toggle button to choose from the list. Then press to confirm your selection. 7.
3. The address details are automatically displayed. 4. Choose one of the following: • Select “Save.” This allows you to save the destination as a shortcut or favorite. Refer to section 9, beginning on page 29. • Select “Show.” The unit does not calculate the route, but will simply display the address using the map browser mode. From here you can select this address as your destination or move around the map to find another destination. Refer to the “Straight from the map” segment below. • Select “Go.
5. Pressing will display a popup window in the top right corner, giving the destination, time to go, distance to go, and the completed percentage for the trip. This screen will timeout after 3 seconds or when any key is pressed. SECTION 8: VIEWING YOUR ROUTE Warning: For your safety, program your Delphi Mobile Navigation and enter information about your destination BEFORE you start your journey. Do not operate Delphi Mobile Navigation while driving.
• Select “Show Details.” The unit does not calculate the route, but will simply display the address using the map browser mode. From here you can select this address as your destination or move around the map to find another destination. 1. From the main menu, select “Map.” 2. Press until you see the next four instructions screen. 3. You can cancel your current route at any time. To return to the main menu, press and select “Route Information” followed by “Cancel Route.
1. From the main menu, select “Route Information.” 2. Select “Show Route.” 3. Zoom in and out as required using and . 4. You can cancel your current route at any time. To return to the main menu, press and select “Route Information” followed by “Cancel Route.” Instruction list Selecting “Instruction List” displays all the turns and direction instructions for the selected route. 1. From the main menu, select “Route Information.” 2. Select “Instruction List.” 3.
SECTION 9: SHORTCUTS AND FAVORITES Warning: For your safety, program your Delphi Mobile Navigation and enter information about your destination BEFORE you start your journey. Do not operate Delphi Mobile Navigation while driving. Ten of your most frequently used destinations can be stored as shortcuts in Delphi Mobile Navigation, while up to 200 can be saved as favorites.
5. If you attempt to save your new shortcut over the top of an existing shortcut, a warning screen is displayed. Choose either of the following: • Select “Yes” to continue and your new shortcut will replace the existing one. • Select “No” to return to the new shortcut screen and change the place to save your new shortcut. 6. Choose one of the following: • Select “Go.” The unit calculates the route and displays the destination on the navigation screen. • Select “Show.
2. Using the up/down function of the eight-way toggle button, select the favorite that you want to edit or delete. Press to confirm your selection. 3. To change the name of a favorite: • Scroll to the “Name” box and press to go to the text entry screen. • On the text entry screen, scroll to the text entry line and press to delete the existing text. • Type in a new name (up to 120 characters). • Select “Enter” to save the name. 4. To move the favorite to your shortcut list: • Scroll to the “Save As” option.
Satellite signal strengths SECTION 10: USING THE GPS STATUS INFORMATION The GPS status screens indicate a variety of information, including how many satellites Delphi Mobile Navigation is receiving information from, signal strength, and satellite position. To view the screens: 1. From the main menu, select “GPS Status.” 2. Press or select the on-screen page forward icon to display the next screen. GPS reception Delphi Mobile Navigation relies on the reception of signals transmitted by the GPS satellites.
SECTION 11: MODIFYING THE SETTINGS Warning: For your safety, program your Delphi Mobile Navigation and enter information about your destination BEFORE you start your journey. Do not operate Delphi Mobile Navigation while driving. Your Delphi Mobile Navigation has a number of settings that you can change, including: • Change the colors and brightness of the display to suit the driving conditions or your preference.
GPS settings This function allows you to modify the format of some of the information displayed in the GPS status screens. 2. Use the “Route” screen to: • Select either “Quickest Time” or “Shortest Distance” from the “Route” menu. • Enable or disable “Avoid Toll Roads” and “Avoid Urban Areas” from the “Route” options. • Enable or disable the Back-On-Track feature from the “Rerouting” menu. 3. Use the “Guidance” screen to: • Enable or disable voice instructions.
4. Select the 12- or 24-hour format that you wish to use. 5. Go to the simulator option by pressing or selecting the on-screen page forward icon. Maps settings 6. Enable “Auto Simulate.” This allows you to program a route without a GPS fix (i.e., from inside a building) and view the route without going anywhere. Refer to the next section for more information on using the automatic simulator. 7. Enable “Repeat” to let the automatic route simulator run continuously. 2.
SECTION 12: AUTOMATIC ROUTE SIMULATOR The automatic route simulator allows you to program a route without a GPS fix, and view the route without going anywhere. To use the auto simulator, you must first set a departure point and a destination. 1. From the main menu, select “Settings,” then “User.” 2. Press or select page forward on the screen to go to the GPS screen. Press again. Enable “Auto Simulate.” 3. Return to the main menu. Select “Map.” 4. Press to display grid lines.
SECTION 13: TROUBLESHOOTING Your Delphi Mobile Navigation unit is designed and built to provide you with trouble-free performance. If it does not appear to be functioning properly, please follow these troubleshooting guidelines. No GPS fix: 1. Check the satellite icon in the lower left corner of the map view screen. The satellite icon is red if you have no GPS fix. If the satellite icon is green, then the unit has a satisfactory GPS fix.
FCC statement This equipment has been tested and found to comply with the limits for a Class B digital device, pursuant to Part 15 of the FCC rules. These limits are designed to provide reasonable protection against harmful interference in a normal installation. This equipment generates, uses, and can radiate radio frequency energy and, if not installed and used in accordance with the instructions, may cause harmful interference to radio communications.
SECTION 14: WARRANTY Delphi Product & Service Solutions (“Delphi”) warrants all Delphi Mobile Navigation sold by Delphi (“Products”) to be free of defects in material and workmanship, subject to the following conditions. The duration of Delphi’s warranty with respect to Delphi Mobile Navigation is limited to one (1) year from the date of sale to the original consumer purchaser. No other express warranties are made with respect to any Product.
Delphi Corporation 1441 West Long Lake Road Troy, Michigan 48098-5090 U.S.A. Technical Service Support: [1] 877.667.8700 www.delphi.com ©2004 Delphi Corporation. All rights reserved.