
User's Manual Chapter 4


4-4
Figure 4-2: Removing the Battery
4. Slide the battery out towards the left until it is completely free. You can
then remove the battery.
LEDs
Button Area
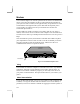
Figure 4-3: Battery
5. The top of the battery has an extra battery charge indicator. The indicator
consists of a button and four small LEDs. When you press the area on the
right side of the indicator, the button, some or all of the red LEDs will start
flashing, depending on how much charge is left in the battery. All four
lights flashing indicates that the battery is fully charged, one light flashing
indicates low battery charge.
6. To replace the battery, slide the battery latch to the back and hold it there,
then slide the battery pack in the compartment until it fits in completely.
Engage the battery latch to secure the battery in the cabinet.