
Operating instructions


Be sure these get plumbed to the proper
connections on your system. Improper
connection will not damage the instrument, but
it will not function properly.
Flexible tubing is recommended to minimize
effect of any vibration that may exist.
2. INSTRUMENT LOCATION
On liquid service, the instrument should be
mounted below the process connections to
facilitate self-bleeding. On gas service, it
should be located above the process
connections to promote self-draining. If the
process contains particulates, a “pigtail” loop or
drop leg (manometer “U-tube” configuration) in
the tubing will minimize the possibility of it
migrating into the instrument.
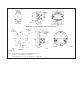
3. PANEL MOUNTING
Gauges with 2-1/2" dials can only be mounted
through the rear of the panel. Make the proper
panel cutout as indicated in (Fig. 5). Remove
the (4) bezel screws. Insert the gauge front
through the rear of the panel and reinstall the
bezel screws through the front of the panel and
into the gauge bezel. Tighten the screws
securely, alternating in a diagonal pattern.
Gauges with 3-1/2" dial must be mounted from
the front of the panel. Contact factory for
mounting information and dimensional data.
The Gauges with 4-1/2" dial must be mounted
from the front of the panel. Make the cutout as
shown in (Fig. 5). Insert the four (4) panel
mounting studs, finger tight, into the metal
inserts located in the rear of the bezel. Insert
the gauge through the panel aligning the panel
mounting studs with the holes in the panel.
Install the four (4) #8-32 nuts onto the studs
and tighten securely.
4. PIPE MOUNTING
An optional pipe mounting kit is available for
mounting the gauge to a 2" vertical or
horizontal pipe.
5. TR
OUBLE SHOOTING
A. Gauge does not indicate differential.
i. Check for proper hook up, high to “hi” and
low to “lo” ports.
ii. Make certain block valves are open and,
if using a 3-valve manifold, that the
equalizer (balance) valve is closed.
iii. If i & ii check out correctly, verify that
there is pressure to the instrument.
iv. If there is pressure to the instrument,
check to determine that there is
differential across the unit being
monitored. If so, contact the factory for
assistance and/or an “RGA” (Return
Goods Authorization) number to return
the instrument for repair or replacement.
B. Gauge accuracy and set point problems:
iVerify gauge is not in an
electromagnetic/magnetic environment.
i.e.; close proximity to high current power
lines.
ii All others, contact the factory for
assistance.