
Installation Guide


13 / 14 Series Installation
2
Cartridge Installation
C.
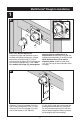
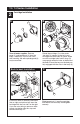
Turn off water supplies. Remove
cover (1) and bonnet nut (2) from the
body, if necessary. If this is not a thin
wall mounting, the entire plasterguard (3)
may be removed.
For back to back or reverse installations
(hot on right and cold on left) insert the
cartridge with the “hot side” on the right.
If you are not making a reverse or back
to back installation skip this step and
continue with step 1C.
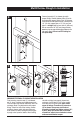
Slide bonnet nut (1) over the cartridge
and thread onto the body. Hand tighten
securely.
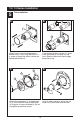
B.
Rotate the cartridge (1) so the words
“hot side” (2) appear on the left. Insert
cartridge into valve body as shown. Make
sure the cartridge tubes and O-rings (3)
are properly seated in holes at the base of
the body. Ensure the keys on the body are
fully engaged with the slots in the body (4).
Back to back Installation
Normal Installation (changes not required)
Reverse
Installation
Cold
Hot
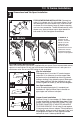
1
4
4
2
3
1
A.
1
2
3
6