
Installation Guide


107528 Rev. C
5
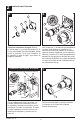
Trim Installation
A.
B-1
B-2
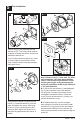
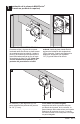
Slide O-ring (1) over cartridge and the
bonnet nut (2). The O-ring, which acts as
a spacer to steady the sleeve, should rest
behind the bonnet nut.
If your model requires a spacer (3), insert
it into the sleeve (4) and push it to the
front. Slide the sleeve over the cartridge,
body and O-ring.
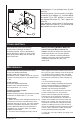
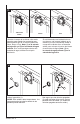
Using an Allen wrench to secure the set
screw (1), install the handle (2) onto the
stem and tighten set screw. Insert plug
button (3) (if your model has one) into
set screw hole. Adjust the sleeve (4) to
minimize the gap between the sleeve &
handle.
Note: Adust for up to 1" thick wall. For thick
wall installation, visit delta faucet website,
check "view technical specication" of the
models you bought, order the appropriate
thick wall installation kit RP to get additional
1 3/4" wall thickness.
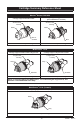
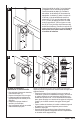
B-1: Secure the escutcheon (1) and backplate
(2) (if your model has one) to the bracket
(3) using the 2 screws (4) provided. Do not
overtighten escutcheon screws. Press the
cover (5) onto the escutcheon (1) when your
product includes the cover.
B-2: Install bracket (5) over the cartridge
body using the 2 screws (6) provided. Install
escutcheon (7) by placing it over the bracket
as shown and rotating it to lock the tabs (8).
Secure the escutcheon to the bracket using set
screw (9).
C-1
3
11
1
1
1
2
3
3
4
2
4
3
2
1
4
5
6
7
5
9
8
8
4