
Installation Guide


Faucet leaks from tub spout/showerhead:
SHUT OFF WATER SUPPLIES.
Replace seats and springs–Repair
Kit RP4993. Check condition of lower O-rings and
replace if necessary RP14414. See Helpful Hints 1,
2, & 3.
If leak persists:
SHUT OFF WATER SUPPLIES.
Replace cap assembly RP46070 or valve cartridge
RP46074.
See Helpful Hints 1, 2, 3 & 5.
Unable to maintain constant
water temperature:
Replace housing assembly with RP46071 or follow
instructions in Helpful Hints 1, 2, 4 & 5.
Helpful Hints:
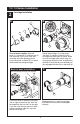
1. Before removing valve cartridge assembly for any
maintenance, be sure to note the position of the
rotational limit stop on the cap. The valve cartridge
assembly must always be put back in the same
position. BE SAFE! After you have finished the
installation, turn on valve to make sure COLD
WATER FLOWS FIRST.
2. To remove valve cartridge from body, shut off
water supplies and remove handle and bonnet
nut. Do not pry the valve cartridge out of the body
with a screwdriver. Place handle on stem and rotate
counterclockwise approximately 1/4 turn after the
stop has been contacted. Lift valve cartridge out
of body.
3. To remove seats and springs, remove valve
cartridge. Separate cap assembly from the
housing assembly by rotating the cap assembly
counterclockwise 90
o
(degrees). Separate cap
and housing assemblies. Remove seats and
springs and replace. Place the largest diameter
of the spring into the seat pocket first and then
press the tapered end of the seal over the spring.
Reassemble valve cartridge and replace in body
following instructions given in 1 above.
4. If the water in your area has lime, rust, sand
or other contaminants in it, your pressure
balance valve will require periodic inspection.
The frequency of the inspection will depend
on the amount of contaminants in the water. To
inspect valve cartridge remove it and follow the
steps in note 1 above. Turn the valve to the full
mix position and shake the cartridge vigorously.
If there is a rattling sound, the unit is functional
and can be reinstalled following instructions given
in note 1 above. If there is no rattle, replace the
housing assembly (RP46071).
5. Push disc until fully seated. See page 8 for
more details.
To order replacement parts, visit
www.deltafaucet.com
13/14 Series Maintenance
10
Cleaning and Care
Care should be given to the cleaning of this prod-
uct. Although its finish is extremely durable, it can
be damaged by harsh abrasives or polish. To clean,
simply wipe gently with a damp cloth and blot dry
with a soft towel.
Warning: Scrubbing Bubbles
®
Bathroom Cleaner
and Lysol
®
Basin Tub and Tile Cleaner must not be
used on the clear knob handles and levers. Use of
these cleaners can result in cracked or severely
damaged handles. If overspray gets onto the
handles, immediately wipe them dry with a soft
cotton cloth
MultiChoice
®
13/14
Grey
Off White
Longer
Lower Housing
Order RP46074 to
Replace Cartridge.
Old
Monitor
®
1300/1400
White
Blue
or
Off White
Shorter Lower Housing
Order RP19804 to
Replace Cartridge.
White
Blue
Shorter Lower Housing
Order RP19804 to
Replace Cartridge.
New
Monitor
®
1300/1400
Cartridge Summary Reference
Units shipped in March
2006 and after.
Replacement cartridges
shipped in July 2006
and after.
Units shipped before
March 2006.