
Installation Guide


SHUT OFF WATER SUPPLIES.
Consider the type and thickness of your
finished wall before placing your stringer
back plate.
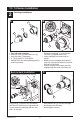
• Install the body (1) so the surface of the
finished wall is flush with the front of the
plasterguard (2) ± 3/8". Note: For
models with stops (3), plasterguard
must be flush or subflush 3/8" to
MultiChoice
®
Rough-In Installation
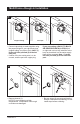
1
A.
B.
• Distance (1) from the stringer (2) to the
front of the plasterguard is 2.8" (71 mm).
• Distance (3) from the stringer (2) to the
front of the bonnet is 3.9" (99 mm).
finished wall.
• Mount body using the two stringer
mounting holes (4) on the bracket.
Note: Remove cover (5) to access
mounting holes.
• Make sure the word “UP” (6) is on top of
the valve body when installing.
IF A THIN WALL IS USED, be sure to
have the plasterguard behind the wall,
otherwise the wall should always be flush
with the front of the plasterguard. See in-
struction on the bag for thin wall mounting.
1
2
6
5
4
4
1
3
2
3
3 72264 Rev. H