
Installation Guide


Connect top outlet (1) to shower pipe with
proper fittings. Connect bottom outlet (2) to tub
spout pipe with proper fittings. Pipe (3) between
valve body and tub spout must be a minimum of
1/2" (13 mm) copper pipe or 1/2" (13 mm) iron
pipe in a straight drop no less than 8" (203 mm)
but no more than 18" (457 mm) long with only
one iron pipe or copper 90 degree elbow to the
tub spout nipple. Do not use PEX tubing for
tub spout drop.
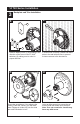
Prior to testing, remove cover (1) and bonnet
nut (2). Insert cartridge and tighten bonnet nut.
Turn cartridge stem counter clockwise until it will
no longer rotate. Plug both outlets with proper
fittings. Check for leaks. After testing, remove
cartridge, shower and/or tub spout plug and
flush system by slowly turning on water supply
to purge valve system of debris. After flushing,
reinstall cartridge (see page 6), bonnet nut
and cover. Install stops (3 & 4) in the models
with stops and set to full open. Note: Install
stops as follows: Thread nut (3) onto stem
(4) as shown. Then press stem and nut
assembly into body and tighten using a 3/8",
6 point, deep well socket. With a flat head
screwdriver, adjust stem clockwise to close
and counterclockwise to open.
E.
F.
MultiChoice
®
Rough-In Installation
1
2
3
PRESSURE TESTING & FLUSHING THE INSTALLATION
1
2
1
2
4
3
5
3
4