
Installation Guide


Síntoma: Alineación Acción recomendada
1. La parte superior del panel de vidrio está
inclinada y separada de la jamba de pared.
Retire el panel de vidrio del riel superior y suba el rodillo del soporte más próximo a la jamba de pared.
2. La parte inferior del panel de vidrio está
inclinada y separada de la jamba de pared.
Retire el panel de vidrio del riel superior y baje el rodillo del soporte más próximo a la jamba de pared.
3. El panel de vidrio no toca el tope instalado. Determine si la parte superior o la inferior del panel de vidrio está más próxima a la pared, y luego ajuste el rodillo más
próximo a la pared según los puntos 1 o 2 anteriores.
4. El riel superior se cortó demasiado corto. Necesita comprar un nuevo kit de rieles y cortar correctamente el riel superior. Vea los pasos 20-23.
5. El riel inferior se cortó incorrectamente. Aplique sellador según se indica para garantizar un sello estanco. Vea los pasos 18 y 19.
Síntoma: Filtraciones de agua Acción recomendada
1. Filtraciones de agua entre los paneles Al ducharse, asegúrese de que el panel interior sea el más próximo a la pared donde está la alcachofa de ducha.
2. Filtraciones de agua entre la jamba de pared y
el panel de vidrio.
Para ajustar el panel, consulte Síntoma: Alineación.
3. Filtraciones de agua debajo del riel inferior. Compruebe que el sellador de silicona se ha aplicado correctamente. Consulte los pasos 40 y 41. Aplique más
sellador de silicona según sea apropiado.
Síntoma: Funcionamiento (abrir/cerrar) Acción recomendada
1. Resulta difícil mover el panel exterior. a. Compruebe que hay suficiente espacio entre el riel inferior y el panel de vidrio. Si fuera necesario, baje los rodillos
al orificio inferior.
b. Compruebe que el panel está bien engarzado sobre el riel superior. Consulte los pasos 32 y 33.
c. Compruebe que los rodillos están bien instalados.
d. Limpie la suciedad del riel superior donde están los rodillos.
2. Resulta difícil mover el panel interior. a. Compruebe que hay suficiente espacio entre el riel inferior y el panel de vidrio. Si fuera necesario, baje los rodillos
al orificio inferior.
b. Compruebe que la guía divisora central interior esté bien sujeta con los tornillos autorroscantes. Consulte el paso 39.
c. Compruebe que los rodillos están bien instalados.
d. Limpie la suciedad del riel superior donde están los rodillos.
Síntoma: Mantenimiento Acción recomendada
1. Ruido o vibración excesivos. a. Compruebe todos los elementos de sujeción y apriételos de nuevo según sea necesario.
b. Compruebe que haya manguitos (CC) instalados en el vidrio.
2. Descoloración del kit de rieles. Examine detenidamente y siga las instrucciones de Cuidado y limpieza.
Symptom: Alignment Recommended Action
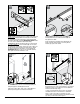
1. The top of the glass panel is tilted away from
the wall jamb.
Remove the glass panel from the top track and raise the roller on the bracket closest to the wall jamb.
2. The bottom of the glass panel is tilted away
from the wall jamb.
Remove the glass panel from the top track and lower the roller on the bracket that is closest to the wall jamb.
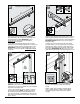
3. The glass panel does not touch the bumper. Determine whether glass panel top or bottom is closer to the wall, and then adjust the roller closest to the wall per #1
or #2 above.
4. The top track is cut too short. New track kit must be purchased and top track must be cut correctly. See steps 20-23.
5. The bottom track is miscut. Seal as directed to ensure watertight seal. See steps 18 and 19. If additional sealant insufficient, new bottom track
may be required.
Symptom: Water Leaks Recommended Action
1. Water leaks between panels When showering, make sure the inside panel is closest to the showerhead wall.
2. Water leaks between wall jamb and the glass
panel.
For adjustment, see Symptom: Alignment.
3. Water leaks under the bottom track. Check for proper silicone sealant application. See steps 40 and 41. Apply more silicone sealant as needed.
Symptom: Operation (open/close) Recommended Action
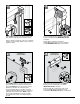
1. The outside panel is difficult to move. a. Ensure sufficient clearance exists between the bottom track and the glass panel. If needed, lower the rollers to the
next hole.
b. Ensure the panel is properly engaged over the bottom track. See steps 32 and 33.
c. Ensure the rollers are properly installed.
d. Clean any debris in the top track where the rollers operate.
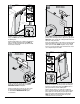
2. The inside panel is difficult to move. a. Ensure sufficient clearance exists between the bottom track and the glass panel. If needed, lower the rollers to the
next hole.
b. Ensure the inside center guide is properly secured with self-tapping screws. See step 39.
c. Ensure the rollers are properly installed.
d. Clean any debris in the top track where the rollers operate.
Symptom: Maintenance Recommended Action
1. Excess noise or vibration. a. Check all fasteners and re-tighten as necessary.
b. Ensure bushings (CC) are installed in glass.
2. Track kit discoloration. Carefully review and follow Care and Cleaning instructions.
TROUBLESHOOTING / SOLUCIÓN DE PROBLEMAS