
Manual


ASSEMBLY iNSTRUCTiONS
_WARNING: FOR YOUR OWN SAFETY, DO NOT
CONNECT THE BAND SAW TO THE POWER
SOURCE UNTIL THE MACHINE IS COMPLETELY
ASSEMBLED AND YOU HAVE READ AND UNDER-
STOOD THE ENTIRE OWNER'S MANUAL.
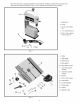
ASSEMBLING TABLE
TO MACHINE
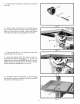
1. Locate table locking lever (shown disassembled)
Fig. 4, flat washer (B) and 4mm wrench (C).
2. Using 4mm wrench (C)Fig. 4, supplied, remove
screw (D) and spring (E) from handle (A) and remove
handle from nut (G). Do not lose spring (E).
Fig. 4
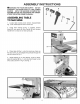
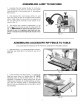
3. Place table (H) Fig. 5, onto the band saw frame so
that stud (J) Fig. 6, and keepers (K) protrude through the
slot of trunnion (L) Fig. 7.
4. While pressing in on stud (M)Fig. 8 with a pencil,
place flat washer (B) Fig. 7, onto stud and thread nut (G)
onto stud as shown in Fig. 4 and Fig. 7.
H
Fig. 5
Fig. 6
Fig. 8