
Manual

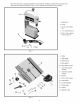


ASSEMBLING LAMP TO MACHINE
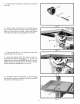
1. Assemble the lamp bracket (A) Fig. 13, to the two
holes located on the back top cover of the machine
using the two M6 x 12mm screws and 1/4" Iockwashers
(B) as shown.
2. Peel backing from cord clamps (C)Fig. 13, and
apply one clamp at each of the approximate locations
shown. Make certain the lamp cord is re-routed out of
the way, then secure cord (D)to cord clamps (C) as
shown in Fig. 13.
3. The flexible lamp operates independently of the
band saw. To turn the lamp on and off, rotate switch (E)
Fig. 13. _WARNING: To reduce the risk of fire, use a
40 watt or less A=15 appliance light bulb (not sup=
plied}. A standard household light bulb should not be
used.
Fig. 13
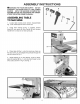
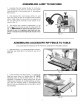
ASSEMBLING ACCESSORY RIP FENCE TO TABLE
If you purchased the Accessory 28-181 Rip Fence, assemble it to the table as follows:
1. With lever (A) Fig. 14, in the raised position as shown,
assemble rear clamp (B) of rip fence (C) over lip of
table (D).
2. Lower the front of rip fence (C) Fig. 15, against the
table and push down on locking lever (A). NOTE:
Clamping action on the rip fence (C)Fig. 15, can be
tightened or loosened by lifting locking lever (A) and
rotating lever clockwise or counterclockwise as neces-
sary until firm clamping action is accomplished. Rip
fence (C) can be positioned either to the right or left of
the saw blade.
Fig. 14
Fig. 15