
Instructions / Assembly


29
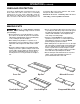
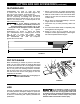
FEATHERBOARD
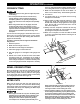
Featherboards are used to keep the work
in contact with the fence and table (Figure 38),
and help prevent kickback. Featherboards are
e
specially useful when ripping small workpieces
and for completing non-through cuts. The end is
angled with a series of narrow slots to give a friction
hold on the workpiece, It is locked in place on the
table or fence with a c-clamp.
To avoid binding between the
workpiece and the blade, make sure a
horizontal feather board presses only on the
uncut portion of the workpiece in front of the blade.
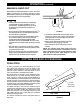
Dimensions for
making a typical
featherboard are shown in Figure 38. Make
your featherboard from a straight piece of wood
that is free of knots and cracks. Clamp
featherboards to the fence and/or table so that
the featherboard will hold the workpiece
against the fence or table.
CUTTING AIDS AND ACCESSORIES
(continued)
FIGURE 38
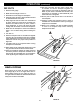
FIGURE 39
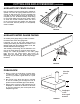
CUT OFF GAUGE
When crosscutting a number of pieces to the same
length, you can clamp a block of wood (A) (See Figure
39) to the fence and use it as a cut-off gauge. The block
(A) must be at least 3/4-inch (19 mm) thick to prevent
the cut off piece from binding between the blade
and the fence. Once the cut-off length is determined,
lock the fence and use the miter gauge to feed the
workpiece into the blade.
Always position the cut-off gauge in
front of the saw blade.
JIGS
Jigs may be created with a variety of special set-ups
to control particular workpiece shapes for particular
cuts. Guidance on how to make specialized jigs can
be found in woodworking and carpentry websites and
publications.
1. Select a solid piece of lumber approximately
¾-inch thick, 2 ½-inches wide and 12-inches long.
2. Mark the center width on one end of stock. Miter
width to 70° (see miter cut section for information
on miter cuts).
3. Set rip fence to allow approximately a 1/4-inch
“finger” to be cut in the stock.
4. Feed stock only to mark previously made at 6
inches.
5. Turn saw off and allow blade to completely stop
rotating before removing stock.
6. Reset rip fence and cut spaced rips into
workpiece to allow approximately 1/4-inch fingers
and 1/8-inch spaces between fingers.
4.5”
3/4”
1/8”
1/4”
70º
12”
A
3/4”
Do not attempt to create or use a jig
unless you are thoroughly familiar with
table saw safety. Do not use any jig that could result
in pinching a kerf or jamming the workpiece between
the jig and the blade. Incorrect setups may cause
kickback which could result in serious injury.