
Instructions / Assembly
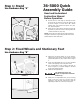


Step 4: Extension Wings
For Models with Three Extension Wings
Step 4a: Extension Wings
For Models with Two Extension Wings
and a Wood Extension Table
1. Attach the left side extension wing (3) to the front
and rear rails using four (5/16-18 x 1 1/8”) at
head screws, four (5/16”) lock washers, and four
(5/16-18) hex ange nuts. See Figure 9a.
2. Attach the left side extension wing (3) to side of
the saw table using three (5/16-18 x 7/8”) hex
head screws with spring washers. See Figure 9b.
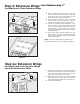
3. Lay the two remaining wings upside down on the
saw table. Place the two wings adjacent to each
other, so the hole patterns match. Fasten the two
wings together using three (5/16-18 x 7/8”) hex
head screws with spring washers and three (5/16-
18) hex ange nuts.
4. Turn the two wings, fastened together, over and
fasten them to right side of the saw table using
three (5/16-18 x 7/8”) hex head screws with spring
washers. See Figure 8.
NOTE: Use a ruler to make sure the top edges of the
wings are ush with the top of the tabletop. See Figure 7.
1. Attach the extension wings (3) to the front and rear
rails using four (5/16-18 x 1 1/8”) at head screws,
four (5/16”) lock washers, and four (5/16-18) hex
ange nuts for each wing. See Figure 9a.
2. Attach the extension wings (3) to side of the saw
table using three (5/16-18 x 7/8”) hex head screws
with spring washers for each wing. See Figure 9b.
3. Proceed to rail assembly.
- Use Hardware Bag “C”
FIGURE 8
FIGURE 7
FIGURE 9
3
3
LEFT EXTENSION LEFT EXTENSION
WING WING
RIGHT EXTENSION RIGHT EXTENSION
WING WING
RULER RULER
3
3
LEFT EXTENSION LEFT EXTENSION
WING WING
RIGHT EXTENSION RIGHT EXTENSION
WING WING
RULER RULER