(Model 50-770) PART NO. 902117 (015) Copyright © 2001 Delta Machinery To learn more about DELTA MACHINERY visit our website at: www.deltamachinery.com. For Parts, Service, Warranty or other Assistance, please call ESPAÑOL: PÁGINA 15 1-800-223-7278 (In Canada call 1-800-463-3582).
GENERAL SAFETY RULES Woodworking can be dangerous if safe and proper operating procedures are not followed. As with all machinery, there are certain hazards involved with the operation of the product. Using the machine with respect and caution will considerably lessen the possibility of personal injury. However, if normal safety precautions are overlooked or ignored, personal injury to the operator may result.
IMPORTANT SAFETY RULES FOR DUST COLLECTORS 10. DO NOT handle the plug or dust collector with wet hands. WARNING: Basic precautions should always be followed when using your dust collector. To reduce the risk of injury, electrical shock or fire, comply with the safety rules listed below: 11. REPLACE a damaged cord immediately. DO NOT use a damaged cord or plug.
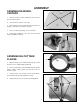
UNPACKING AND CLEANING Carefully unpack the tool and all loose items from the shipping container(s). Remove the protective coating from all unpainted surfaces. This coating may be removed with a soft cloth moistened with kerosene (do not use acetone, gasoline or lacquer thinner for this purpose). After cleaning, cover the unpainted surfaces with a good quality household floor paste wax. 1 3 4 2 5 6 12 11 8 13 10 17 7 14 15 16 18 9 Fig. 2 1. 2. 3. 4. 5. 6. 7. 8. 9.
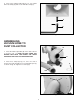
ASSEMBLY ASSEMBLING WHEEL CASTERS 1. Remove the hex nut and lockwasher from each of the four wheel casters. A 2. Place the dust collector on its side. 2. Insert bolt from wheel caster through the four holes (A) Fig. 3 in the base of the dust collector. Fig. 3 3. Place a lockwasher (A) Fig. 4 onto each bolt. 4. Thread hex nut (B) Fig. 4 onto each of the four bolt heads and tighten securely. B A Fig. 4 ASSEMBLING OUTTAKE FLANGE B A 1. Align the holes in the outtake flange (A) Fig.
ASSEMBLING DUSTPORT TUBE AND CONNECTOR TO DUST COLLECTOR BODY A B 1. Place tube clamp (A) Fig. 7 on the lower support tube holder (B). Fig. 7 2. Insert the tube support bracket (A) into the tube support holder (B) as shown in Fig. 8. A B Fig. 8 3. Place a tube clamp (A) onto the lower tube support as shown in Fig. 9. A Fig.
4. Align the two holes in the intake support angle brace (A) Fig. 10 with the two holes in the intake funnel (B). A B Fig. 10 5. Fasten the intake support angle brace to the intake funnel by inserting the two 5/16-18x5/8" button head carriage bolts (C) thru the intake funnel (B) and the intake support angle brace (A) as shown in Fig. 11. A B C Fig. 11 6. Place a 5/16" lockwasher (A) Fig. 12,onto the bolt (B), and thread a 5/16" hex nut (C) onto the bolt (B) and tighten securely. A B C Fig. 12 7.
. Place lower support tube (B) Fig. 14, onto intake funnel assembly (A) and secure with tube clamp (C). A C B Fig. 14 ASSEMBLING VACUUM HOSE TO DUST COLLECTOR D 1. Place the intake cap holder (D) on the dust collector as shown in Fig. 15. NOTE: DO NOT COVER THE INTAKE PORT WITH THE INTAKE CAP WHEN ATTACHING THE HOSE TO THE INTAKE PORT. C 2. Place hose clamp (A) Fig. 15, onto one end of vacuum hose (B) and slide hose around intake port (C) as shown in Fig. 16. Tighten hose clamp (A). A B Fig.
3. Place the remaining hose clamp (A) Fig. 17, around the other end of vacuum hose (B) and slide hose (B) onto intake funnel (C) and tighten hose clamp (A). NOTE: If desired, intake funnel (C) can be rotated to the vertical position, as shown in Fig. 18. A B C C Fig. 17 Fig. 18 ASSEMBLING DUST BAG TO DUST COLLECTOR Loosely thread end of dust bag strap (A) through clamp (B) as shown in Fig. 19. Place open end of dust bag (C) Fig. 19, over outlet flange (D) Fig.
120 VOLT, SINGLE PHASE OPERATION GROUNDED OUTLET BOX This tool must be grounded while in use to protect the operator from electric shock. The motor recommended for use with your dust collector is shipped wired for 120 Volt, Single Phase, and is equipped with an approved 3-conductor cord and 3-prong grounding type plug to fit the proper grounding type receptacle, as shown in Fig. 19. The green conductor in the cord is the grounding wire. Never connect the green wire to a live terminal.
MINIMUM GAUGE EXTENSION CORD MINIMUM GAUGE EXTENSION CORD RECOMMENDED SIZES FOR USE WITH STATIONARY ELECTRIC TOOLS RECOMMENDED SIZES FOR USE WITH STATIONARY ELECTRIC TOOLS Ampere Rating 0-6 0-6 0-6 0-6 6-10 6-10 6-10 6-10 10-12 10-12 10-12 10-12 12-16 12-16 12-16 Volts 120 120 120 120 120 120 120 120 120 120 120 120 120 120 120 Total Length of Cord in Feet up to 25 25-50 50-100 100-150 up to 25 25-50 50-100 100-150 up to 25 25-50 50-100 100-150 up to 25 25-50 Gauge of Extension Cord 18 AWG 16 AWG 16
OPERATIONS This versatile dust collector is light, compact and can easily be transported to a variety of locations for use in and out of the workshop. This dust collector can be used with many different types of woodworking machinery as shown in Figs. 26, 27, and 28. This dust collector shows its versatility in the way that the intake port can be positioned to accommodate different types of wood working machinery. Fig. 26 illustrates the dust collector used in conjunction with a router.
TRANSPORTATION AND STORAGE A 1. The dust collector features a convenient carrying handle with rubber grip (A) Fig. 29, which allows the unit to be carried easily from one job area to another. IMPORTANT: THE DUST COLLECTOR WEIGHS APPROXIMATELY 46 LBS. CARE SHOULD BE TAKEN WHEN LIFTING AND TRANSPORTING THE MACHINE. 2. In addition to the carrying handle, the machine features a storage mounting bracket (B) Fig. 30, with a hole for mounting the dust collector to a wall or wooden support (when not in use).
ACCESSORIES A complete line of accessories is available from your Delta Supplier, Porter-Cable • Delta Factory Service Centers, and Delta Authorized Service Stations. Please visit our Web Site www.deltamachinery.com for a catalog or for the name of your nearest supplier. WARNING: Since accessories, other than those offered by Delta, have not been tested with this product, use of such accessories could be hazardous. For safest operation, only Delta recommended accessories should be used with this product.