
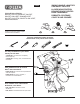
Installation Guide
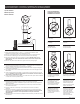

SILICONE
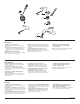
A.
B.
D.
E.
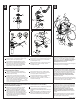
A.
Removestopper(1),brassnut&washer(2),black
gasket(3)andtailpiece(4).
B.
Applysiliconetoundersideofflange(1).Insertflange
intosink.
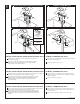
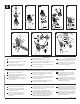
C.
Installblackgasket(1),washerandbrassnut
(2)ontoflange(3)frombelowsink,butdonot
tightenbrassnut(2).Screwontailpiece(4)
andhandtighten.
D.
Withpivot(1)facingtowardfaucet,pullpop-up
straightdownintodrainholeandsecuregas-
ket(2),brassnutandwasher(3).DONOT
TURNPOP-UPWHILETIGHTENINGBRASS
NUTORSEALANTMAYNOTSEALDRAIN.
Removeexcesssealant.
Pop-Up with Metal Flange and Plastic Tail Piece
(Suivez les instructions pour le type d’inclus renvoi mécanique avec votre modèle.)
Renvoi mécanique avec collerette en métal et raccord droit de vidange en plastique
A.
Enlevezlabonde(1),l’écrouenlaitonetlarondelle
(2),lejointnoir(3)etleraccorddroitdevidange(4).
B.
Appliquezdecomposéàlasiliconesouslacollerette
(1).Introduisezlacollerettedansl’évier.
C.
Montezlejointnoir(1),larondelleetl’écrouenlaiton
(2)surlacollerette(3)pardessousl’éviersansserrer
l’écrouenlaiton(2).
Vissezleraccorddroitde
vidange(4)etserrez-leàlamain.
C.
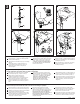
F
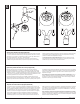
E.
Removepivotnut(1).Installhorizontalrod(2)and
stopper(3)asremovable(4)ornon-removable(5).
Handtightenpivotnut(1).
F.
Attachhorizontalrod(1)tostrap(2)usingclip(3).
Installliftrod(4),tightenscrew(5).Connect
assemblytodrain(6).
A.
Quiteeltapón(1),latuercadebronceylaarandela
(2),elempaquenegro(3)ylapiezadecola(4).
B.
Apliquesilicónpordebajodelabrida(1).
Introduzcalabridadentrodellavamanos.
C.
Instaleelempaquenegro(1),laarandelaylatuer-
cadebronce(2)enlabrida(3)desdelaparte
interiordellavamanosperonoaprietelatuercade
bronce(2).Atornillelapiezadecola(4)yaprietea
mano.
D.
Conelpivote(1)defrentealallave,haleel
desagüeautomáticodirectamentehaciaabajo
dentrodeldrenajeyfijeelempaque(2),latuer-
cadebronceylaarandela(3).NOGIREEL
DRENAJEAUTOMÁTICOMIENTRAS
APRIETELATUERCADEBRONCEOEL
SELLADORPUEDANOSELLAREL
DRENAJE.Quiteelexcesodesellador.
(Siga las instrucciones para el tipo de incluido desagüe automático con su modelo.)
Drenaje automático con brida de metal y la pieza de cola plástica
E.
Quitelatuercadelpivote(1).Instalelabarrahor-
izontal(2)yeltapón(3)comodesmontable(4)o
fijo(5).Aprieteamanolatuercadelpivote(1).
F.
Unalabarrahorizontal(1)alabarrachata(2)uti-
lizandoelgancho(3).Instalelabarradealzar(4),
aprieteeltornillo(5).Conecteelensambleal
desagüe(6).
D.
Alorsquelepivot(1)faitfaceaurobinet,
tirezlerenvoidirectementverslebasdans
l’orificedel’évier,puisfixezlejoint(2),l’écrouen
laitonetlarondelle(3).NETOURNEZPASLE
RENVOIPENDANTQUEVOUSSERREZ
L’ÉCROUENLAITONCARLECOMPOSÉÀLA
SILICONEPOURRANEPASASSURER
L’ÉTANCHÉITÉDURENVOI.Enlevezl’excèsde
composéd’étanchéité.
E.
Enlevezl’écroudupivot(1).Installezlatige
horizontale(2)etlabonde(3)demanièrequela
bondesoitamovible(4)ounonamovible(5).
Serrezl’écrou(1)dupivotàlamain.
F.
Fixezlatigehorizontale(1)aufeuillard(2)àl’aide
del’agrafe(3).Installezlatigedemanoeuvre(4)et
serrezlavis(5).Fixezl’ensembleaurenvoi(6).
1
4
2
3
1
3
1
2
4
1
2
3
1
3
5
2
2
3
4
3
1
4
5
6
54195 Rev.P
8
4
(Follow the instructions for the type of pop-up included with your model.)