
Installation Guide


INSTALLING SHOWER
MOUNTS
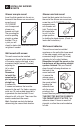
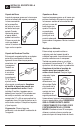
Shower arm pin mount
Insert the thick gasket into the nut on
the end of the shower arm mount and
screw the nut
CLOCKWISE
onto the exposed
shower arm
threads until tight.
The mounting pin
must be pointing
straight up when
finished. This is
a joint you will
check for leaks after installation and can
re-tighten if needed.
Wall mount with screws
This wall mount can be installed
anywhere on the wall within hose reach
of the water supply outlet and at any
convenient height (normal 72 inches)
adjusting for
tall or short
bathers.
Remember
to install the
mount so the
pin is pointing
straight up.
It comes with
2 screws and anchors that must be
secured to the wall. For tiled or masonry
walls use 1/4 inch carbide tipped drills
to penetrate the hard surface. Do not
attempt to drill a tile joint. Then insert the
anchors and attach the mount.
Hint: Complete one hole first before
determining the second hole location.
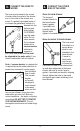
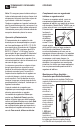
Shower arm fork mount
Insert the thick gasket into the nut on
the end of the shower arm mount and
screw the nut CLOCKWISE onto the
exposed shower
arm threads until
tight. The fork may
be rotated after
to put it into the
proper position
for holding the hand shower. (Check for
leaks after installation.)
Wall mount adhesive
This wall mount can be installed
anywhere on the wall within hose reach
of the water supply outlet and at any
convenient height (normal 72 inches)
adjusting for tall or short bathers.
Remember to install the mount so the
hand shower will be pointing straight
up when finished. Pick your location,
clean the wall following directions on
the back of the
mount and mark
it; remove the
release paper
form the back of
the mount without
touching the
adhesive; then
with the mount
pointing in the
correct direction press it firmly to the wall.
THE FIRST TRY MUST BE CORRECT;
YOU CANNOT MOVE IT AFTER. The
adhesive takes 24 hours to reach full
strength, so allow the cure time before
full use
2.
2