
Installation Guide


Page 2
210317 Rev. A
STEP 1 - ROUGH IN
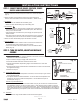
● Remove suitable knockout(s) in box(es) and insert cable bushing(s).
See Fig.1. NOTE: Wires connecting between boxes and from the
transformer must be protected from abrasion and being pulled at
connections. They also may have to be finished through at a later
stage of construction. Depending on the installation, the cable
bushings included may be replaced by installer supplied 1/2” conduit.
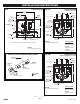
● Rough in box as per Fig.3. Use Figures 4, 5, 6 and 7 for specific
box information.
● For Hardwire Models: Install CSA and/or UL approved Class 2
transformer or equivalent in a convenient location or in a pipe
chase. (DO NOT install the transformer inside the control box.)
The transformer is to be installed in an adjacent accessible space.
Cable from the transformer to the control box may be roughed in at
this time depending on installation. Use cable which complies with
local electrical codes for a 1 amp load. No.18 cable is usually
sufficient.
STEP 2 - CONNECT SHOWER
STEP 3 - FLUSH SYSTEM
INSTALLATION INSTRUCTIONS
Installation should be in accordance with local plumbing and electrical codes.
FLUSH ALL PIPES THOROUGHLY BEFORE INSTALLATION.
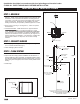
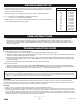
Fig. 2
Outlet
Cold Water
Inlet
Hot Water
Inlet
Inlets 1/2” Copper
30° Institutional
Shower Head
102mm
(4”)
Stainless Steel
Cover Plate
2,007mm
(79”) *
Top of Box
Outlet
Stainless Steel
Push Button
C
L
of Push Button
254 x 257 x 102mm
(10” x 10-1/8” x 4”)
Control Box
1,320mm
(52”) *
* NOTE:
Recommended
Mounting Height
Finished Floor
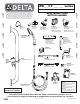
PRODUCT SUPPLIED AS SHOWN BY SOLID LINES.
ALL ITEMS SHOWN BY DOTTED LINES
SUPPLIED BY OTHERS.
● Connect piping from supply to valves as per applicable Figure 4,
5, 6 or 7 and for shower head (Fig. 2).
● Finish drainage system and walls.
● Install shower outlet.
● Open screw driver stop(s) to flush installation for 30 seconds. If
pressure balancing valve is supplied, use supplied handle to rotate
the valve stem midway between its stops before flushing. If thermo-
static mixing valve is supplied, move lever to central position before
flushing.
● Close stops.
Cable Bushing
Knockouts
Fig. 1
www .specselect.com