
Instructions / Assembly


8 9
FEATURESUNPACKING
Prior to tool assembly and use, read
this manual thoroughly to familiarize yourself with
proper assembly, maintenance and safety procedures.
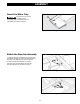
Check shipping carton and machine for damage
before unpacking. Carefully remove components in
top foam layer. Remove the top layer of foam then
remove all components in the bottom layer of foam.
Lay out all parts on a piece of cardboard or other clean,
flat surface. Always check for and remove protective
shipping materials around motors and moving parts.
Do not discard shipping carton and packing materials
until you have carefully inspected the contents,
assembled the machine and are satisfied that it
operates correctly.
Compare package contents to Component Parts List and
Hardware Package List prior to assembly to make sure all
items are present. Carefully inspect parts to make sure no
damage occurred during shipping. If any parts are missing,
damaged or preassembled, do not assemble. Instead, call
Service Center at 1-800-223-7278 for assistance. After
assembly remove any protective materials and coatings from
all of the parts and the tile saw. The protective coatings can
be removed by spraying WD-40® on them and wiping them
owithasoftcloth.Thismayneedtoberedoneseveraltimes
before all of the protective coatings are removed completely.
The part and hardware names and numbers correspond to those used in
Saw Features on page 7 and the Shipping Contents on page 8 & 9.
Shipping Contents
Description(QTY)
1. Water Tray (1)
2. Main Frame (1)
3. Miter Gauge (1)
4. Work Table (1)
5. Saw Arm Assembly (1)
5b. Blade Wrench (1)
5c. 4 mm Allen Wrench (1)
6. Hose (1)
7. Pump (1)
16. Splash Tray (1)
17. Table Extention (1)
18. Side Splash Tray (1)
19. Guided Tray (1)
H1. M10 x 60 Hex Head Screws (3)
H2. 8 mm Allen Wrench (1)
H3. M4 x 10 Philips Plastic Self Tapping Screw (3)
1 2
3
4
5
5b
5c
6
16
17
18
H1
H3
19
H2
7