
Full Product Manual


14 15
OPERATION
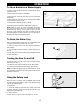
Re-Setting the Short Circuit Safety Button
Making Cuts
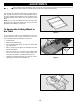
Parallel Cut
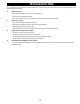
Angle Cut
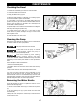
This saw is equipped with a safety feature that prevents the
power plug from short-circuiting in case it gets wet.
Whenever the saw’s power plug is disconnected from the
power source, the safety feature will trip the internal breaker.
This is normal.
To start the saw after it has been reconnected to a power
source, depress the red reset button (D, Fig. 21) so that it
locks in place.
Turn the switch knob to the “OFF” position when adjusting the motor.
Do not attempt to cut very small pieces. Avoid awkward hand positions where a sudden slip could cause your
hand or finger to come in contact with the cutting wheel. When cutting any material, make sure that it is fully
supported. Hold workpiece firmly. Do not force the material into the cutting wheel.
Make sure that the cutting-depth adjustment knob and the bevel-cut-adjustment knob are tightened before
operating the saw.
Always ensure the pump is plugged into the power receptacle on the tile saw. Plugging pump into any other
receptacle other than the one supplied on saw, may result in shock hazard.
Make sure the pump is completely submerged in water to protect pump from failure.
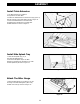
A parallel cut is any cut made with the miter scale (10) at 45º
degrees (the face of the miter guide is parallel to the cutting
wheel). To make a parallel cut:
1. Ensure that the angle arrow (A) on the miter guide points to
45º.
2. Loosen the knob (B) on the miter guide.
3. Adjust the miter gauge so that the desired angle on the
scale aligns with the angle arrow (A).
4. Tighten the knob.
5. Position and press the tile firmly against the miter guide and
move the table evenly with two hands during cutting. Do not
force the work piece or move the table too quickly while the
motor is turned on.
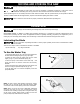
Using the miter guide you can make angled cuts up to
45-degrees. To make an angled cut:
1. Loosen the lock knob (C) on the miter guide.
2. Adjust the miter guide to the desired angle and tighten the
knob.
3. Using the miter guide to align the material for angle cutting.
4. Move the table forward with two hands during cutting while
holding tile securely against table backstop.
5. Do not force the work piece or move the table too quickly.
D
Figure 21
Figure
22
Figure
23
A
B
C