
Installation Guide


C-2
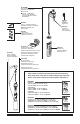
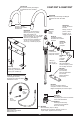
Custom Fit Connections
If you determine the PEX supply tubing for
this faucet is too long and must be shorter
to create an acceptable installation, be
sure to read the instructions and plan
ahead. When cutting the supply tubing the
installer accepts the responsibility to do
so in a way that allows a leak-free joint to
be created. Delta is not responsible for
tubing that is cut too short or cut in a way
that will not allow for a leak-free joint.
For custom fit installations, you must use
RP50952 sleeves supplied with model and
nuts included on supply lines. Tube cut must
be straight. See plastic sleeve installation
instructions found in RP50952 and included
in this document for more information.
Secure metal nut (1) on faucet tube to check
valve connection (2) and hand tighten, then
tighten an additional 2 turns with wrench. DO
NOT OVERTIGHTEN. Repeat for other tube.
WARNING: Do not use pipe dope or other
sealants on water line connections.
Potential Problems and Remedies
l Tubing is not cut perpendicular to the axis of
the tube: carefully make an additional cut, being
careful not to cut the tube too short.
l Tubing is cut too short: buy a coupling union and
a replacement supply line that mate together from
a store. The coupling union end intended to
connect to the faucet must mate to the standard
3/8" connection nuts and plastic sleeves supplied
with the faucet.
l The plastic sleeve or connection nut is lost:
purchase a replacement nut and/or plastic sleeve
that are designed to seal with PEX tubing. NOTICE:
DO NOT use a metal sleeve, RP51243 gasket
(supplied with faucet) or ferrule in the place of
the plastic sleeve supplied, it may not create a
leak-free joint.
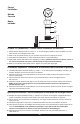
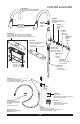
Water Line Connections
A.
Important: To ensure proper operation
of your plumbing it is essential to install
these check valve assemblies onto your
supply stops. Insert ferrule (1) into cold
water stop.
B.
Thread on check valve (2) and tighten. DO
NOT OVERTIGHTEN. Repeat steps A & B
for hot water stop.
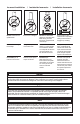
C-1
Standard Connections
Ensure all fittings and end connections are
free of debris. Faucet fittings (1) are 3/8"
compression, with ends colored red for hot
and blue for cold. Loop tubing (2) if it is too
long. Note: Recommended tubing
minimum bend diameter is 8". Secure
metal nut (3) on faucet tube to check valve
connection (4) and hand tighten, then
tighten one additional turn with wrench. DO
NOT OVERTIGHTEN. Repeat for other
tube. WARNING: Do not use pipe dope or
other sealants on water line connections.
Conexiones a la Línea de Agua
A.
Importante: Para asegurar el funcio-
namiento correcto de su plomería es
esencial instalar los ensambles de las
válvulas checadoras en los topes del
suministro. Introduzca el casquillo (1) en
el pare de agua fría.
B.
Enrosque en el adaptador (2) y apriete. NO
APRIETE DEMASIADO. Repita los pasos
A & B en el tope del agua caliente.
C-1
Asegúrese que todos los accesorios y las
conexiones finales estén libres de residuos.
Los accesorios (1) son de compresión de
3/8”, con los extremos de color rojo para el
agua caliente y azul para el agua fría. Enlace
las tuberías (2) si es muy larga. Nota: La
curva mínima recomendada es de 8" de
diámetro. Fije la tuerca de metal (3) en el
tubo de la llave de agua a la conexión (4) y
apriete a mano, luego apriete con una vuelta
adicional con una llave de tuercas. NO
APRIETE DEMASIADO. Repita con el otro
tubo. AVISO: No use compuesto para
tuberías u otros selladores en las
conexiones de la tubería de agua.
C-2
Conexiones Especiales
AVISO: Si usted determina que la
tubería PEX para el suministro de agua
para esta llave de agua es muy larga y
debe recortarse para crear una
instalación aceptable, asegúrese leer
las instrucciones y planifique de
antemano. Cuando corte la tubería de
suministro el instalador acepta la
responsabilidad de hacerlo de una
manera que permite crear una
articulación sin filtraciones. Delta no se
responsabiliza por las tuberías que se
han cortado demasiado cortas o
cortadas de una manera que no permite
una articulación libre de filtración.
Para instalaciones hechas a la medida,
usted debe usar mangas RP50952
incluidas con el modelo y las tuercas
incluidas en las tuberías de suministro. El
corte del tubo debe ser recto. Vea las
instrucciones para la instalación de la
manga plástica incluida con el RP50952 y
para más información incluida en este
documento.
Fije la tuerca de metal (1) en la tubería de
la llave de agua / grifo a la conexión de la
válvula de suministro (2) y apriete a mano.
Con la llave de tuercas, apriete la tuerca
dándole 2 vueltas más de si fuera apretado
a mano. NO APRIETE DEMASIADO.
Repita con la otra tubería. AVISO: No use
compuesto para tuberías u otros
selladores en las conexiones de la
tubería de agua.
Problemas Potenciales y Soluciones
l La tubería no está cortada perpendicular al
eje del tubo: cuidadosamente haga un corte
adicional, teniendo cuidado de no cortar el tubo
demasiado corto.
39