
Installation Guide


51
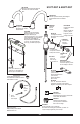
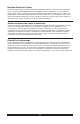
If faucet exhibits very low flow –
Unscrew hose from spray head and clean debris
from screen (1) (the screen is located just inside
the spray) . IMPORTANT: Reinstall screen to the
spray head (failure to reinstall the screen could
damage internal parts).
If faucet leaks from under handle or
from spout outlet – Insert a small screwdriver
into slot (2) in button (3) and remove. Loosen
set screw (4) inside of handle. Remove handle.
Remove bonnet (5) by rotating counterclockwise.
Bonnet may be stiff due to O-ring, but should
rotate by hand. Remove bonnet nut (6) by
rotating counterclockwise with a wrench. Remove
cartridge (7) by pulling directly back on stem.
Replace cartridge and reassemble.
WARNING: Failure to securely tighten bonnet
nut with a wrench could result in water
damage.
Note: A small amount of water may run out the
spout or drip for a very short period after the
faucet is shut off. This is a natural occurrence
caused by the long exible hose.
Maintenance
Cleaning and Care
Care should be given to the cleaning of this prod-
uct. Although its finish is extremely durable, it can
be damaged by harsh abrasives or polish. To clean,
simply wipe gently with a damp cloth and blot dry
with a soft towel. Glass cleaner can be used on SS
(Stainless) finish to remove fingerprints and main-
tain color match. You can avoid turning the faucet
on and off by closing the handle.
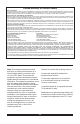
LED Guide
If LED (8) is:
Solid Blue - Solenoid valve is open, water
temperature is less than 80
°F (27°C).
Solid Magenta -
Solenoid valve is open, water
temperature is between 80
°F (27°C) and
110
°F
(43°C).
Solid Red -
Solenoid valve is open, water
temperature is greater than 110
°F (43°C).
3 red flashes before solenoid opens or closes -
replace batteries.
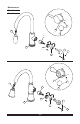
Solenoid Troubleshooting
Note: Normal operation of the faucet will turn
off water flow if faucet is not touched for 4
minutes.
1. If your spout flashes a red light on then off
and then keeps repeating this,
replace the batteries.
If the spout still flashes a red light, please
replace solenoid and electronics kit**. (see
manual bypass of electronics section*)
2. If your spout displays the proper light, but no
water is coming out of the spout,
a. Verify the handle is in the “on” position.
b. Verify the water supplies are turned to the
“on” position.
c. Move handle to the “off” position. Unscrew
hose from spray head and check for
any debris in the spray head inlet. Move
handle to the “on” position to verify water is
reaching the sprayer. Replace spray head.
d. Move handle to the “off” position. Remove
the hose from the solenoid and move handle
to the “on” position to check for ow coming
from the solenoid. Reconnect hose to
solenoid.
e. With handle in the “off” position, remove
the hose from the faucet to the solenoid.
Move handle to the “on” position to check if
water is going through the manual valve and
reaching the solenoid. If water is getting to
the solenoid, but it is not getting through the
solenoid, replace solenoid and electronics
kit**.
3. If your LED base indicator is not displaying
any lights,
a. Check to make sure the spout connector,
RP53233 is attached to the spout and the
wire from the solenoid / electronics kit. If it is
disconnected, or loose (see step 3), reattach
and check for proper operation.
b. Replace batteries.
c. If it is attached and the light still does not
display on the indicator at the base of the
spout, replace the spout assembly**.
*For immediate and temporary operation of your
faucet.
** Refer to part diagram included in this document
for correct RP number.