
Installation Guide

INSTALLATION INSTRUCTIONS FOR HAND HELD SHOWERS.
1/2" & 3/4" Hand-Held Shower Installation
IMPORTANT: Use Teflon
®
tape on all threaded connections.
INSTALLATION INSTRUCTIONS
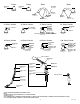
Supply valve installation: Water supply is through diverter.
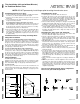
1. Install hose guide assembly on finished deck as shown in Figure 1.
See Figure 1A & Figure 3 for additional information on hose guide
installation.
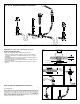
2. Slide flexible metal hose through hose guide assembly and attach to
30" metal braided hose as shown in Figure 2.
3. Attach hand held showerhead unit to the end of the flexible metal hose
as shown in Figure 4.
4. Attach the end of the metal braided hose to the diverter as shown in
Figure 5.
Figure 1.
1-1/4" Diameter Hole
Flat Washer
Hex Nut
1-1/2" Maximum
Deck Thickness
Hose Protection Nut
Figure 2.
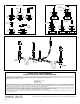
Figure 1A.
Figure 3.
Figure 4. Figure 5.
3
25424 Rev.A
Align Seats Flats
Perpendicular to
Tub Rim.
Modify as
Shown for
Decks
Thicker than
1 1/2"
We suggest the following minimum maintenance for maximum enjoyment and
use of your faucets.
All brass parts have been carefully finished and protected with Artistic Brass'
exclusive Marine
TM
Protective Finish before leaving the factory. After each use, wipe
the fitting gently with a damp cloth and blot dry with a soft towel. It is particularly
important not to let water stand where the faucet contacts the counter, tub deck, or
finished wall. Use only mild soap and water to clean your faucet. NEVER USE
ACIDS, HARSH ABRASIVES, OR DETERGENTS. Failure to comply with these
maintenance instructions may void the warranty.
HOW TO CARE FOR YOUR BEAUTIFUL FAUCETS!