
User Manual

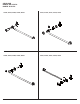

C.
D.
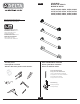
92851 Rev. A
4
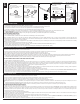
1. Hold on tightly to the fl ange and keep pressure on the bar
behind the wall to ensure that the bar stays upright with the
longest part of the bar pointing upward. The bar behind the wall
must always be upright and the longest part must be pointing
upward for the anchor to perform properly.
2. As you hold the fl ange and apply pressure to the bar by pulling
outward, insert a 3” machine screw into the center hole of the
fl ange. Then align the machine screw with the threaded insert in
the bar and tighten.
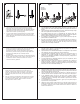
1. Turn and tighten the screw while applying pressure on the bar to keep it
upright. Tighten the screw till the fl ange plate is fl ush against the wall and is
secure.
2. Tighten the fl ange with the #3 Phillips screw driver. Ensure the fl ange is tight
and secure against the wall without any movement.
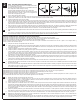
3. If an adapter (Figure D, Type 1) is provided with the product, align the
adapter with the installed anchor, then take the product and align the product
with the adapter installed wall anchor and ensure holes align.
4. If an adapter is not provided (Figure D, Type 2) with the product, align the
product with the installed anchor.
5. Use the 10-24 machine screws that are supplied with the wall anchor to
fasten the product to the wall anchor. Three (3) machine screws are needed
to fasten the product to the wall anchor and they need to be securely
fastened with a #2 Phillips screwdriver.
Adapter
Adaptador
Adaptateur
Type 1 Type 2
1. Sujete fi rmemente la brida y mantenga la presión sobre la barra
detrás de la pared para asegurarse de que la barra permanece
en posición vertical con la parte más larga de la barra
apuntando hacia arriba. La barra detrás de la pared siempre
debe estar en posición vertical y la parte más larga debe estar
apuntando hacia arriba para que el anclaje funcione
correctamente.
2. Mientras sujeta la brida y aplica presión a la barra halando hacia
afuera, inserte un tornillo de 3" en el orifi cio central de la brida. A
continuación, alinee el tornillo para metales con el inserto
roscado en la barra y apriételo.
1. Tenez fermement la collerette et maintenez la pression contre
l'arrière du mur pour vous assurer que le renfort reste à la
verticale, sa partie la plus longue au sommet. Le renfort contre
l’arrière du mur doit toujours être à la verticale et sa partie la
plus longue doit pointer vers le haut, pour que l'ancrage soit
utilisable.
2. Alors que vous tenez la collerette et faites pression sur le renfort
en tirant vers l'extérieur, insérez une vis à métaux de 3 po dans
le trou central de la collerette. Alignez ensuite la vis avec le
taraudage dans le renfort et serrez.
1. Gire y apriete el tornillo mientras presiona la barra para mantenerlo en
posición vertical. Apriete el tornillo hasta que la placa de la brida esté
nivelada contra la pared y quede fi ja.
2. Apriete la brida con el destornillador Phillips # 3. Asegúrese de que la brida
esté apretada y fi ja contra la pared sin ningún movimiento.
3. Si se suministra un adaptador (Figura D, Tipo 1) con el producto, alinee el
adaptador con el anclaje instalado, luego tome el producto y alinee el
producto con el adaptador instalado en el anclaje de pared y asegúrese de
que los agujeros se alineen.
4. Si no se proporciona un adaptador (Figura D, Tipo 2) con el producto, alinee
el producto con el anclaje instalado.
5. Utilice los tornillos de metal de 10-24 que se suministran con el anclaje de
pared para sujetar el producto al anclaje de pared. Se necesitan tres (3)
tornillos de metal para sujetar el producto al anclaje de pared y deben fi jarse
fi rmemente con un destornillador Phillips # 2.
1. Tournez et serrez la vis tout en exerçant une pression sur le renfort pour le
maintenir à la verticale. Serrez la vis jusqu'à ce que la plaque de la collerette
soit fermement appuyée contre le mur.
2. Serrez la collerette avec le tournevis cruciforme no 3. Assurez-vous que la
collerette est bien serrée et plaquée contre le mur et qu’elle ne bouge plus.
3. Si un adaptateur (fi gure D, type 1) est fourni avec le produit, alignez
l’adaptateur avec l’ancrage installé. Prenez ensuite le produit, puis alignez-
le avec l’adaptateur et l’ancrage mural installé en prenant soin de faire
correspondre les trous.
4. Si un adaptateur n’est pas fourni (fi gure D, type 2) avec le produit, alignez
le produit avec l’ancrage installé.
5. Utilisez les vis à métaux 10-24 fournies avec l'ancrage mural pour fi xer le
produit à l’ancrage mural. Trois (3) vis à métaux sont nécessaires pour fi xer
le produit à l'ancrage mural et elles doivent bien serrées à l'aide d'un
tournevis cruciforme n° 2.